// Build a single package
sfp build -v devhub --branch=main -p feature-mgmt
Install sfp community edition
A. Install sfp in your local machine
npm i -g @flxbl-io/sfp
B. Check sfp version
sfp requires node-gyp for its dependencies. If you are facing issues during installation, with node-gyp, please follow the instructions here
C. Validate Installation
Domains
sfp is a natural fit for organisations that utilize Salesforce in a large enterprise setting as its purpose built to deal with modular saleforce development. Often these organisations have teams dedicated to a particular business function, think of a team who works on features related to billing, while a team works on features related to service\
Packages in an org organised by domains
The diagram illustrates the method of organizing packages into specific categories for various business units. These categories are referred to as 'domains' within the context of sfp cli.
Each domain can either contain further domains ( sub-domains) and each domain constitute of one or more packages.
sfp cli utilizes 'Release Config' to organise packages into domains. You can read more about creating a release config in the next section
Docker Images
sfp docker images are published from the flxbl-io Github packages registry at the link provided below
One can utilize the flxbl-io sfp images by using the
docker pull ghcr.io/flxbl-io/sfp:latest
You can also pin to a specific version of the docker image, by using the version published here
To preview latest images for the docker image, visit the release candidate page and update your container image reference.
For example:
default:
image: ghcr.io/flxbl-io/sfp-rc:<version-number>
or
image: ghcr.io/flxbl-io/sfp-rc:<sha>
Overview
sfp is a purpose-built CLI tool for modular Salesforce development and release management. sfp streamlines and automates the build, test, and deployment processes of Salesforce metadata, code, and data. It extends sf cli functionalities, focusing on artifact-driven development to support #flxbl Salesforce project development.
sfp is available in two editions:
sfp (Community Edition): Open-source CLI with core build, deploy, and orchestration capabilities
Artifacts
An artifact is a key concept within sfp. An artifact is a point in time snapshot of a version of a package, as mentioned in sfdx-project.json . The snapshot contains source code of a package directory , additional metadata information regarding the particular version, changelog and other details. An artifact for 2GP package would also contain details such as
In the context of sfp, packages are represented in your version control, and artifact is an output of a the build command when operated on a package
Artifacts provide an abstraction over version control, as it detaches the version control from from the point of releasing into a salesforce org. Almost all commands in sfp operates on an artifact or generates an artifact. \
Packages
Packages are containers used to group related metadata together. A package would contain components such as objects, fields, apex, flows and more allowing these elements to be easily installed, upgraded and managed as a single unit
Packages in the context of sfp are not limited to second generation packaging (2GP), sfp supports various types of packages which you can read in the following sections
Diff Package
A diff package is a variant of '' , where the contents of the package only contain the components that are changed. This package is generated by sfpowerscripts by computing a git diff of the current commit id against a baseline set in the Dev Hub Org
A diff package mimics a model, where only changes are contained in the artifact. As such, this package is always an incremental package. It only deploys the changes incrementally compared to baseline and applied to the target org. Unless both previous version and the current version have the exact same components, a diff package can never be rolled back, as the impact on the org is unpredictable. It is always recommended to roll forward a diff package by fixing or creating a necessary change that counters the impact that you want on the target orgs.
Build & Install an Artifact
In the earlier section, we looked at how we configured the project directory for sfp, Now lets walk through some core commands.
A. Build an artifact for a package
The build command will generate a zipped artifact file for each package you have defined in the sfdx-project.json file. The artifact file will contain metadata and the source code at the point build creation for you to use to install.
Congratulations!
Good Work! If you made it past the getting started guide with minimal errors and questions, you are well on your way to introduce sfp into your Salesforce Delivery workflow.
Let's summarize what you have done:
Setup pre-requisite software on your workstation and have access to a Salesforce Org.
Installed the latest sfp cli.
Building a domain
Assume you have a domain 'sales' as defined by release config sales.yaml provided as shown in this example here.
In order to build the artifact of the packages defined by the above release config, you would use the the build command with the flags as described here.
If you require only to build packages that's changed form the last published packages, you would add an additional diffcheck flag.
diffcheck will work accurately only if the build command is able to access the latest tag in the repository. In certain CI system if the command is operated on a repository where only the head commit is checked out, diffchek will result in building all the artifacts for all packages within the domain
Project structure
Projects that utilise sfp predominantly follow a mono-repo structure similar to the picture shown above. Each repository has a "src" folder that holds one or more packages that map to your sfdx-project.json file.
Different folders in each of the structure are explained as below:
core-crm: A folder to house all the core model of your org which is shared with all other domains.
Package vs Artifacts
In Salesforce, a package is a container that groups together metadata and code in order to facilitate the deployment and distribution of customizations and apps. Salesforce supports different types of packages, such as:
Unlocked Packages: These are more modular and flexible than traditional managed packages, allowing developers to group and release customizations independently. They are version-controlled, upgradeable, and can include dependencies on other packages.
Org-Dependent Unlocked Packages: Similar to unlocked packages but with a dependency on the metadata of the target org, making them less portable but useful for specific org customizations.
Determining whether an artifact need to be built
sfp's build commands process the packages in the order as mentioned in your sfdx-project.json. The commands also read your dependencies property, and then when triggered, will wait till all its dependencies are resolved, before triggering the equivalent package creation command depending on the type of the package and generating an artifact in the due process
sfp's build command is equipped with a diffcheck functionality, which is enabled when one utilizes diffcheck flag, A comparison (using git diff) is made between the latest source code and the previous version of the package published by the '' command. If any difference is detected in the package directory, package version or scratch org definition file (applies to unlocked packages only), then the package will be created - otherwise, it is skipped.
For eg: provided the followings packages in sfdx-project.json along with its dependencies
Scenario 1 : Build All
Overview
sfp cli features an intiutive command to build artifacts of all your packages in your project directory. The 'build' command automatically detects the type of package and builds an artifact individually for each package
By default, the behaviour of sfp's build command is to build a new version of all packages in your project directory and and creates it associated artifact.
sfp's build command is also equipped with an ability to selectively build only packages that are changed. Read more on how sfp determines a package to be built on the subsequent sections.
Configured your source project and added additional properties required for sfp cli to generate artifacts.
Build artifact(s) locally to be used to deploy.
Installed artifact(s) to target org.
This is just the tip of the iceberg for the full features sfp can provide for you and your team. Please continue to read further and experiment.
For any comments/recommendations to sfp so please join our Slack Community. If you are adventurous, contribute!
Managed Packages: Managed packages are a type of Salesforce package primarily used by ISVs (Independent Software Vendors) for distributing and selling applications on the Salesforce AppExchange. They are fully encapsulated, which means the underlying code and metadata are not accessible or editable by the installing organization. Managed packages support versioning, dependency management, and can enforce licensing. They are ideal for creating applications that need to be securely distributed and updated across multiple Salesforce orgs without exposing proprietary code.
sfp auguments the above formal salesforce package types with additional package types such as below
Source Packages: These are not formal packages in Salesforce but refer to a collection of metadata and code retrieved from a Salesforce org or version control that can be deployed to an org but aren't versioned or managed as a single entity.
Diff Packages: These are not a formal type of Salesforce package but refer to packages created by determining the differences (diff) between two sets of metadata, often used for deploying specific changes.
In the context of sfp, an artifact represents a more enhanced concept compared to a Salesforce package. While it is based on a Salesforce package (of any type mentioned above), an artifact in sfp includes additional attributes and metadata that describe the package version, dependencies, installation behavior, and other context-specific information relevant to the CI/CD process. Artifacts in sfp are designed to be more than just a bundle of code and metadata; they encapsulate the package along with its CI/CD lifecycle information, making them more aligned with DevOps practices.
Key differences between Salesforce packages and sfp artifacts include:
Versioning and Dependencies: While Salesforce packages support versioning, sfp artifacts enrich this with detailed dependency tracking, ensuring that the CI/CD pipeline respects the order of package installations based on dependencies.
Installation Behavior: Artifacts in sfp carries additional metadata that defines custom installation behaviors, such as pre- and post-installation scripts or conditional installation steps, which are not inherently a part of Salesforce packages.
CI/CD Integration: Artifacts in sfp are specifically designed to fit into a CI/CD pipeline, such as supporting storing in an artifact registory, version tracking, and release management that are essential for automated deployments but are outside the scope of Salesforce packages themselves.
Defining a package in repository
frameworks: This folder houses multiple packages which are basically utilities/technical frameworks such as Triggers, Logging and Error Handling, Dependency Injection etc.
sales: An example of a domain in your org. Under this particular domain, multiple packages that belong to the domain are included.
src-access-mgmt: This package is typically one of the packages that is deployed second to last in the deployment order and used to store profiles, permission sets, and permission set groups that are applied across the org. Permission Sets and Permission Set Groups particular to a domain should be in their respective package directory.
src-env-specific: An aliasified package which carries metadata for each particular stage (environment) of your path to production. Some examples include named credentials, remote site settings, web links, custom metadata, custom settings, etc.
src-temp: This folder is marked as the default folder in sfdx-project.json. This is the landing folder for all metadata and this particular folder doesn't get deployed anywhere other than a developers scratch org. This place is utilized to decide where the new metadata should be placed into.
src-ui: Should include page layouts, flexipages and Lightning/Classic apps unless we are sure these will only reference the components of a single domain package and its dependencies. In general, custom UI components such as LWC, Aura and Visualforce should be included in a relevant domain package.
runbooks: This folder stores markdown files required for each release and or sandbox refresh to ensure all manual steps are accounted for and versioned control. As releases are completed to production, each release run book can be archived as the manual steps should typically no longer be required. Sandbox refresh run books should be managed accordingly to the type of sandbox depending if they have data or only contain metadata.
scripts: This optional folder is to store commonly used APEX or SOQL scripts that need to be version controlled and reference by multiple team members.
src-env-specific should be added to .forceignore files and should not be deployed to a scratch org.
A domain is defined by a release configuration. In order to define a domain, you need to create a new release config yaml file in your repository
A simple release config can be defined as shown below
// Sample release config <business_domain.yaml>
releaseName: <business_domain> # --> The name of the domain
pool: <sandbox/scratch org pools>
excludeAllPackageDependencies: true
includeOnlyArtifacts: # --> Insert packages
- <pkg1>
releasedefinitionProperties:
promotePackagesBeforeDeploymentToOrg: prod
The resulting file could be stored in your repository and utilized by the commands such as build, release etc.
Dependency management
sfp features commands and functionality that helps in dealing with complexity of defining dependency of unlocked packages. These functionalities are designed considering aspects of a #flxbl project, such as the predominant use of mono repositories in the context of a non-ISV scenarios.
Package dependencies are defined in the sfdx-project.json (Project Manifest). More information on defining package dependencies can be found in the Salesforce docs.
Let's unpack the concepts utilizing the above example:
There are two unlocked packages and one source package
Expense Manager - Util is an unlocked package in your DevHub, identifiable by 0H in the packageAlias
Expense Manager - another unlocked package which is dependent on ' Expense Manager - Util', 'TriggerFramework' and 'External Apex Library - 1.0.0.4'
Expense Manager Org Config - a source package, lets assume has some reports and dashboards
External Apex Library is an external dependency, it could be a managed package or any unlocked package released on a different Dev Hub. All external package dependencies must be defined with a 04t ID, which can be determined from the installation URL from AppExchange or by contacting your vendor.
Source Packages/Org Dependent Unlocked / Data packages have an implied dependency as defined by the order of installation, as in it assumes any depedent metadata is already available in the target org before the installation of components within the package
Diff packages doesnt work with scratch orgs. It should be used with sandboxes only.
A diff package is the least consistent package among the various package types available within sfpowerscripts, and should only be used for transitioning to a modular development model as prescribed by flxbl
The below example demonstrates a sfdx-project.json where the package unpackaged is a diff package. You can mark a diff package with the type 'diff'. All other attributes applicable to source packages are applicable for diff packages.
A manual entry in sfpowerscripts_Artifact2__c custom object should be made with the name of the package and the baseline commit id and version. Subsequent deployments will automatically reset the baseline when the package gets deployed to Dev Hub
sfp commands
Command Summary
─────────────────────────────── ─────────────────────────────────────────────────────────────────────────────────────────────────────────────────────────────────────────────────────────────────
apextests trigger Triggers Apex unit test in an org. Supports test level RunAllTestsInPackage, which optionally allows validation of individual class code coverage
artifacts fetch Fetch sfp artifacts from a NPM compatible registry using a release definition file
artifacts promote Promotes artifacts predominantly for unlocked packages with code coverage greater than 75%
artifacts query Fetch details about artifacts installed in a target org
build Build artifact(s) of your packages in the current project
...
sfp-pro: Enterprise edition with additional features including a centralized server, environment management, authentication services, and team collaboration tools
Key Aspects of sfp:
Built with codified process: sfp is derived from extensive experience in modular Salesforce implementations. By embracing the #FLXBL framework, it streamlines the process of creating a well-architected, composable Salesforce Org, eliminating time-consuming efforts usually spent on re-inventing fundamental processes.
Artifact-Centric Approach: sfp packages Salesforce code and metadata into artifacts with deployment details, ensuring consistent deployments and simplified version management across environments.
Best-in-Class Mono Repo Support: Offers robust support for mono repositories, facilitating streamlined development, integration, and collaboration.
Support for Multiple Package Types: sfp accommodates various Salesforce package types with streamlined commands, enabling modular development, independent versioning, and flexible deployment strategies.
Orchestrate Across Entire Lifecycle: sfp provides an extensive set of functionality across the entire lifecycle of your Salesforce development.
End-to-End Observability: sfp is built with comprehensive metrics emitted on every command, providing unparalleled visibility into your ALM process.
Centralized Server (sfp-pro): A backend server that provides environment management, authentication, webhooks, and API access for team-based workflows.
A Salesforce Project (in a git repository)
Commands
sfp incorporates a suite of commands to aid in your end-to-end development cycle for Salesforce. Starting with the core commands, you can perform basic workflows to build and deploy artifacts across environments through the command line. As you get comfortable with the core commands, you can utilize more advanced commands and flags in your CI/CD platform to drive a complete release process, leveraging release definitions, changelogs, metrics, and more.
sfp is constantly evolving and driven by the passionate community that has embraced our work methods. Over the years, we have introduced utility commands to solve pain points specific to the Salesforce Platform. The commands have been successfully tested and used on large-scale enterprise implementations.
Below is a high-level snapshot of the main command categories in sfp.
Core
Advanced
Server (sfp-pro)
Utilities
quickbuild
validate
init
profile
build
pool
start / stop / status
apextests
install
release
health / logs / scale
In the context of sfp, an artifact represents a more enhanced concept compared to a Salesforce package. While it is based on a Salesforce package or specific package types introduce by sfp, an artifact in sfp includes additional attributes and metadata that describe the package version, dependencies, installation behavior, and other context-specific information relevant to the CI/CD process. Artifacts in sfp are designed to be more than just a bundle of code and metadata; they encapsulate the package along with its CI/CD lifecycle information, making them more aligned with DevOps practices.
sfp's artifacts are built to be compatible for npm package supported registries , most CI/CD providers provide a npm compatible registry to host these packages/artifacts. Here is the link to operate on Github Package Manager for instance (https://docs.github.com/en/packages/working-with-a-github-packages-registry/working-with-the-npm-registry)
Artifacts built by sfp follow a naming convention that starts with the <name_of_the_package>sfpowerscripts_artifact_<Major>.<Minor>.<Patch>-<BuildNumber>. One can use any of the npm commands to interact with sfp artifacts. \
Open up a terminal within your Salesforce project directory and enter the following command:
You will see the logs with details of your package creation, for instance here is a sample output
Build Outputs
A new "artifacts" folder will be generated within your source project containing a zipped artifact file for each package defined in your sfdx-project.json file.
For example, the artifact files will contain the following naming convention with the "_sfpowerscript_artifact_" in between the package name and version number.
package-name_sfpowerscripts_artifact_1.0.0-1.zip
\
artifacts folder
B. Install the artifact to a target org
Ensure you have authenticated your salesforce cli to a org first. If you haven't, please find the instructions here.
Once you have the authenticated to the sandbox, you could execute the installation command as below
Install Outputs
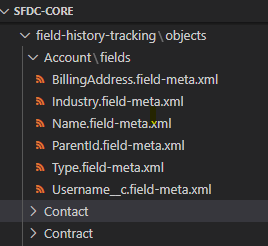
Navigate to your target org and confirm that the package is now installed with the expected changes from your artifact. In this example above, a new custom field has been added to the Account Standard Object.
Depending on the type of packages, sfp will issue the equivalent test classes with in the package directory and it could result in failures during installation, Please fix the issues in your code and repeat till you get a sucessful installation. If your packages doesn't have sufficient test coverage, you may need to use the all tests in the org to get your package installed. Refer to the material here
Trigger creation of artifact for package A
Once A is completed, trigger creation of artifacts for packages B & C **,**using the version of A, created in step 1
Once C is completed, trigger creation of package D
Scenario 2 : Build with diffCheck enabled on a package with no dependencies
In this scenario, where only a single package has changed and diffCheck is enabled, the build command will only trigger the creation of Package B
Scenario 3 : Build with diffCheck enabled on changes in multiple packages
In this scenario, where there are changes in multiple packages, say B & C, the build command will trigger the creation of artifacts for these packages in parallel, as their dependent package A has not changed (hence fulfilled). Please note even though there is a change in C, package D will not be triggered, unless there is an explicit version change of version number (major.minor.patch) of package D
sfp is a purpose-built cli tool used predominantly in a modular salesforce project. \
How sfp works
A project utilizing sfp implements the following concepts.
Domains
In an sfp-powered Salesforce project, "Domains" represent distinct business capabilities. A project can encompass multiple domains, and each domain may include various sub-domains. Domains are not explicitly declared within sfp but are conceptually organized through ""
A package (synonymous with modules) is a container that groups related metadata together. A package would contain components such as objects, fields, apex, flows and more, allowing these elements to be easily installed, upgraded and managed as a single unit. A package is defined as a directory in your project repository and is defined by an entry in sfdx-project.json
An artifact represents a versioned snapshot of a package at a specific point in time. It includes the source code from the package directory (as specified in sfdx-project.json), along with metadata about the version, change logs, and other relevant details. Artifacts are the deployable units in the sfp framework, ensuring consistency and traceability across the development lifecycle.
When sfp is integrated into a Salesforce project, it centralizes around the following key essential process
Building' refers to the creation of an artifact from a package. Utilizing the build command, sfp facilitates the generation of artifacts for each package in your repository. This process encapsulates the package's source code and metadata into a versioned artifact ready for installation.
Publishing a domain involves the process of publishing the artifacts generated by the build command into an artifact repository. This is the storage area where the artifacts are fetched for releases, rollback, etc.
Releasing an domain involves the process of promoting, installing a collection of artifacts to a higher org such as production, generating an associated changelog for the domain. This process is driven by the release command along with a .
\
SF CLI vs. SFP
Salesforce CLI
The Salesforce CLI is a command-line interface that simplifies development and build automation when working with your Salesforce org. There are numerous of commands that the sf cli provides natively that is beyond the scope of this site and can be found on the official Salesforce Documentation Site.
From a build, test, and deployment perspective, the following diagram depicts the bare minimum commands necessary to get up and running in setting up your sf project, retrieving and deploying code to the target environments.
sf cli deployments
SFP
sfp is based on the for building a command line interface (CLI) in . Instead of being a typical Salesforce CLI plugin, sfp is standalone and leverages the same core libraries and APIs as the . sfp releases are independently managed and as core npm libraries are stable, we will update them as needed to ensure no breaking changes are introduced.
The diagram below depicts the basic flow of the development and test process, building artifacts, and deploying to target environments.
Once you have mastered the basic workflow, you can progress to publishing artifacts to a NPM Repository that will store immutable, versions of the metadata and code used to drive the release of your packages across Salesforce Environments.
References
The list below is a curated list of core sf cli and Salesforce DX developer guides for your reference.
SF CLI
Org-Dependent Unlocked Packages
Org-dependent unlocked packages, a variation of unlocked packages, allow you to create packages that depend on unpackaged metadata in the target org. Org dependent package is very useful in the context of orgs that have lots of metadata and is struggling with understanding the dependency while building a 'unlocked package'
Org dependent packages significantly enhance the efficiency of #flxbl projects who are already on scratch org based development. By allowing installation on a clean slate, these packages validate dependencies upfront, thereby reducing the additional validation time often required by unlocked packages.
Org-Dependent Unlocked Package and Test Coverage
Org-dependent unlocked packages bypass the test coverage requirements, enabling installation in production without standard validation. This differs significantly from metadata deployments, where each Apex class deployed must meet a 75% coverage threshold or rely on the org's overall test coverage. While beneficial for large, established orgs, this approach should be used cautiously.
To address this, sfp incorporates a default test coverage for org-dependent unlocked packages during the validation process. To disable this test coverage check during validation, additional attributes must be added to the package directory in the sfdx-project.json file.
Select the latest release (or a specific version you need)
Download the appropriate installer for your platform:
Platform
Installer
Filename Example
Step 2: Install
Windows
macOS
Linux (Debian/Ubuntu)
Linux (RHEL/Fedora/CentOS)
Step 3: Verify Installation
Updating sfp-pro
Download and run the latest installer - it will automatically upgrade your existing installation.
Uninstalling
Windows
Use "Add or Remove Programs" in Control Panel
macOS
Linux (Debian/Ubuntu)
Linux (RHEL/Fedora/CentOS)
Overview
validate command helps you to test ((deployability, apex tests, coverage) a change made to your configuration / code against a target org. This command is typically triggered as part of your Pull Request (PR) or Merge process, to ensure the correctness of configuration/code, before being merged into your main branch.
sfp validates a change by deploying the changed packages into the target org. This is different from 'check only' deployment in other CI/CD solutions.
validate can either utilise a scratch org from a tagged pool prepared earlier using the preparecommand or one could use the a target org for its purpose
// An example where validate is utilized against a pool
// of earlier prepared scratch orgs with label review
sfp validate pool -p review \
-v devhub \
--diffcheck
validate pool / validate org command runs the following checks with the options to enable additional features such as dependency and impact analysis:
Checks accuracy of metadata by deploying the metadata to an org
Triggers Apex Tests
Validates Apex Test Coverage of each package (default: 75%)
Configure Your Project
A. Ensure you have enabled and authenticated to DevHub
Ensure you have enabled DevHub in your production org or created a developer org.
B. Authenticate your Salesforce CLI to DevHub
Ensure you have authenticated your local development environment to your DevHub. If you are not familiar with the process, you can follow the instructions provided by Salesforce .
C. Add additional attributes to your Salesforce DX Project
sfp cli only works with a Salesforce DX project, with source format as described . If your project is not source format, you would need to convert into source format using the
Navigate to your sfdx-project.json file and locate the packageDirectories property.
In the above example, the package directories are
force-app
unpackaged
utils
Add the following additional attributes to the sfdx-project.json and save.
package
versionNumber
Thats the minimal configuration required to run sfp on a project.
Move on to the next chapter to execute sfp commands in this directory.
For detailed configurations on this sfdx-project.json schema for sfp, click .
Setup Salesforce Org
To fully leverage the capabilities of sfp, a few addition steps need to be configured in your Salesforce Orgs. Please follow the following steps.
1. Enable Dev Hub
To enable modular package development, the following configurations need to be turned on in order to create Scratch Orgs and Unlock Packages.
Enable Dev Hub in your Salesforce org so you can create and manage scratch orgs and second-generation packages. Scratch orgs are disposable Salesforce orgs to support development and testing.
The sfpowerscripts-artifact package is a lightweight unlocked package consisting of a custom setting SfpowerscriptsArtifact2__c that is used to keep a record of the artifacts that have been installed in the org. This enables package installation, using sfp, to be skipped if the same artifact version already exists in the target org.
Once the command completes, confirm the unlocked package has been installed.
Navigate to the Setup menu
Go to Apps > Packaging > Installed Packages
Confirm the package sfpowerscripts-artifact is listed in the "Installed Packages"
Ensure that you install sfpowerscripts artifact unlocked package in all your target orgs that you intend to deploy using sfp.
If refreshing from Production with sfpowerscripts-artifact already installed, you do not need to install again to your sandboxes.
Check-Only Deployment Mode
sfp-pro
sfp (community)
Availability
✅
❌
From
February 26
Attribute
Type
Description
Package Types Applicable
Certain packages cannot be validated in pooled review environments (scratch orgs or sandboxes) - for example, Data Cloud packages that require specific provisioning, or integration-heavy packages that depend on connected apps and named credentials not available in pools.
The checkOnlyAgainst attribute allows these packages to be validated against persistent orgs using Salesforce's check-only deployment, which verifies deployability without committing changes to the target org.
This attribute only affects the sfp validate org command. It has no effect during deploy, release, or install stages.
When running sfp validate org --targetorg datacloud-dev --releaseconfig config/dc-domain.yaml, the package will be validated using check-only deployment against the specified org.
Behavior
When using sfp validate org with a --releaseconfig:
If --targetorg matches one of the aliases in checkOnlyAgainst → Check-only deployment
If --targetorg does NOT match any alias → Package is skipped
When using sfp validate pool, packages with checkOnlyAgainst are always skipped regardless of pool alias.
Requirements
Release Config Required
The feature only works when --releaseconfig is provided. This is required to validate the single-package domain constraint.
Single Package Per Domain
Domains containing a package with checkOnlyAgainst must have exactly one package. This avoids dependency ordering complexity.
Org Authentication
The org alias in --targetorg must be pre-authenticated in your CI environment.
Skip Testing
Attribute
Type
Description
Package Types Applicable
skipTesting
boolean
Skip trigger of apex tests while validating or deploying
unlocked
org-dependent unlocked
source
One can utilize this attribute on a package definition is sfdx-project.json to skipTesting while a change is validated. Use this option with caution, as the package when it gets deployed (depending on the package behaviour) might trigger testing while being deployed to production
// Demonstrating how to do use skipTesting
{
"packageDirectories": [
{
"path": "core-crm",
"package": "core-crm",
"versionDescription": "Package containing core schema and classes",
"versionNumber": "4.7.0.NEXT",
"skipTesting": true
},
...
]
}
Test Synchronously
Attribute
Type
Description
Package Types Applicable
testSynchronous
boolean
Ensure all tests of the package is triggered synchronously
unlocked
org-dependent unlocked
source
sfp by default attempts to trigger all the apex tests in a package in asynchronous mode during validation. This is to ensure that you have a highly performant apex test classes which provide you fast feedback.
During installation of packages, test cases are triggered synchronously for source and diff packages. Unlocked and Org-depednendent packages do not trigger any apex test during installation
If you have inherited an existing code base or your unit tests have lot of DML statemements, you will encounter test failuers when a tests in package is triggered asynchronously. You can instruct sfp to trigger the tests of the package in a synchronous mode by setting 'testSynchnronous as true
\
Always sync a package during validation
sfp-pro
sfp (community)
Availability
✅
❌
From
November 25
Attribute
Type
Description
Package Types Applicable
To ensure a package is always included during validation when its domain is impacted, add alwaysSync as a property to your package descriptor:
When framework-core is changed and validation is triggered, framework-config will automatically be included because it belongs to the same domain and has alwaysSync: true.
This also works across domains when using dependencyOn in release configs. If Domain B has a dependencyOn referencing a package from Domain A, and that package changes, all alwaysSync packages in Domain A will be included.
Pre-Requisites
The following list of software is the minimum to get started using sfp. Our assumption is that you are familiar with the Salesforce CLI and are comfortable using VS Code. To keep the material simple, we will be assuming you already have access to a Salesforce Sandbox that you can build and install artifacts.
Salesforce
Workstation
Migrating from sfp community edition to sfp pro edition
Breaking Changes: sfp community edition to sfp-pro
Command
Must Work
Notes
Identifying types of a package
This section details identifies on how sfp analyzes and classifies different package types by using the information in sfdx-project.json
Unlocked Packages are identified if a matching alias with a package version ID is found and verified through the DevHub. For example, the package named "Expense-Manager-Util" is found to be an Unlocked package upon correlation with its alias "Expense Manager - Util" and subsequent verification.
Source Packages are assumed if no matching alias is found in packageAliases. These packages are typically used for source code that is not meant to be packaged and released as a managed or unlocked package.
Supported package types
sfp cli supports operations on various types of packages within your repository. A short summary on the comparison between different package types is provided below\
Features
Unlocked Packages
Org Dependent Unlocked Packages
Source Packages
Data Packages
Diff Packages
Explain Dependencies
sfp-pro
sfp (community)
The sfp dependency:explain command helps you understand the dependencies between packages in your project. It can analyze either a specific package's dependencies or all package dependencies in the project, showing both direct and transitive dependencies.
sfp build -v <DevHubAlias/DevHubUsername>
sfp install -o <TargetOrgAlias/TargetOrgUsername>
// An example where validate is utilized against a target org
sfp validate org -o ci \
-v devhub \
--installdeps
// An example with branch references for intelligent synchronization
sfp validate org -o ci \
-v devhub \
--ref feature-branch \
--baseRef main
// An example with release config for domain-limited validation
sfp validate org -o ci \
-v devhub \
--releaseconfig config/release-sales.yml
Toggle between different modes for validation:
Thorough(Default) - Comprehensive validation with full deployments and all tests
Individual - Validates changed packages individually, ideal for PRs
sfp provides mechanisms to control the aspects of the build command, the following section details how one can configure these mechanisms in your sfdx-project.json
sfp provides various features to alter the installation behaviour of a package. These behaviours have to be applied as an additional property of a package during build time. The following section details each of the parameters that is available.
sfp is built on the concept of immutable artifacts, hence any properties to control the installation aspects of a package need to be applied during the build command. Installation behaviour of an package cannot be controlled dynamically. If you need to alter or add a new behaviour, please build a new version of the artifact
Core functionality unchanged
sfp release
✅
Core functionality unchanged
Critical: Update Your Pipelines
Most orchestrator: command aliases have been removed in sfp-pro. You must update your pipelines:
Old Command (sfp-comm)
New Command (sfp-pro)
sfp orchestrator:build
sfp build
sfp orchestrator:deploy
sfp install
sfp orchestrator:release
sfp release
sfp orchestrator:validate
sfp validate
sfp orchestrator:quickbuild
sfp quickbuild
New/Changed in sfp-pro:
Exception:sfp orchestrator:publish still works in sfp-pro.
--commit flag added to build command for specifying commit hash
Server flags added to most commands (--server-url, --api-key)
Additional commands in pro: server:*, dev:*, project:*, sandbox:*
Orchestrator alias: Both versions support sfp orchestrator:build as alias for sfp build
✅ What Stays the Same
Core command functionality is unchanged
All flags from sfp-comm still work
Command outputs remain compatible
Migration Notes:
🆕 New in sfp-pro
All core orchestrator commands (build, install, publish, release) work identically
Existing pipelines using these commands will continue to work
Enable Unlocked Packages and Second-Generation Managed Packages
Enable Dev Hub
sfpowerscripts-artifact
checkOnlyAgainst
string[]
Array of org aliases where this package should be validated using check-only (validate-only) deployment. When the target org matches an alias in this array, a check-only deployment is performed; otherwise skipped.
unlocked
org-dependent unlocked
source
diff
diff
alwaysSync
boolean
During validation, automatically includes this package when any other package in the same domain is impacted. Useful for config/settings packages that must stay synchronized with their domain.
unlocked
org-dependent unlocked
source
data
Selective ignoring of components from being built
Sometimes, due to certain platform errors, some metadata components need to be ignored during build (especially for unlocked packages) while the same being required for other commands like validate . sfp offer you an easy mechanism which allows to switch .forceignore files depending on the operation.
Add this entry to your sfdx-project.json and as in the example below, mention the path to different files that need to be used for different stages
Given a directory of artifacts and a target org, the deploy command will deploy the artifacts to the target org according to the sequence defined in the project configuration file.
// Command to install set of artifacts to devhub
sfp install -u devhub --artifactdir artifacts
Sequence of Activities
The install command runs through the following steps
Reads all the sfp artifacts provided through the artifact directory
Unzips the artifacts and finds the latest sfdx-project.json.ori to determine the deployment order, if this particular file is not found, it utilizes sfdx-project.json on the repo
Read the installed packages in the target org utilizing the records in SfpowerscriptsArtifacts2__c
Install each artifact from the provided artifact directory to the target org based on the deployment order respecting the attributes configured for each package
The presence of an additional type attribute within a package directory will further inform sfp of the specific nature of the package. For instance, types such as "data" for data packages or "diff" for diff packages
The sfdx-project.json file outlines various specifications for Salesforce DX projects, including the definition and management of different types of Salesforce packages. From the sample provided, sfp (Salesforce Package Builder) analyzes the "package" attribute within each packageDirectories entry, correlating with packageAliases to identify package IDs, thereby determining the package's type as 2GP (Second Generation Packaging).
Consider the following sfdx-project.json
Understanding Package Type Determination using the samplesfdx-project.json
The sfdx-project.json sample can be used to determine how sfp processes and categorizes packages within a Salesforce DX project. The determination process for each package type, based on the attributes defined in the packageDirectories, unfolds as follows:
Unlocked Packages: For a package to be identified as an Unlocked package, sfp looks for a correlation between the package name defined in packageDirectories and an alias within packageAliases. In the provided example, the "Expense-Manager-Util" under the util path is matched with its alias "Expense Manager - Util", subsequently confirmed through the DevHub with its package version ID, categorizing it as an Unlocked package.
Source Packages: If a package does not have a corresponding alias in packageAliases, it is treated as a Source package. These packages are typically utilized for organizing source code not intended for release. For instance, packages specified in paths like "exp-core-config" and "expense-manager-test-data" would default to Source packages if no matching aliases are found.
Specialized Package Types: The explicit declaration of a type attribute within a package directory allows for the differentiation into more specialized package types. For example, the specification of "type": "data" explicitly marks a package as a Data package, targeting specific use cases different from typical code packages.
When analyzing dependencies, the command provides information about:
Direct dependencies: Dependencies explicitly declared in the package's configuration
Transitive dependencies: Dependencies that are required by your direct dependencies
For transitive dependencies, the command shows which packages contribute to requiring that dependency
JSON Output Structure
When using the --json flag, the command returns data in the following structure:
Examples
Analyze all package dependencies:
Analyze dependencies for a specific package:
Get dependencies in JSON format:
Notes
The command requires a valid SFDX project configuration
Dependencies are resolved based on the information in your sfdx-project.json file
Transitive dependency resolution helps identify indirect dependencies that might not be immediately obvious from the project configuration
Availability
✅
✅
From
November 24
December 24
# Double-click the .msi file or run:
msiexec /i sfp-pro-*.msi
# 1. Open the DMG file
# 2. Drag sfp-pro.app to your Applications folder
# 3. Run the installer script from the DMG:
sudo bash /Volumes/sfp-pro-*/install-cli.sh
# Or if you've already unmounted the DMG:
sudo /Applications/sfp-pro.app/Contents/Resources/install-cli.sh
sudo dpkg -i sfp-pro_*.deb
sudo rpm -i sfp-pro_*.rpm
# or
sudo yum install sfp-pro_*.rpm
sfp --version
# Example output: @flxbl-io/sfp/49.3.0 linux-x64 node-v22.0.0
Requires dependency to be resolved during creation
Yes
No
No
N/A
No
Supported Metadata Types
Unlocked Package Section in
Unlocked Package Section in
Metadata API
Section in
N/A
Metadata API
Section in
Code Coverage Requirement
Package should have 75% code coverage or more
Not enforced by Salesforce, sfp by default checks for 75% code coverage
Each apex class should have a coverage of 75% or above for optimal deployment, otherwise the entire coverage of the org will be utilized for deployment
N/A
Each apex class that's part of the delta between the current version and the baseline needs a test class and requires a coverage of 75%.
Component Lifecycle
Automated
Automated
Explicit, utilize destructiveManifest or manual deletion
N/A
Explicit, utilize destructiveManifest or manual deletion
Component Lock
Yes, only one package can own the component
Yes, only one package can own the component
No
N/A
No
Version Management
Salesforce enforced versioning; Promotion required to deploy to prod
Salesforce enforced versioning; Promotion required to deploy to prod
sfp enforced versioning
sfp enforced versioning
sfp enforced versioning
Dependency Validation
Occurs during package creation
Occurs during package installation
Occurs during package installation
N/A
sfp-pro
SFP-Pro provides Docker images through our self-hosted Gitea registry at source.flxbl.io. These pre-built images are maintained and updated regularly with the latest features and security patches.
Prerequisites
Access to source.flxbl.io (Gitea server)
Docker installed on your machine
Registry credentials from your welcome email
Accessing the Images
Login to the Gitea registry:
Pull the desired image:
The version numbers can be found at
(Optional) Tag for your registry:
Best Practices
Use specific version tags in production
Cache images in your private registry for better performance
Implement proper access controls in your registry
Building Docker Images
If you need to build the images yourself, you can access the source code from source.flxbl.io and follow these instructions:
Prerequisites
Docker with BuildKit support
GitHub Personal Access Token with packages:read permissions
Node.js (for local development)
Building the Base Image (sfp-pro-lite)
Building the Image with SF CLI Bundled (sfp-pro)
Build Arguments
The following build arguments are supported:
NODE_MAJOR: Node.js major version (default: 22)
SFP_VERSION: Version of SFP Pro to build
GIT_COMMIT: Git commit hash for versioning
Support
For issues or questions about Docker images, please contact flxbl support through your designated support channels.
Destructive Changes
sfp handles destructive changes according to the type of package. Here is a rundown on how the behaviour is according to various package types and modes
Metadata that was removed in the new package version is also removed from the target org as part of the upgrade. Removed metadata is metadata not included in the current package version install, but present in the previous package version installed in the target org. If metadata is removed before the upgrade occurs, the upgrade proceeds normally. Some examples where metadata is deprecated and not deleted are:
User-entered data in custom objects and fields are deprecated and not deleted. Admins can export such data if necessary.
An object such as an Apex class is deprecated and not deleted if it’s referenced in a Lightning component that is part of the package.
sfp utilizes mixed mode while installing unlocked packages to the target org. So any metadata that can be deleted is removed from the target org. If the component is deprecated, it has to be manually removed.
Components that are hard deleted upon a version upgrade is found .
Source Packages
Source packages support destructive changes using folder structure to demarcate components that need to be deleted. One can make use of pre-destructive and `post-destructive folders to mark components that need to be deleted
The package installation is a single deployment transaction with components that are part of pre/post deployed along with destructive operation as specified in the folder structure. This would allow one to refactor the current code to facilitate refactoring for the destructive changes to succeed, as often deletion is only allowed if there are no existing components in the org that have a reference to the component that is being deleted
{% hint style="info" %} Destructive Changes support for source package is currently available only in sfp (pro) version. {% endhint %}
{% hint style="info" %}
Things to look out for
Test destructive changes in your review environment thoroughly before merging your changes
You will need to understand the dependency implications while dealing with destructive changes, especially the follow on effects of a deletion in other packages, It is recommended you do a compile all of all apex classes ( & ) to detect any errors on apex classes or triggers
After the version of package is installed across all the target orgs, you would need to merge another change which would remove the post-destructive or pre-destructive folders. You do not need to rush through this , as sfp ignores any warning associated with missing components in the org {% endhint %}
Data Packages
Data packages utilize sfdmu under the hood, and one can utilize any of the below approaches to remove data records.
Approach 1: Combined Upsert and Delete Operations
One effective method involves configuring SFDMU to perform both upsert and delete operations in sequence for the same object. This approach ensures comprehensive data management—updating and inserting relevant records first, followed by removing outdated entries based on specific conditions.
Upsert Operation: Updates or inserts records based on a defined external ID, aligning the Salesforce org with new or updated data from a source file.
Delete Operation: Deletes specific records that meet certain criteria, such as being marked as inactive, to ensure the org only contains relevant and active data.
Approach 2: Utilizing deleteOldData
Another approach involves using the deleteOldData parameter. This parameter is particularly useful when needing to clean up old data that no longer matches the current dataset in the source before inserting or updating new records.
Delete Old Data: Before performing data insertion or updates, SFDMU can be configured to remove all existing records that no longer match the new dataset criteria, thus simplifying the maintenance of data freshness and relevance in the target org
Data Packages
Data packages are a sfpowerscripts construct that utilise the SFDMU plugin to create a versioned artifact of Salesforce object records in csv format, which can be deployed to the a Salesforce org using the sfpowerscripts package installation command.
The Data Package offers a seamless method of integrating Salesforce data into your CICD pipelines , and is primarily intended for record-based configuration of managed package such as CPQ, Vlocity (Salesforce Industries), and nCino.
Data packages are a wrapper around SFDMU that provide a few key benefits:
Ability to skip the package if already installed: By keeping a record of the version of the package installed in the target org with the support of an unlocked package, sfpowerscripts can skip installation of data packages if it is already installed in the org
Versioned Artifact: Aligned with sfpowerscripts principle of traceability, every deployment is traceable to a versioned artifact, which is difficult to achieve when you are using a folder to deploy
Orchestration: Data package creation and installation can be orchestrated by sfpowerscripts, which means less scripting
Defining a Data package
Simply add an entry in the package directories, providing the package's name, path, version number and type (data). Your editor may complain that the 'type' property is not allowed, but this can be safely ignored.
Generating the contents of the data package
Export your Salesforce records to csv files using the . For more information on plugin installation, creating an export.json file, and exporting to csv files, refer to Plugin Basic > Basic Usage in SFDMU's .
Options with Data Packages
Data packages support the following options, through the sfdx-project.json.
Adding Pre/Post Deployment Scripts to Data Packages
Refer to this for more details on how to add a pre/post script to data package
Defining a vlocity Data Package
sfpowerscripts support vlocity RBC migration using the vlocity build tool (vbt). sfpowerscripts will be automatically able to detect whether a data package need to be deployed using vlocity or using sfdmu. (Please not to enable vlocity in preparing scratchOrgs, the enableVlocity flag need to be turned on in the pool configuration file)
A vlocity data package need to have vlocityComponents.yaml file in the root of the package directory and it should have the following definition
The same package would be defined in the sfdx-project.json as follows
Skip Coverage Validation
Attribute
Type
Description
Package Types Applicable
skipCoverageValidation
boolean
Skip apex test coverage validation of a package
unlocked
org-dependent unlocked
source
sfp during validation checks the apex test coverage of a package depending on the package type. This is beneficial so that you dont run into any coverage issues while deploying into higher environments or building an unlocked package. \
However, there could be situations where the test coverage calculation is flaky , sfp provides you with an option to turn the coverage validation off.
Limiting Validation by Domain
Validation processes often need to synchronize the provided organization by installing packages that differ from those already installed. This task can become particularly time-consuming for large projects with hundreds of packages, especially in monorepo setups with multiple independent domains.
Using Release Configurations
To streamline the validation process and focus it on specific domains, you can use release configurations with the --releaseconfig flag. This approach limits the scope of validation to only the packages defined in your release configuration, significantly enhancing efficiency and reducing validation time.
Basic Usage
In this example, validation is limited to packages defined in the release-domain-sales.yml configuration file. Only packages that:
Are listed in the release configuration AND
Have changes compared to what's installed in the org
will be validated.
Multiple Domain Configurations
For projects with multiple independent domains, you can specify multiple release configurations:
Benefits of Domain-Limited Validation
Faster Feedback: Validate only the relevant packages for your team's domain
Reduced Dependencies: Avoid failures from unrelated packages in other domains
Parallel Development: Multiple teams can work independently without blocking each other
Example Release Configuration
Combining with Other Options
With Diff Check
With Individual Mode
With Branch References
Best Practices
Organize by Domain: Create separate release configurations for each logical domain
Keep Configurations Updated: Regularly review and update package lists in release configs
Use in CI/CD: Automate domain-specific validation in your pipeline
Note: The deprecated --mode=thorough-release-config and --mode=ff-release-config have been replaced by using the standard modes with the --releaseconfig flag. This provides the same functionality with a simpler, more consistent interface.
Ignoring packages from being built
Attribute
Type
Description
Package Types Applicable
ignoreOnStage
array
Ignore a package from being processed by a particular stage
unlocked
org-dependent unlocked
source
Using the ignoreOnStage:[ "build" ] property on a package, causes the particular package to be skipped by the build command. Similarly you can use ignoreOnStage:[ "quickbuild" ] to skip packages in the quickbuild stage.
Transitive Dependency Resolution
This feature is by default activated whenever build/quickbuild even in implicit scenarios such as validate, prepare etc, which might result in building packages.
Let's consider the following sfdx-project.json to explain how this feature works.
The above project manifest (sfdx-project.json) describes three packages, sfdc-logging, feature-mgmt., core-crm . Each package are defined with dependencies as described below
Package
Incorrectly Defined Dependencies
Release Config
Release configuration is a fundamental setup that outlines the organisation of packages within a project, streamlining across different lifecycle of your project, such as validating, building, deploying/release of artifacts. In flxbl projects, a release config is used to define the concept of a domain/subdomains.
This configuration is instrumental when using sfp commands, as it allows for selective operations on specified packages defined by a configuration. By employing a release configuration, teams can efficiently manage a mono repository of packages across various teams.
The below table list the options that are currently available for release configuration
Parameter
Required
Type
Description
AI-Assisted Error Analysis
sfp-pro
sfp (community)
sfp provides intelligent AI-assisted error analysis to help developers quickly understand and resolve validation failures. When enabled through the errorAnalysis configuration in ai-assist.yaml
Dependency Management
sfp provides powerful commands to manage and understand package dependencies in your Salesforce projects. These tools help you maintain clean dependency declarations, troubleshoot dependency issues, and optimize your build processes.
Available Commands
Command
Description
Overview
sfp-pro
sfp (community)
The project analysis command helps you analyze your Salesforce project for potential issues and provides detailed reports in various formats. This command is particularly useful for identifying issues such as duplicate components, compliance violations, hardcoded IDs and URLs, and other code quality concerns.
Different types of validation
sfp provides validation techniques to verify changes in your Salesforce projects before merging. The validate command supports two primary modes to suit different validation needs.
Validation Modes
Mode
Description
Flag
Shrink Dependencies
sfp-pro
sfp (community)
The sfp dependency:shrink command optimizes your project's dependency declarations by removing redundant transitive dependencies from your sfdx-project.json. This results in a cleaner project configuration with only the necessary direct dependencies declared for each package.
AI Assisted Insight Report
sfp-pro
sfp (community)
The AI-powered report functionality generates comprehensive analysis reports for your Salesforce projects using advanced language models. This feature provides deep insights into code quality, architecture, and best practices specific to the Flxbl framework.
Limiting artifacts to be built
Artifacts to be built can be limited by various mechanisms. This section deals with various techniques to limit artifacts being built
Limiting artifacts by domain
Artifacts to be built can be restricted by during a build process in sfp by utilizing specific configurations. Consider the example provided in
You can use the path to the config file to the build command to limit the artifacts being built as in the sample below
Building a collection of packages together
Attribute
Type
Description
Package Types Applicable
In certain scenarios, it's necessary to build a new version of a package when any package in the collection undergoes changes. This can be accomplished by utilizing the buildCollection attribute in the sfdx-project.json
Skip Install on Certain Orgs
Attribute
Type
Description
Package Types Applicable
sfp cli when encounters the attribute skipDeployOnOrgs on a package, the generated artifact during installation is checked against the alias or the username passed onto the installation command. If the username or the alias is matched, the artifact installation is skipped
Always deploy a package
Attribute
Type
Description
Package Types Applicable
To ensure that an artifact of a package is always deployed, irrespective the same version of the artifact is previously deployed to the org, you can utlize alwaysDeploy as a property added to your package,
Applying attributes of an artifact
All the attributes that are configured additionally to a package in your project is recorded within the artifact. When the artifact is being installed to the target org, the following steps are undertaken in sequence as seen in the below diagram. Each of the configured attributes below to one of the category in the sequence and executed
In the above example, if the alias to installation command is qa, the artifact for core-crm will get skipped during intallation. The same can also be applied for username of an org as well
skipDeployOnOrgs
array
Skips installation of an artifact on a target org
org-dependent unlocked
unlocked
data
source
diff
// Demonstrating how to do use skipDeployOnOrgs
{
"packageDirectories": [
{
"path": "core-crm",
"package": "core-crm",
"versionDescription": "Package containing core schema and classes",
"versionNumber": "4.7.0.NEXT",
"skipDeployOnOrgs":[
"qa",
"[email protected] ]
},
...
]
}
alwaysDeploy
boolean
Deploys an artifact of the package, even if it's installed already in the org. The artifact has to be present in the artifact directory for this particular option to work
As you might have noticed, this is an incorrect representation, as per the definitions of unlocked package, the package 'core-crm' should be explicitly defining all its dependencies. This means it should be as described below.
Package
Correctly Defined Dependencies
sfdc-logging
None
feature-mgmt
sfdc-logging
core-crm
sfdc-logging, feature-mgmt
To successfully create a version of core-crm , both sfdc-logging and feature-mgmt. should be defined as an explicit dependency in the sfdx-project.json
As the number of packages grow in your project, it is often seen developers might accidentally miss declaring dependencies or the sfdx-project.json has become so large due to large amount of repetition of dependencies between packages. This condition would result in build stage often failing with missing dependencies.
sfp features a transitive dependency resolution which can autofill the dependencies of the package by inferring the dependencies from sfdx-project.json, so the above package descriptor of core-crm will be resolved correctly to \
Please note, in the current iteration, it will autofill dependency information from the current sfdx-project.json and doesn't consider variations among previous versions.
For dependencies outside of the sfdx-project.json, one could define an externalDependencyMap as shown below
If you need to disable this feature and have stringent dependency management rules, utilize the following in your sfdx-project.json
An external dependency is a package that is not defined within the current repositories sfdx-project.json. Managed packages and unlocked packages built from other repositories fall into 'external dependency' bucket. IDs of External packages have to be defined explicitly in the packageAliases section.
sfdc-logging
None
feature-mgmt
Usage
Flags
Flag
Description
Required
-o, --overwrite
Overwrites the existing sfdx-project.json file with the shrunk configuration
Without --overwrite, creates a new file at ./project-config/sfdx-project.min.json
With --overwrite, backs up existing sfdx-project.json to ./project-config/sfdx-project.json.bak and overwrites the original
Removes transitive dependencies that are already covered by direct dependencies
Preserves external dependency mappings
External Dependencies Configuration
External dependencies can be configured in your sfdx-project.json file using the plugins.sfp section. This is particularly useful for managed packages or packages from other Dev Hubs that your project depends on.
Configuration Format
Example
Notes
External dependencies must be defined with their 04t IDs (subscriber package version IDs)
The versionNumber can use .LATEST to automatically use the latest version that matches the major.minor.patch pattern
External dependencies are preserved during both shrink and expand operations
These dependencies are automatically included when calculating transitive dependencies
Availability
✅
✅
Overview
The report generator analyzes your codebase through multiple perspectives:
Models: Default models are optimized for best value and performance
GitHub Copilot: No additional cost if you have Copilot subscription
Amazon Bedrock: Pay-per-use pricing through AWS, check Bedrock pricing in your region
Availability
✅
❌
From
October 25
Not Available
Limiting artifacts by packages
Artifacts to be built can be limited only to certain packages. This could be very helpful, in case you want to build an artifact of only one package or a few while testing locally.
Limiting artifacts by ignoring packages
Packages can be ignored from the build command by utilising an additional descriptor on the package in project manifest (sfdx-project.json)
In the above scenario, src-env-specific-pre will be ignored while build command is invoked
To ensure that a new version of a package is built whenever any package in a specified collection undergoes a change, you can use the buildCollection attribute in the sfdx-project.json file. Below is an example illustrating how to define a collection of packages that should be built together.
buildCollection
array
Build a collection of packages together, even if only one package among the collection is changed
unlocked
org-dependent unlocked
source
diff
docker login source.flxbl.io -u your-username
# For base sfp-pro image
docker pull source.flxbl.io/sfp-pro-lite:version
# For sfp-pro with SF CLI
docker pull source.flxbl.io/sfp-pro:version
# Tag for your registry
docker tag source.flxbl.io/sfp-pro:version your-registry/sfp-pro:version
# Push to your registry
docker push your-registry/sfp-pro:version
# Create a file containing your GITEA token
echo "YOUR_GITEA_TOKEN" > .npmrc.token
# Build the base sfp-pro image (without SF CLI)
docker buildx build \
--secret id=npm_token,src=.npmrc.token \
--build-arg NODE_MAJOR=22 \
--file dockerfiles/sfp-pro-lite.Dockerfile \
--tag sfp-pro-lite:local .
# Remove the token file
rm .npmrc.token
# Create a file containing your GITEA token
echo "YOUR_GITEA_TOKEN" > .npmrc.token
# Build the sfp-pro image with SF CLI bundled
docker buildx build \
--secret id=npm_token,src=.npmrc.token \
--build-arg NODE_MAJOR=22 \
--file dockerfiles/sfp-pro.Dockerfile \
--tag sfp-pro:local .
# Remove the token file
rm .npmrc.token
// Consider a source package feature-management
// with path as src/feature-management
└── feature-management
├── main
├──── default
├──────── <metadata-contents>
├── post-destructive
├──────── <metadata-contents>
├── pre-destructive
├──────── <metadata-contents>
└── test
{
"name": "CustomObject__c",
"operation": "Upsert",
"externalId": "External_Id__c",
"query": "SELECT Id, Name, IsActive__c FROM CustomObject__c WHERE SomeCondition = true"
}
{
"name": "CustomObject__c",
"operation": "Delete",
"query": "SELECT Id FROM CustomObject__c WHERE IsActive__c = false"
}
// Use of deleteOldData
{
"name": "CustomObject__c",
"operation": "Upsert",
"externalId": "External_Id__c",
"deleteOldData": true
}
{
"path": "path--to--data--package",
"package": "name--of-the-data package", //mandatory, when used with sfpowerscripts
"versionNumber": "X.Y.Z.0 // 0 will be replaced by the build number passed",
"type": "data", // required
}
{
"path": "path--to--package",
"package": "name--of-the-package", //mandatory, when used with sfpowerscripts
"versionNumber": "X.Y.Z.[NEXT/BUILDNUMBER]",
"type": "data", // required
"aliasfy": <boolean>, // Only for source packages, allows to deploy a subfolder whose name matches the alias of the org when using deploy command
"assignPermSetsPreDeployment: ["","",],
"assignPermSetsPostDeployment: ["","",],
"preDeploymentScript":<path>, //All Packages
"postDeploymentScript":<path> // All packages
}
# $1 package name
# $2 org
# $3 alias
# $4 working directory
# $5 package directory
sfdx force:apex:execute -f scripts/datascript.apex -u $2
projectPath: src/vlocity-config // Path to the package directory
expansionPath: datapacks // Path to the folder containing vlocity attributes
autoRetryErrors: true //Additional items
manifest:
# Create a shrunk version of the project configuration
sfp dependency:shrink
# Overwrite the existing sfdx-project.json with shrunk dependencies
sfp dependency:shrink --overwrite
Name of the release config, in flxbl project, this name is used as the name of the domain
pool
No
String
Name of the scratch org or sandbox pool associated with this release config during validation
excludeArtifacts
No
Array
An array of artifacts that need to be excluded while creating the release definition
includeOnlyArtifacts
No
Array
An array of artifacts that should only be included while creating the release definition
dependencyOn
No
Array
An array of packages that denotes the dependency this configuration has. The dependencies mentioned will be used for synchronization in review sandboxes
excludePackageDependencies
No
Array
Exclude the mentioned package dependencies from the release definition
includeOnlyPackageDependencies
No
Array
Include only the mentioned package dependencies from the release definition
releasedefinitionProperties
No
Object
Properties of release definition that should be added to the generated release definition. See below
A release configuration also can contain additional options that can be used by certain sfp commands to generate release definitions. These properties in a release definiton alters the behaviour of deployment of artifacts during a release
When validation fails and changes are significant, AI provides:
Root Cause Analysis: Understanding why the error occurred
Quick Fix Suggestions: Immediate actions to resolve issues
Related Components: Other files that might be involved
Documentation Links: References to relevant Salesforce docs
Configuration
Configure AI assistance through config/ai-assist.yaml:
Usage
AI error analysis is automatically enabled when:
A config/ai-assist.yaml file exists in your project
The errorAnalysis.enabled flag is set to true
Valid LLM provider credentials are available
No additional CLI flags are required - sfp automatically detects and uses the configuration.
Availability
✅
❌
From
October 25
Remove redundant transitive dependencies for cleaner configuration
Analyze and understand package dependencies
Understanding Dependencies
In Salesforce DX projects, packages can depend on other packages. These dependencies come in two forms:
Direct Dependencies: Dependencies explicitly declared in a package's configuration
Transitive Dependencies: Dependencies of your dependencies (indirect dependencies)
For example, if Package A depends on Package B, and Package B depends on Package C, then:
Package A has a direct dependency on Package B
Package A has a transitive dependency on Package C
Dependency Management Workflow
A typical dependency management workflow involves:
Development Phase: Use sfp dependency:expand to make all dependencies explicit during development, helping identify potential issues early
Analysis: Use sfp dependency:explain to understand dependency relationships and identify unnecessary dependencies
Cleanup: Use sfp dependency:shrink before committing to maintain minimal, clean dependency declarations
Build Optimization: Expanded dependencies help build tools understand the complete dependency graph for optimized builds
External Dependencies
External dependencies are packages from outside your project, typically:
Managed packages from AppExchange
Packages from other Dev Hub organizations
Third-party components
These are configured in your sfdx-project.json under plugins.sfp.externalDependencyMap:
Best Practices
Keep dependencies minimal: Only declare direct dependencies in your source control
Use expand for analysis: Temporarily expand dependencies to understand the full graph
Validate regularly: Run dependency commands in CI/CD to catch issues early
Document external dependencies: Clearly document why each external dependency is needed
Version carefully: Use specific versions for production, .LATEST for development
Common Issues and Solutions
Circular Dependencies
If packages depend on each other in a circular manner, the dependency commands will report an error. Refactor your packages to break the circular dependency.
Missing Dependencies
If a package references components from another package without declaring the dependency, add the missing dependency to the package's configuration.
Version Conflicts
When different packages require different versions of the same dependency, sfp will use the highest compatible version. Consider standardizing versions across your project.
Add all transitive dependencies to make them explicit
Usage
Common Use Cases
The analyze command serves several key purposes:
Runs various available linters across the project
Generating comprehensive analysis reports
Integration with CI/CD pipelines for automated checks
Available Flags
Flag
Description
Required
Default
--package, -p
The name of the package to analyze
No
-
--domain, -d
The domain to analyze
No
-
--source-path, -s
The path to analyze
No
Scoping Analysis
The command provides three mutually exclusive ways to scope your analysis:
By Package: Analyze specific packages
By Domain: Analyze all packages in a domain
By Source Path: Analyze a specific directory
Output Formats
The command supports multiple output formats:
Markdown: Human-readable documentation format
JSON: Machine-readable format for integration with other tools
GitHub: Special format for GitHub Checks API integration
GitHub Integration
When running in GitHub Actions, the command automatically:
Creates GitHub Check runs for each analysis
Adds annotations to the code for identified issues
Provides detailed summaries in the GitHub UI
Examples
Basic analysis of all packages:
Analyze specific packages with JSON output:
Analyze with strict validation:
Generate reports in a specific directory:
Generate compliance configuration:
Run compliance checks with custom rules:
Availability
✅
❌
From
January 25
Include package dependencies, code coverage, all test classes during full package deployments. This is the recommended mode for comprehensive validation.
--mode=thorough
Individual
Ignore packages installed in scratch org, identify list of changed packages from PR/Merge Request, and validate each of the changed packages (respecting any dependencies) using thorough validation rules.
--mode=individual
Release Config Filtering
Both validation modes support filtering packages using a release configuration file through the --releaseconfig flag. When provided, only packages defined in the release config that have changes will be validated. This is useful for:
Large monorepos with multiple domains
Focusing validation on specific package groups
Reducing validation time by limiting scope
Evolution of Validation Modes
Why Fast Feedback Was Deprecated
Fast Feedback mode was initially introduced to provide quicker validation by:
Installing only changed components instead of full packages
Running selective tests based on impact analysis
Skipping coverage calculations
Skipping packages with only descriptor changes
However, this mode was deprecated and removed because:
Complexity vs. Value: The mode introduced significant complexity in determining what to test versus what to synchronize, while the time savings were inconsistent.
Improved Alternative Approach: The validation logic was enhanced to automatically differentiate between:
Packages to synchronize: Already validated packages from upstream changes (deployed but not tested)
Packages to validate: Packages with changes introduced by the current PR (deployed and tested)
This automatic differentiation provides the speed benefits of fast feedback without requiring a separate mode.
Better Options Available:
Use --ref and --baseRef flags to specify exact comparison points
Use --releaseconfig to limit validation scope
Currently Deprecated Modes
Fast Feedback (--mode=fastfeedback) - Removed in favor of automatic synchronization logic
Fast Feedback Release Config (--mode=ff-release-config) - Use --releaseconfig with standard modes instead
Thorough Release Config (--mode=thorough-release-config) - Use --mode=thorough --releaseconfig instead
Note: The current validation intelligently handles synchronized vs. validated packages automatically when you provide --ref and --baseRef flags, achieving faster feedback without a separate mode.
Sequence of Activities
The following steps are orchestrated by the validate command:
Initial Setup
When using pools:
Fetch a scratch org from the provided pools in a sequential manner
Build packages that are changed by comparing the tags in your repo against the packages installed in the target
If --releaseconfig is provided, filter packages based on the release configuration
For each package to validate:
Thorough Mode (Default):
Deploy all the built packages as source packages / data packages (unlocked packages are installed as source packages)
Trigger Apex Tests if there are any apex tests in the package
Additional Options
Test Execution
By default, all apex tests are triggered in parallel with automated retry. Tests that fail due to SOQL locks or other transient issues are automatically retried synchronously. You can override this behavior:
--disableparalleltesting: Forces all tests to run synchronously
--skipTesting: Skip test execution entirely (use with caution)
Coverage is validated per class for source packages and per package for unlocked packages
Best Practice: Use "thorough" mode for comprehensive validation before merging to ensure all packages are properly tested and deployable. For faster feedback during development, consider using "individual" mode or filtering with release configs.
Skipping tests with --skipTesting bypasses critical quality checks. Only use this option in development environments or when you're certain the changes don't require test validation.
Thorough (Default)
Development Environment
In a Flxbl project powered by sfp, development follows a structured, iterative workflow designed for team collaboration and continuous delivery. This section guides you through the complete development lifecycle - from setting up your environment to submitting code for review.
Prerequisites
DevHub Access is Required for sfp development:
Building any type of package (source, unlocked, data)
Creating and managing scratch orgs
Resolving package dependencies
Ensure your Salesforce user has DevHub access by following .
The Development Flow
Development in an sfp project follows these key principles:
Isolated Environments: Each developer works in their own sandbox or scratch org
Source-Driven Development: All changes are tracked in version control
Iterative Cycles: Developers continuously pull, modify, and push changes
How Developers Work
Developers in an sfp project typically follow this pattern:
Starting a Sprint or Feature
Fetch a fresh environment from a pre-prepared pool
Scratch orgs: Can be fetched per story for maximum isolation
Sandboxes: Usually fetched at sprint start for longer-running work
Daily Development Cycle
Pull changes from the org to stay synchronized
Make modifications to metadata and code
Push changes back to the org for testing
Completing Work
Create a pull request with your changes
Automated validation runs via CI/CD pipeline
Review environment is created for acceptance testing
Environment Management
sfp provides powerful commands for environment management through pools:
Local Scratch Org Pools (Community Edition)
Pre-prepared scratch orgs managed locally via DevHub:
Server-Managed Pools (sfp-pro)
Centralized pool management for both scratch orgs and sandboxes:
This pooling approach means developers spend less time waiting for environment creation and more time coding.
Source Synchronization
The foundation of sfp development is bidirectional source synchronization:
Pull Command
Retrieves changes from your org to local source:
Automatically handles text replacement reversals
Detects conflicts and provides resolution options
Suggests new replacements for hardcoded values
Push Command
Deploys local changes to your org:
Applies environment-specific text replacements
Handles destructive changes automatically
Supports various test execution levels
What's Next?
For a complete walkthrough of the development workflow with detailed commands and examples:
For specific development tasks:
For managing environments:
CI/CD Integration
The project analysis command integrates seamlessly with various CI/CD platforms to provide automated code quality checks and visual feedback through GitHub Checks.
Automatic Detection
GitHub Actions (Default)
When running in GitHub Actions, everything works automatically because GitHub Actions provides built-in access to GitHub App tokens:
Note: The GITHUB_TOKEN provided by GitHub Actions has the necessary permissions to create checks. This is why it works automatically in GitHub Actions but requires special setup in other CI platforms (see below).
The command automatically:
✅ Detects it's running in a PR context
✅ Fetches changed files from the PR
✅ Creates GitHub Checks with results
Other CI Platforms
If you're using a CI platform other than GitHub Actions, you can still create GitHub Checks by setting the required environment variables.
Required Environment Variables
Variable
Required
Description
PR Event Data File
Create a JSON file at the path specified by GITHUB_EVENT_PATH:
Command Line Flags
For accurate diff detection, pass these flags:
Flag
Description
Authentication
Creating GitHub Checks requires a GitHub App installation token. Personal Access Tokens (PATs) cannot create checks.
Use sfp server to generate installation tokens:
Troubleshooting
No PR Context Detected
Solution: Verify GITHUB_ACTIONS=true and GITHUB_EVENT_NAME=pull_request are set.
Missing GitHub Context
Solution: Ensure GITHUB_REPOSITORY, GITHUB_SHA, and GITHUB_EVENT_PATH are set.
Authentication Failed
Solution: Set GITHUB_TOKEN environment variable with a valid token.
Wrong Line Counts
Solution: Provide correct --base-ref and --head-ref flags. In PR contexts, use the actual base/head SHAs, not just HEAD.
Duplicate Check
sfp-pro
sfp (community)
Availability
✅
❌
From
January 25
The duplicate check functionality helps identify duplicate metadata components across your Salesforce project. This analysis is crucial for maintaining clean code organization and preventing conflicts in your deployment process.
Overview
Duplicate checking scans your project's metadata components and identifies:
Components that exist in multiple packages
Components in aliasified packages
Components in unclaimed directories (not associated with a package)
How It Works
The duplicate checker:
Scans all specified directories for metadata components
Creates a unique identifier for each component based on type and name
Identifies components that appear in multiple locations
Configuration
Duplicate checking can be configured through several flags in the project:analyze command:
Key Configuration Options
Option
Description
Default
Understanding Results
The duplicate check provides three types of findings:
Direct Duplicates: Same component in multiple packages
Aliasified Components: Components in aliasified packages (typically expected)
Unclaimed Components: Components in directories (such as unpacakged or src/temp) not associated with packages
Sample Output
Understanding Indicators
The analysis uses several indicators to help you understand the results:
❌ Indicates a problematic duplicate that needs attention
⚠️ Indicates a duplicate that might be intentional (e.g., in aliasified packages)
(aliasified) Marks components in aliasified packages
Best Practices
Regular Scanning: Run duplicate checks regularly during development
Clean Package Structure: Keep each component in its appropriate package
Proper Package Configuration: Ensure all directories are properly claimed in sfdx-project.json
Common Scenarios and Solutions
1. Legitimate Duplicates
Some components may need to exist in multiple packages. In these cases:
Use aliasified packages when appropriate
Document the reason for duplication
Consider creating a shared package for common components
2. Unclaimed Directories
If you find components in unclaimed directories:
Add the directory to sfdx-project.json
Assign it to an appropriate package
Re-run the analysis to verify the fix
3. Aliasified Package Duplicates
Duplicates in aliasified packages are often intentional:
Used for environment-specific configurations
Different versions of components for different contexts
Not considered errors by default
Integration with CI/CD
Integration is limited only to GitHub at the monent, The command needs GITHUB_APP_PRIVATE_KEY and GITHUB_APP_ID to be set in an env variable for the results to be reported as a GitHub check
When integrating duplicate checking in your CI/CD pipeline:
Configure Failure Conditions:
Generate Reports:
Review Results:
Troubleshooting
False Positives
Verify package configurations in sfdx-project.json
Check if components should be in aliasified packages
Field History & Feed Tracking
Attribute
Type
Description
Package Types Applicable
enableFHT
boolean
Enable field history tracking for fields
unlocked
org dependent unlocked
enableFT
boolean
Enable Feed Tracking for fields
unlocked
org dependent unlocked
Salesforce has a strict limit on the number of fields that can be tracked. Of course, this limit can be increased by raising it to the Salesforce Account Executive (AE). However, it would be problematic if an unlocked package is deployed to orgs that do not have the limit increased. So don’t be surprised when you are working on a flxbl project and happen to find that the deployment of field history tracking from unlocked packages is disabled by Salesforce.
One workaround is to keep a copy of all the fields that need to be tracked in a separate source package (field-history-tracking or similar) and deploy it as one of the last packages with the ‘alwaysDeploy’ option.
However, this specific package has to be carefully aligned with the original source/unlocked packages, to which the fields originally belong. As the number of tracked fields increases in large projects, this package becomes larger and more difficult to maintain. In addition, since it’s often the case that the project does not own the metadata definition of fields from managed packages, it doesn’t make much sense to carry the metadata only for field history tracking purposes.
To resolve this, sfp features the ability to automate the deployment of field history tracking for both unlocked packaged and managed packages without having to maintain additional packages.
Two mechanisms are implemented to ensure that all the fields that need to be field history tracking enabled are properly deployed. Specifically, a YAML file that contains all the tracked fields is added to the package directory.
During deployment, the YAML file is examined and the fields to be set are stored in an internal representation inside the deployment artifact. Meanwhile, the components to be deployed are analyzed and the ones with ‘trackHistory’ on are added to the same artifact. This acts as a double assurance that any field that is missed in the YAML files due to human error will also be picked up. After the package installation, all the fields in the artifact are retrieved from the target org and, for those fields, the trackHistory is turned on before they are redeployed to the org.
In this way, the deployment of field history tracking is completely automated. One now has a declarative way of defining field history tracking (as well as feed tracking) without having to store the metadata in the repo. The only maintenance effort left for developers is to manage the YAML file.
State management for Flows
Attribute
Type
Description
Package Types Applicable
enableFlowActivation
boolean
Enable Flows automatically in Production
source
diff
unlocked
While installing a source/diff package, flows by default are deployed as 'Inactive' in the production org. One can deploy flow as 'Active' using the steps mentioned here, however, this requires the flow to meet test coverage requirement.
Also making a flow inactive, is convoluted, find the detailed article provided by
sfp has automation built in that attempts to align the status of a particular flow version as kept inside the package. It automatically activates the latest version of a Flow in the target org (assuming the package has the latest version). If an earlier version of package is deployed, it skips the activation.
At the same time, if the package contains a Flow with status Obsolete/InvalidDraft/Draft, all the versions of the flow would be rendered inactive.\
This feature is enabled by default, if you would like to disable the feature, set enableFlowActivation to false on your package descriptor
Use of multiple config file in build command
The configFile flag in the build command is used for features and settings of the scratch org used to validate your unlocked package. It is optional and if not passed in, it will assume the default one which is none.
Typically, all packages in the same repo share the same scratch org definition. Therefore, you pass in the definition that you are using to build your scratch org pool and use the same to build your unlocked package.
However, there is an option to use multiple definitions.
For example, if you have two packages, package 1 is dependent on SharedActivities, and package 2 is not. You would pass a scratch org definition file to package 1 via scratchOrgDefFilePaths in sfdx-project. Package 2 would be using. the default definitionFile.
Reconciling Profiles
Attribute
Type
Description
Package Types Applicable
reconcileProfiles
boolean
Reconcile profiles to only apply permissions to objects, fields and features that are present in the target org.
source
diff
In order to prevent deployment errors to target Salesforce Orgs, enabling reconcileProfiles totrue ensures and extra steps are taken to ensure the profile metadata is cleansed of any missing attributes prior to deployment.
During the reconcilement process, you can provide the follow flags to the command:
Folder - path to the folder which contains the profiles to be reconciled, if project contain multiple package directories, please provide a comma separated list, if
Profile List - list of profiles to be reconciled. If omitted, all the profiles components will be reconciled.
Source Only - set this flag to reconcile profiles only against component available in the project only. Configure ignored permissions in sfdx-project.json file in the array
For more details on thesfp profile reconcile command, .
For more a more detailed understanding of the ProfileReconcile library, visit the GitHub repository "" for details of on the .
Updating Picklist
Attribute
Type
Description
Package Types Applicable
enablePicklist
boolean
Enable picklist upgrade for unlocked packages
unlocked
org dependent unlocked
Salesforce inherently does not support the deployment of picklist values as part of unlocked package upgrades. This limitation has led to the need for workarounds, traditionally solved by either replicating the picklist in the source package or manually adding the changes in the target organization. Both approaches add a burden of extra maintenance work. This issue has been documented and recognised as a known problem, which can be reviewed in detail here.
To ensure picklist consistency between local environments and the target Salesforce org, the following pre-deployment steps outline the process for managing picklists within unlocked packages:
Retrieval and Comparison: Initially, picklists defined within the packages marked for deployment will be retrieved from the target org. These retrieved values are then compared with the local versions of the picklists.
Update on Change Detection: Should any discrepancies be identified between the local and retrieved picklists, the differing values will be updated in the target org using the Salesforce Tooling API.
Handling New Picklists: During the retrieval phase, picklists that are present locally but absent in the target org are identified as newly created. These new picklists are deployed using the standard deployment process, as Salesforce permits the deployment of new picklists from unlocked packages.
Controlling Aspects of Installation
Skip artifacts if they are already installed
// Command to deploy set of artifacts to devhub
sfp install -u devhub --artifactdir artifacts --skipifalreadyinstalled
By using the skipifalreadyinstalled option with the deploy command, you can prevent the reinstallation of an artifact that is already present in the target organization.
Install artifacts to an org baselined on an another org
The --baselineorg parameter allows you to specify the alias or username of an org against which to check whether the incoming package versions have already been installed and form a deployment plan.This overrides the default behaviour which is to compare against the deployment target org. This is an optional feature which allows to ensure each org's are updated with the same installation across every org's in the path to production.
This guide helps organizations set up automated synchronization of sfp pro images from Flxbl's registry to their own container registry, with optional customization capabilities
Why Synchronize to Your Registry?
While you can pull directly from source.flxbl.io, maintaining your own synchronized copy provides:
Unlocked Packages
Unlocked/Org Dependent Unlocked Packages
There is a huge amount of documentation on unlocked packages. Here are list of curated links that can help you get started on learning more about unlocked package
The Basics
Expand Dependencies
sfp-pro
sfp (community)
The sfp dependency:expand command enriches your project's dependency declarations by automatically adding all transitive dependencies to your sfdx-project.json. This ensures that each package explicitly declares all its dependencies, both direct and indirect, making the dependency graph complete and explicit.
An array of regular expression used to identify work items in your commit messages
releasedefinitionProperties.changelog.workitemUrl
No
Prop
The generic URL of work items, to which to append work item codes. Allows easy redirection to user stories by clicking on the work-item link in the changelog.
releasedefinitionProperties.changelog.limit
No
Prop
Limit the number of releases to display in the changelog markdown
Destination Folder - the destination folder for reconciled profiles, if omitted existing profiles will be reconciled and will be rewritten in the current location
Picklist Enabled Package Identification: Throughout the build process, the sfp cli examines the contents of each unlocked package artifact. A package is marked as 'picklist enabled' if it contains one or more picklist(s).
// Command to deploy with baseline
sfp install -u qa \
--artifactdir artifacts \
--skipifalreadyinstalled --baselineorg devhub
Centralized version control across all teams
Reduced external dependencies during CI/CD runs
Ability to add organization-specific customizations
Improved pull performance from your own registry
Compliance with internal security policies
Setting Up Automated Synchronization
Step 1: Create a Dedicated Repository
Create a GitHub repository in your organization specifically for Docker image management (e.g., docker-images or sfp-docker).
Step 2: Configure Repository Secrets
Add the following secrets to your repository (Settings → Secrets and variables → Actions):
Secret Name
Description
Value
GITEA_USER
Your Gitea username
From your welcome email
GITEA_PAT
Personal Access Token for Gitea
Generate at source.flxbl.io (Settings → Applications → Personal Access Tokens) with read:package permission
Step 3: Create Synchronization Workflow
Create .github/workflows/sync-sfp-pro.yml in your repository:
Creating Custom Images
If you need to add organization-specific tools or configurations, create a Dockerfile:
For base sfp-pro-lite (without SF CLI):
For sfp-pro with SF CLI:
Then modify the workflow to build and push your custom image:
Using Synchronized Images in Your Pipelines
Update your project workflows to use images from your registry:
GitHub Actions:
GitLab CI:
Azure DevOps:
Verification
After running the workflow, verify the synchronization:
Troubleshooting
Authentication Issues
If you encounter authentication errors:
Verify your PAT has read:package permission
Check that secrets are correctly set in repository settings
Ensure your Gitea username is correct
Image Not Found
If the source image cannot be pulled:
Check the version exists at https://source.flxbl.io/flxbl/-/packages/container/sfp-pro/
Verify your network can reach source.flxbl.io
Confirm your credentials are valid
Push Failures to GitHub Container Registry
Ensure the workflow has packages: write permission
Verify the repository name in IMAGE_PREFIX is correct
Check GitHub Packages settings for your repository
What It Does
When you run sfp dependency:expand, it:
Analyzes all packages in your project to identify their direct dependencies
Resolves transitive dependencies by recursively finding dependencies of dependencies
Updates each package to include both direct and transitive dependencies
Maintains proper ordering ensuring dependencies are listed in topological order
Preserves external dependencies defined in your project configuration
Why Use Expand
Expanding dependencies is useful for:
Explicit dependency management: Makes all dependencies visible in the project configuration
Build optimization: Helps build tools understand the complete dependency graph
Troubleshooting: Easier to identify dependency-related issues when all dependencies are explicit
CI/CD pipelines: Ensures all required dependencies are known upfront
Usage
Flags
Flag
Description
Required
-o, --overwrite
Overwrites the existing sfdx-project.json file with the expanded configuration
Without --overwrite, creates a new file at ./project-config/sfdx-project.exp.json
With --overwrite, backs up existing sfdx-project.json to ./project-config/sfdx-project.json.bak and overwrites the original
Adds all transitive dependencies to each package's dependency list
Maintains topological ordering of dependencies
Handles version conflicts by selecting the highest version required
Example: Before and After
Before Expansion
After Expansion
Relationship with Shrink
The expand and shrink commands are complementary:
Expand: Adds all transitive dependencies, making them explicit
Shrink: Removes redundant transitive dependencies, keeping only direct ones
Typical workflow:
Use expand during development to understand full dependency graphs
Use shrink before committing to maintain clean, minimal dependency declarations
Version Conflict Resolution
When multiple packages require different versions of the same dependency, expand automatically selects the highest version that satisfies all requirements. For example:
Occasionally you might need to assign a permission set for the deployment user to successfully install the package, run apex tests or functional tests, sfp provides you an easy mechanism to assign permission set either before installation or after installation of an artifact.
assignPermSetsPreDeployment assumes the permission sets are already deployed on the target org and proceed to assign these permission sets to the user
assignPermSetsPostDeployment can be used to assign permission sets that are introduced by the artifact to the target org for any aspects of testing or any other automation usage
assignPermSetsPreDeployment
array
Apply permsets before installing an artifact to the deployment user
unlocked
org-dependent unlocked
source
diff
assignPermSetsPostDeployment
array
Apply permsets after installing an artifact to the deployment user
# Fetch a scratch org for your feature (aliases: pool:fetch)
sfp pool scratch fetch --tag dev-pool --alias my-feature \
--targetdevhubusername mydevhub
# Fetch an org instance from the server pool
sfp server pool instance fetch \
--repository myorg/myrepo \
--tag dev-pool \
--assignment-id feature-123
# The same command works for both scratch orgs and sandboxes
# Pool type is configured at the server level
# List available images in your registry
docker search ghcr.io/your-org/docker-images
# Pull and test the synchronized image
docker pull ghcr.io/your-org/docker-images/sfp-pro:latest
docker run --rm ghcr.io/your-org/docker-images/sfp-pro:latest sfp --version
# Create an expanded version of the project configuration
sfp dependency:expand
# Overwrite the existing sfdx-project.json with expanded dependencies
sfp dependency:expand --overwrite
The following sections deals with more of the operational aspects when dealing with unlocked packages
Unlocked Package and Test Coverage
Unlocked Packages, excluding Org-Dependent unlocked packages have mandatory test coverage requirements. Each package should have minimum of 75% coverage requirement. A validated build (or build command in sfp) validates the coverage of package during the build phase. To enable the feedback earlier in the process, sfp provide you functionality to validate test coverage of a package such as during the Pull Request Validation process.
Managing Version Numbers of Unlocked Package
For unlocked packages, we ask users to follow a semantic versioning of packages.
Please note Salesforce packages do not support the concept of PreRelease/BuildMetadata. The last segment of a version number is a build number. We recommend to utilize the auto increment functionality provided by Salesforce rather than rolling out your own build number substitution ( Use 'NEXT' while describing the build version of the package and 'LATEST' to the build number where the package is used as a dependency)
Note that an unlocked package must be promoted before it can be installed to a production org, and either the major, minor or patch (not build) version must be higher than the last version of this package which was promoted. These version number changes should be made in the sfdx-project.json file before the final package build and promotion.
Deprecating Components from an Unlocked Package
Unlocked packages provide traceability in the org by locking down the metadata components to the package that introduces it. This feature which is the main benefit of unlocked package can also create issues when you want to refactor components from one package to another. Let's look at some scenarios and common strategies that need to be applied
For a project that has two packages.
Package A and Package B
Package B is dependent on Package A.
Scenario 1:
Remove a component from Package A, provided the component has no dependency
Solution: Create a new version of Package A with the metadata component being removed and install the package.
Scenario 2:
Move a metadata component from Package A to Package B
Solution: This scenario is pretty straight forward, one can remove the metadata component from Package A and move that to Package B. When a new version of Package A gets installed, the following things happen:
If the deployment of the unlocked package is set to mixed, and no other metadata component is dependent on the component, the component gets .
On the subsequent install of Package B, Package B restores the field and takes ownership of the component.
Scenario 3:
Move a metadata component from Package B to Package A, where the component currently has other dependencies in Package B
Solution: In this scenario, one can move the component to Package A and get the packages built. However during deployment to an org, Package A will fail with an error this component exists in Package B. To mitigate this one should do the following:
Deploy a version of Package B which removes the lock on the metadata component using deprecate mode. Some times this needs extensive refactoring to other components to break the dependencies. So evaluate whether the approach will work.
If not, you can go to the UI (Setup > Packaging > Installed Packages > <Name of Package> > View Components and Remove) and remove the lock for a package.
Managing Package Dependencies
Package dependencies are defined in the sfdx-project.json. More information on defining package dependencies can be found in the Salesforce docs.
Let's unpack the concepts utilizing the above example:
There are two unlocked packages
Expense Manager - Util is an unlocked package in your DevHub, identifiable by 0H in the packageAlias
Expense Manager - another unlocked package which is dependent on ' Expense Manager - Util', 'TriggerFramework' and 'External Apex Library - 1.0.0.4'
External Apex Library is an external dependency, it could be a managed package or any unlocked package released on a different Dev Hub. All external package dependencies must be defined with a 04t ID, which can be determined from the installation URL from AppExchange or by contacting your vendor.
Build Options with Unlocked Packages
Unlocked packages have two build modes, one with skip dependency check and one without. A package being built without skipping dependency check cant be deployed into production and can usually take a long time to build. sfp cli tries to build packages in parallel understanding your dependency, however some of your packages could spend a significant time in validation.
During these situations, we ask you to consider whether the time taken to build all validated packages on an average is within your build budget, If not, here are your options
Move to org dependent package: Org-dependent unlocked packages are a variant of unlocked packages. Org-dependent packages do not validate the dependencies of a package and will be faster. However please note that all the org's where the earlier unlocked package was installed, had to be deprecated and the component locks removed, before the new org-dependent unlocked package is installed.
Move to source-package: Use it as the least resort, source packages have a fairly loose lifecycle management.
Handling metadata that is not supported by unlocked packages
Create a source package and move the metadata and any associated dependencies over to that particular package.
Aliasified packages are available only for Source Package
Aliasify enables deployment of a subfolder in a source package that matches the target org. For example, you have a source package as listed below. \
During Installation, only the metadata contents of the folder that matches the alias gets deployed. If the alias is not found, sfp will fallback to the 'default' folder. If the default folder is not found, an error will be displayed saying default folder or alias is missing.\
Default folder are only deployed to sandboxes
When to Use Aliasfy Packages vs String Replacements
Both aliasfy packages and string replacements provide environment-specific deployments, but serve different purposes:
Use Aliasfy Packages When:
You have structural metadata differences between environments (different fields, objects, workflows, or permissions)
You need completely different files per environment (e.g., different page layouts, record types)
The entire metadata component varies by environment
Only configuration values differ between environments (endpoints, emails, feature flags)
You want to avoid duplicating entire files just to change a few values
You need to maintain single source of truth for business logic
You're dealing with code-based metadata (Apex, LWC, Aura) with environment-specific values
Combine Both When:
Large packages need both structural differences AND configuration value changes
Different teams manage different aspects of environment-specific configurations
You're gradually migrating from full file duplication to value-based replacements
Example Comparison
Aliasfy Approach - Different permission sets per environment:
String Replacements Approach - Same code, different values:
String replacements complement aliasfy packages - use them together for complete environment management
aliasfy
boolean
Enable deployment of contents of a folder that matches the alias of the environment
source
Files to be maintained to enable field history tracking deployment before the Jan 23 Release
Sample history-tracking.yml
Files to be maintained to enable field history tracking deployment after the Jan 23 Release.
(Needs to be kept in 'postDeploy' folder)
Validation Scripts
sfp-pro
sfp (community)
Availability
✅
✅
From
Aug 25 - 02
December 25
Validation scripts allow you to execute custom logic at specific points during the validation process. These global-level scripts provide hooks for setup, cleanup, reporting, and integration with external systems during validation workflows.
Send notifications to Slack, Teams, or other systems
Generate custom reports or metrics
Push Changes to your org
sfp-pro
sfp (community)
Availability
✅
❌
From
August 24
The sfp project:push command deploys source from your local project to a specified Salesforce org. It can push changes based on a package, domain, or specific source path. This command is useful for deploying local changes to your Salesforce org.
Usage
Flags
Flag
Description
Required
Flag Details
The -p, -d, and -s flags are mutually exclusive. Use only one to specify the scope of the push operation.
--ignore-conflicts: Use this flag to override conflicts and push changes to the org, potentially overwriting org metadata.
Source Tracking
Source tracking is a feature that keeps track of the changes made to metadata both in your local project and in the org. When source tracking is enabled, the project:push command can more efficiently deploy only the changes made locally since the last sync, rather than deploying all metadata.
How Source Tracking Works with project:push
When pushing to a source-tracked org without specifying a package, domain, or source path, the command will use source tracking to deploy only the local changes.
For non-source-tracked orgs or when a specific scope is provided (via -p, -d, or -s flags), the command will deploy all metadata within the specified scope.
Limitations
Source tracking is not available for all org types. It's primarily used with scratch orgs and some sandbox orgs.
If source tracking is not enabled or supported, the project:push command will fall back to deploying all metadata within the specified scope.
Text Replacements (Pro Feature)
Availability: String replacements are available from September 2025 in sfp-pro only.
The push command automatically applies text replacements to convert placeholder values in your source files to environment-specific values before deployment. This feature helps manage environment-specific configurations without modifying source files.
For detailed information about string replacements, see .
Quick Example
If your source contains placeholders:
During push to a dev org, it becomes:
To skip replacements:
Examples
Push changes using source tracking (if available):
Push changes for a specific package:
Push changes for a specific domain:
Push changes from a specific source path:
Push changes and ignore conflicts:
JSON Output
When --json is specified, the command outputs a JSON object with the following structure:
The replacements field (available in sfp-pro) provides detailed information about text replacements applied during the push operation.
Error Handling
If an error occurs during the push operation, the command will throw an error with details about what went wrong. Use the --json flag to get structured error information in the output.
Optimized Installation
Attribute
Type
Description
Package Types Applicable
isOptimizedDeployment
boolean
Detects test classes in a source package automatically and utilise it to deploy the provided package
source
diff
sfp cli optimally deploys artifacts to the target organisation by reducing the time spent on running Apex tests where possible. This section explains how this optimisation works for different package types.
Package Type
Apex Test Execution during installation
Coverage Requirement
To ensure salesforce deployment requirements for source packages, each Apex class within the source package must achieve a minimum of 75% test coverage. This coverage must be verified individually for each class. It's imperative that the test classes responsible for this coverage are included within the same package.
During the artifact preparation phase, sfp cli will automatically identify Apex test classes included within the package. These identified test classes will then be utilised at the time of installation to verify that the test coverage requirement is met for each Apex class, ensuring compliance with Salesforce's deployment standards.
When there are circumstances, where individual coverage cannot be achieved by the apex classes within a package, one can disable 'optimized deployment' feature by using the attribute mentioned below.
This option is only applicable to source/diff packages. Disabling this option will trigger the entire local tests in the org and can lead to considerable delays
Pre/Post Deployment Script
Attribute
Type
Description
Package Types Applicable
preDeploymentScript
string
Run an executable script before deploying an artifact. Users need to provide a path to the script file
unlocked
org-dependent unlocked
source
postDeploymentScript
string
Run an executable script after deploying an package. Users need to provide a path to the script file
unlocked
org-dependent unlocked
source
In some situations, you might need to execute a pre/post deployment script to do manipulate the data before or after being deployed to the org. sfp allow you to provide a path to a shell script (Mac/Unix) / batch script (on Windows).
The scripts are called with the following parameters. In your script you can refer to the parameters using
Please note scripts are copied into the and are not executed from version control. sfpowerscripts only copies the script mentioned by this parameter and do not copy any additional files or dependencies. Please ensure pre/post deployment scripts are independent or should be able to download its dependencies
Position
Value
Please note the script has to be completely independent and should not have dependency on a file in the version control, as scripts are executed within the context of an artifact.
Entitlement Deployment Helper
Have you ever encountered this error when deploying an updated Entitlement Process to your org?
Deployment Issue with Entitlement Process in Salesforce
It's important to note that Salesforce prevents the deployment of an Entitlement Process that is currently in use, irrespective of its activation status in the org. This limitation holds true even for inactive processes, potentially impacting deployment strategies.
To create a new version of an Entitlement Process, navigate to the Entitlement Process Detail page in Salesforce and perform the creation. If you then use sf cli to retrieve this new version and attempt to deploy it into another org, you're likely to encounter errors. Deploying it as a new version can bypass these issues, but this requires enabling versioning in the target org first.
The culprit behind this is an attribute in the Entitlement Process metadata file: versionMaster.
According to the Salesforce documentation, versionMaster ‘identifies the sequence of versions to which this entitlement process belongs and it can be any value as long as it is identical among all versions of the entitlement process.’ An important factor here about versionMaster is: versionMaster is org specific. When you deploy a completely new Entitlement Process to an org with a randomly defined versionMaster, Salesforce will generate an ID for the Entitlement Process and map it to this specific versionMaster.
Deploying updated Entitlement Processes from one Salesforce org to another can often lead to deployment errors due to discrepancies in the versionMaster attribute, sfp's enitlement helper enables you to automatically align the versionMaster by pulling its value from the target org and updating the deploying metadata file accordingly. This ensures that your deployment process is consistent and error-free.
Enable Versioning: First and foremost, activate versioning in the target org to manage various versions of the Entitlement Process.
Create or Retrieve Metadata File:
Create a new version of the Entitlement Process as a metadata file, which can be done via the Salesforce UI and retrieved with the Salesforce CLI (sf cli).
Automation around entitlement filter can be disabled globally by using these attributes in your sfdx-project.json
String Replacements During Install
sfp-pro
sfp (community)
Availability
✅
❌
From
September 2025
During artifact installation, sfp automatically applies string replacements to convert placeholder values to environment-specific values based on the target org.
How It Works
When installing artifacts with embedded replacement configurations:
Org Detection: Identifies the target org alias and whether it's a sandbox or production org
Value Resolution: Determines the appropriate replacement value based on org alias or defaults
File Modification: Applies replacements to matching files before deployment
Environment Resolution
Replacements are resolved in this order:
Exact alias match: If the org alias matches a configured environment
Default value: For sandbox/scratch orgs when no exact match is found
Error: For production orgs without explicit configuration
Installation Output
During installation with replacements, you'll see:
Command Line Options
Disable Replacements
To skip replacements during installation:
Override Replacements
To use a custom replacement configuration file:
Production Deployments
Production deployments require explicit configuration for the org alias. If no configuration is found, the installation will fail:
Troubleshooting
No Replacements Applied
Verify the artifact was built with replacements embedded
Check that glob patterns match your files
Ensure the org alias has configured values
Wrong Values Applied
Verify org alias with sf org list
Check environment resolution order
Ensure production orgs have explicit configuration
Related Documentation
Source Packages
sfp-pro
sfp (community)
Source Packages is an sfp feature that provides a flexible alternative to native unlocked packages for metadata deployment and organization.
Pull Changes from your org
sfp-pro
sfp (community)
The sfp project:pull command retrieves source from a Salesforce org and updates your local project files. It can pull changes based on a package, domain, or specific source path. This command is useful for synchronizing your local project with the latest changes in your Salesforce org.
// Single file with placeholders
public class IntegrationService {
private static final String ENDPOINT = '%%API_ENDPOINT%%';
private static final String API_KEY = '%%API_KEY%%';
}
--no-replacements: Disables automatic text replacements. By default, sfp applies configured replacements from preDeploy/replacements.yml.
--replacementsoverride: Specify a custom YAML file containing replacement configurations to use instead of the default.
--json: When specified, the command outputs a structured JSON object with detailed information about the push operation, including replacement details.
Source tracking provides faster and more efficient deployment of changes, especially in large projects.
Source Packages are metadata deployments from a Salesforce perspective - they are groups of components that are deployed to an org as a unit. Unlike Unlocked packages which are First Class Salesforce deployment constructs with lifecycle governance (versioning, component locking, automated dependency validation), source packages provide more flexibility at the cost of some safety guarantees.
When to Use Source Packages
While we generally recommend using unlocked packages over source packages for production code, source packages excel in several scenarios:
Ideal Use Cases
Application Configuration: Configuring applications delivered by managed packages (e.g., changes to help text, field descriptions)
Org-Specific Metadata: Global or org-specific components (queues, profiles, permission sets, custom settings)
Environment-Specific Configuration: Components that vary significantly across environments
Composite UI Layouts: Complex UI configurations that don't package well
Rapid Development: When iteration speed is more important than package versioning
Large Monolithic Applications: When breaking into unlocked packages is not feasible
Starting Package Development: Teams beginning their journey to package-based development
Source packages fully support destructive changes through dedicated folders:
pre-destructive/: Components deleted before deployment
post-destructive/: Components deleted after deployment
Destructive changes are automatically detected and processed during package installation.
Apex Testing Behaviour
Source packages have the following test execution control:
Development/Sandbox: Tests skipped by default for faster iterations
Production: Tests always run & coverage validated (Salesforce requirement)
Override Options:
sfp install --runtests: Force test execution while installing a package to a sandbox
Package-level skipTesting in sfdx-project.json (ignored in production, in production tests are always executed and each individual class needs to have a coverage of 75% or more)
This provides significant performance improvements during development while maintaining production safety.
Dependency Management
Source packages can depend on other unlocked packages or managed packages. Dependencies are validated at deployment time, meaning the dependent metadata must already exist in the target org.
For development in scratch orgs, you can add dependencies to enable automatic installation:
sfp commands like prepare and validate will automatically install dependencies before deploying the source package.
Best Practices
Use unlocked packages for shared libraries that need version control and component protection
Use source packages for environment-specific configuration and org-specific metadata
Organize large source packages into logical domains for better maintainability
Leverage aliasified packages for structural differences between environments
Use text replacements for configuration values that change across environments
Document destructive changes clearly in your release notes
Test in lower environments before production deployment
Consider org-dependent unlocked packages as a middle ground when validation time is a concern
Migration Paths
From Unpackaged Metadata
Identify logical groupings of metadata
Create source package entries in sfdx-project.json
Move metadata into package directories
Define dependencies between packages
Test deployment order
To Unlocked Packages
Start with source packages to organize metadata
Identify stable components suitable for packaging
Gradually convert source packages to unlocked packages
Keep environment-specific components as source packages
Availability
✅
✅
String replacements are available only for Source Packages and require sfp-pro (available from September 2025)
String replacements enable automatic substitution of placeholder values with environment-specific values during package installation, similar to how aliasfy packages work with folder structures.
How It Works
During build, when a package contains a preDeploy/replacements.yml file:
The configuration is analyzed and validated
The replacement patterns are embedded in the artifact
During installation, placeholders are replaced based on the target org
For example, if you have placeholders like %%API_ENDPOINT%% in your code, they get replaced with the appropriate value for the target environment during installation.
Configuration
Place your replacements.yml file in the package's preDeploy directory:
The replacement configuration will be automatically detected and processed during build.
Package Type Requirements
String replacements are only supported for source packages. If you attempt to use replacements with other package types (unlocked, org-dependent unlocked, or data), the build will fail with an error message indicating that you must either remove the replacements.yml file or change the package type to 'source'.
Example Configuration
The replacements.yml file in the preDeploy folder is automatically detected and processed during build.
When to Use String Replacements vs Aliasfy Packages
String replacements and aliasfy packages are complementary features for managing environment-specific configurations:
Use String Replacements For:
Configuration values that change between environments (API endpoints, email addresses, feature flags)
Reducing duplication when only specific values differ in otherwise identical files
Maintaining single source for business logic while varying configuration
Code-based metadata (Apex classes, Lightning components) with environment-specific values
Use Aliasfy Packages For:
Structural differences between environments (different fields, objects, workflows)
Completely different metadata per environment (unique page layouts, permission sets)
Declarative configurations that vary significantly by environment
Binary metadata that cannot be text-replaced (images, static resources)
Migration Strategy
If you're currently using aliasfy packages with duplicated files just for value changes, consider migrating to string replacements:
Identify candidates: Find files duplicated solely for configuration value changes
Consolidate files: Create single source file with placeholder patterns
// A script to enable email deliverablity to All
#!/bin/bash
export SF_DISABLE_DNS_CHECK=true
# Create a temporary file
temp_file="$(mktemp)"
# Write the anonymous Apex code to the temp file
cat << EOT >> "$temp_file"
{
"$schema": "https://raw.githubusercontent.com/amtrack/sfdx-browserforce-plugin/master/src/plugins/schema.json",
"settings": {
"emailDeliverability": {
"accessLevel": "All email"
}
}
}
EOT
if [ "$3" = 'ci' ]; then
# Execute the browserforce configuration to this org
sf browserforce:apply -f "$temp_file" --target-org $3
fi
# Clean up by removing the temporary file
rm "$temp_file"
Text replacements for org alias dev (sandbox)
Total replacement configs 3
Modified APIService.cls with 2 replacements
Modified ConfigService.cls with 1 replacements
Replacements summary: 3 replacements in 2 files using dev environment
sfp install --targetorg dev --artifactdir artifacts --no-replacements
sfp install --targetorg dev --artifactdir artifacts --replacementsoverride custom-replacements.yml
ERROR: No replacement value found for production org with alias 'prod'
Production deployment requires explicit configuration for alias 'prod' in replacement 'API Endpoint'
API Name: Validate that the API name within the metadata file accurately reflects the new version.
Version Number: Update the versionNumber in your metadata file to represent the new version clearly.
Default Version: Confirm that only one version of the Entitlement Process is set as Default to avoid deployment conflicts.
Source Tracking
Source tracking is a feature in Salesforce development that keeps track of the changes made to metadata both in your local project and in the org. When source tracking is enabled, the project:pull command can more efficiently retrieve only the changes made in the org since the last sync, rather than retrieving all metadata.
How Source Tracking Works
Source tracking maintains a history of changes in both your local project and the Salesforce org.
It allows sfp to determine which components have been added, modified, or deleted since the last synchronization.
This feature is automatically enabled for scratch orgs and can be enabled for non-scratch orgs that support it.
Source Tracking and project:pull
When pulling from a source-tracked org without specifying a package, domain, or source path, the command will use source tracking to retrieve only the changes made in the org.
For non-source-tracked orgs or when a specific scope is provided (via -p, -d, or -s flags), the command will retrieve all metadata within the specified scope.
Source tracking provides faster and more efficient retrieval of changes, especially in large projects.
Limitations
Source tracking is not available for all org types. It's primarily used with scratch orgs and some sandbox orgs.
If source tracking is not enabled or supported, the project:pull command will fall back to retrieving all metadata within the specified scope.
Usage
Flags
Flag
Description
Required
-o, --targetusername
Username or alias of the target org
Yes
-p, --package
Name of the package to pull
No
-d, --domain
Name of the domain to pull
No
-s, --source-path
Path to the local source files to pull
No
Flag Details
The -p, -d, and -s flags are mutually exclusive. Use only one to specify the scope of the pull operation.
--ignore-conflicts: Use this flag to override conflicts and pull changes from the org, potentially overwriting local changes.
--retrieve-path: Specifies a custom location for the retrieved source files.
--no-replacements: Disables automatic text replacements. By default, sfp applies reverse replacements to convert environment-specific values back to placeholders.
--replacementsoverride: Specify a custom YAML file containing replacement configurations to use instead of the default.
--json: When specified, the command outputs a structured JSON object with detailed information about the pull operation, including replacement details and pattern suggestions.
Examples
Pull changes using source tracking (if available):
Pull changes for a specific package:
Pull changes for a specific domain:
Pull changes from a specific source path:
Pull changes and ignore conflicts:
Pull changes without applying reverse replacements:
Pull changes with custom replacement configuration:
Text Replacements (Pro Feature)
Availability: String replacements are available from September 2025 in sfp-pro only.
The pull command automatically applies reverse text replacements to convert environment-specific values back to placeholders when retrieving source from the org. This feature helps maintain clean, environment-agnostic code in your repository.
For detailed information about string replacements, see String Replacements.
How Reverse Replacements Work
When you pull changes from an org, sfp automatically:
Detects known values: Identifies environment-specific values that match your replacement configurations
Converts to placeholders: Replaces these values with their placeholder equivalents
Suggests new patterns: Detects potential patterns that could be added to your replacements
Quick Example
If your org contains:
After pulling, it becomes:
Pattern Detection
During pull operations, sfp analyzes retrieved code for patterns that might benefit from replacements:
To skip reverse replacements:
JSON Output
When --json is specified, the command outputs a JSON object with the following structure:
The replacements field (available in sfp-pro) provides detailed information about reverse text replacements applied during the pull operation, including any pattern suggestions detected.
Error Handling
If an error occurs during the pull operation, the command will throw an error with details about what went wrong. Use the --json flag to get structured error information in the output.
Availability
✅
❌
From
August 24
Aliasfy Packages - Merge Mode
Attribute
Type
Description
Package Types Applicable
mergeMode
boolean
Enable deployment of contents of a folder that matches the alias of the environment using merge
source
sfp-pro
sfp (community)
mergeMode adds an additional mode for deploying aliasified packages with content inheritance. During package build, the default folder's content is merged with subfolders that matches the org with alias name, along with subfolders able to override inherited content. This reduces metadata duplication while using aliasifed packages.\
Note in the image above that the AccountNumberDefault__c field is replicated in each deployment directory that matches the alias.
The default folder is deployed to any type of environment, including production unlike when only used with aliasfy mode
The table below describes the behavior of each command when merge mode is enabled/disabled.
Merge Mode
Default available?
Build
Install
Push
Pull
When merge mode is enabled, it also supports push/pull commands, the default subfolder is always used during this process, make sure it is not force ignored.
Before merge mode, the whole package was "force ignored." With merge mode, you have the option to allow push/pull from aliasfy packages by not ignoring the default subfolder.
Non-merge mode
Merge Mode
AI Assisted Architecture Analysis
sfp-pro
sfp (community)
The AI-powered review functionality provides intelligent architecture and code quality analysis during pull request reviews. This feature automatically analyzes changed files using advanced language models to provide contextual insights about architectural patterns, Flxbl framework compliance, and potential improvements.
Creating a package
All packages start out as directory in your repo!
A package is a collection of metadata grouped together in a directory, and defined by an entry in your sfdx-project.json (Project Manifest).
Each package in sfp must have the following attributes as the minimum:
private static final String API_URL = 'https://api-dev.example.com';
private static final String API_URL = '%%API_ENDPOINT%%';
⚠️ Potential replacements detected:
📄 force-app/main/default/classes/APIService.cls:
• URL detected: 'https://new-api.example.com/v2'
New URL pattern detected. Consider adding to replacements.yml
💡 To include these values in future replacements, update your replacements.yml file.
📐 Architecture Analysis Results
════════════════════════════════
✅ Analysis Complete (AI-powered by anthropic/claude-sonnet-4-5-20250929)
## Summary
Analyzed 5 changed files focusing on architectural patterns and Flxbl compliance.
## Key Insights
### ⚠️ Service Layer Pattern (Warning)
File: src/classes/AccountController.cls
Description: Direct SOQL queries in controller violates service layer pattern.
Consider moving data access logic to a dedicated service class.
### ℹ️ Dependency Management (Info)
File: src/classes/OrderService.cls
Description: Good use of dependency injection pattern for testability.
This aligns well with Flxbl framework principles.
### ⚠️ Error Handling (Concern)
File: src/classes/PaymentProcessor.cls:45
Description: Missing comprehensive error handling for external callouts.
Implement try-catch blocks with proper logging and user feedback.
## Recommendations
1. Extract data access logic to service layer classes
2. Implement centralized error handling strategy
3. Consider adding unit tests for new service methods
4. Document architectural decisions in ARCHITECTURE.md
- name: Run Project Analysis with AI Linter
run: |
sfp project:analyze --output-format github
env:
ANTHROPIC_API_KEY: ${{ secrets.ANTHROPIC_API_KEY }}
# GitHub context automatically detected
focusAreas:
- security # For compliance-critical projects
- performance # For high-volume applications
- maintainability # For long-term projects
Package Types - Learn more about different package types
path
yes
Path to the directory that contains the contents of the package
package
yes
String Replacements
sfp-pro
sfp (community)
Availability
✅
❌
From
September 2025
String replacements provide a mechanism to manage environment-specific values in your Salesforce code without modifying source files. This feature automatically replaces placeholders with appropriate values during build, install, and push operations, and converts values back to placeholders during pull operations.
String replacements complement the existing feature. While aliasfy packages handle structural metadata differences by deploying different files per environment, string replacements handle configuration value differences within the same files, reducing duplication and maintenance overhead.
How It Works
String replacements work across multiple sfp commands:
Build Operations: During sfp build, replacement configurations are analyzed and embedded in the artifact for later use during installation.
Install/Deploy Operations: During sfp install or sfp deploy, placeholders are replaced with environment-specific values based on the target org:
Push Operations: During sfp push, placeholders in your source files are replaced with environment-specific values before deployment:
Pull Operations: During sfp pull, environment-specific values are converted back to placeholders:
Configuration
Replacements are configured in a replacements.yml file within each package's preDeploy directory:
Example configuration:
The properties accepted by the configuration file are:
Field
Required
Description
Example Usage
API Configuration Example
Source file with placeholders:
After pushing to a dev org, the placeholders are replaced:
Pattern Detection
During pull operations, sfp automatically detects potential patterns that could be converted to replacements:
URLs: Detects HTTP/HTTPS URLs
Email Addresses: Identifies email patterns
API Keys: Recognizes common API key formats
When patterns are detected, sfp provides suggestions:
Environment Resolution
Replacements are resolved based on the target org:
Exact Alias Match: First checks for an exact match with the org alias
Sandbox Default: For sandbox/scratch orgs, uses the default value
Production Requirement: Production deployments require explicit configuration
Org Alias Mapping
The org alias is determined from your Salesforce CLI authentication:
Command Support
String replacements are supported across the following sfp commands:
Command
Support
Description
Command Line Options
Disable Replacements
Override Replacements
JSON Output
Both push and pull commands support JSON output with detailed replacement information:
JSON Output Structure
Troubleshooting
Replacements Not Applied
Check File Location: Ensure replacements.yml is in preDeploy directory
Verify Glob Pattern: Test glob pattern matches your files
Check Org Alias: Verify the org alias matches your configuration
Pattern Not Found
Case Sensitivity: Patterns are case-sensitive
Special Characters: Escape special regex characters if needed
File Encoding: Ensure files are UTF-8 encoded
Wrong Value Applied
Org Detection: Verify org alias with sf org list
Environment Priority: Check resolution order (exact match → default)
Override Files: Check if override file is being used
Limitations
Replacements are text-based and work with any text file format
Binary files are not supported
Large files may impact performance
Related Documentation
- Configure string replacements in packages
- How replacements work during installation
- Deploy changes with replacements
// A sample sfdx-project.json with a package
{
"packageDirectories": [
{
"path": "src/my-package",
"package": "my-package",
"versionNumber": "1.0.0.NEXT"
}
]
}
public class APIService {
private static final String ENDPOINT = '%%API_ENDPOINT%%';
private static final String API_KEY = '%%API_KEY%%';
}
public class APIService {
private static final String ENDPOINT = 'https://api-dev.example.com';
private static final String API_KEY = 'dev-key-12345';
}
⚠️ Potential replacements detected:
📄 src/package/main/default/classes/APIService.cls:
• URL detected: 'https://new-api.example.com/v2'
New URL pattern detected. Consider adding to replacements.yml
💡 To include these values in future replacements, update your replacements.yml file.
# Check your org aliases
sf org list
# Push with specific org alias
sfp push -o dev-sandbox -p your-package
# Skip replacements during install
sfp install --targetorg dev --artifactdir artifacts --no-replacements
# Skip replacements during push
sfp push -p your-package -o dev --no-replacements
# Skip replacements during pull
sfp pull -p your-package -o dev --no-replacements
# Use override file during install
sfp install --targetorg dev --artifactdir artifacts --replacementsoverride custom-replacements.yml
# Use override file during push
sfp push -p your-package -o dev --replacementsoverride custom-replacements.yml
# Use override file during pull
sfp pull -p your-package -o dev --replacementsoverride custom-replacements.yml
# Get JSON output with replacement details
sfp push -p your-package -o dev --json
sfp pull -p your-package -o dev --json
This guide covers the setup and configuration of Large Language Model (LLM) providers for AI-powered features in sfp:
- sfp-pro only
- Available in both sfp-pro
- Intelligent validation error analysis
Prerequisites
Installation Methods
Supported LLM Providers
sfp currently supports the following LLM providers through OpenCode:
Provider
Status
Recommended
Best For
Provider Configuration
Anthropic (Claude) - Recommended
Anthropic's Claude models provide the best understanding of Salesforce and Flxbl framework patterns. The default model used is claude-sonnet-4-5-20250929 which offers optimal balance between performance and cost.
Setup
Step 1: Environment Variable
Step 2: Configuration File Create or edit config/ai-architecture.yaml:
Getting an Anthropic API Key
Visit
Sign up or log in to your account
Navigate to API Keys section
Create a new API key for sfp usage
Claude Models Available:
claude-sonnet-4-5-20250929 - Recommended, best balance (default)
claude-opus-4-0-20250514
OpenAI
OpenAI provides access to GPT models with good code analysis capabilities.
Setup
Step 1: Environment Variable
Step 2: Configuration File
Getting an OpenAI API Key
Visit
Sign up or log in
Go to API Keys section
Create a new secret key
Amazon Bedrock
Amazon Bedrock is ideal for enterprise environments already using AWS infrastructure. It provides access to Claude models through AWS.
Setup
Step 1: AWS Profile
STEP 3: Configuration File
Important: AWS Bedrock requires both AWS_BEARER_TOKEN_BEDROCK and AWS_REGION environment variables to be set. Authentication will fail if either is missing.
Bedrock Model Access: Ensure your AWS account has access to the Claude models in Bedrock. You may need to request access through the AWS Console under Bedrock > Model access.
Regional Considerations
Bedrock automatically handles model prefixes based on your AWS region:
US Regions: Models may require us. prefix
EU Regions: Models may require eu. prefix
AP Regions: Models may require apac.
The OpenCode SDK handles this automatically based on your AWS_REGION.
GitHub Copilot
GitHub Copilot can be used if you have an active subscription with model access enabled.
Setup
Prerequisites:
Active GitHub Copilot subscription (Individual, Business, or Enterprise)
Models must be enabled in your GitHub Copilot settings
Setup Methods
Method 1: Generate Token Using Script (Recommended)
sfp includes a helper script to generate Copilot tokens via the GitHub device flow:
The script will:
Request a device code from GitHub
Display a URL and verification code
Open your browser automatically (on supported systems)
Poll for authorization completion
After the script completes, set the token:
Method 2: Environment Variable (CI/CD)
For CI/CD pipelines, set the COPILOT_TOKEN environment variable:
In GitHub Actions:
Important: Use COPILOT_TOKEN instead of GITHUB_TOKEN in CI/CD environments. The GITHUB_TOKEN is automatically set by GitHub Actions for repository operations and may conflict with Copilot authentication.
How Token Exchange Works
sfp automatically handles the OAuth token exchange process:
OAuth Token (ghu_ prefix): The token you obtain from device flow authentication
API Token Exchange: sfp automatically exchanges the OAuth token for a Copilot API token via GitHub's internal API
Transparent Process: This exchange happens automatically when you use --provider github-copilot
Configuration File
Available Models
GitHub Copilot provides access to various models. The default is claude-sonnet-4.5:
Model
Description
Notes
Model Naming: GitHub Copilot uses simplified model names without date suffixes (e.g., claude-sonnet-4.5 instead of claude-sonnet-4-20250514).
Configuration File Reference
The AI features are configured through config/ai-assist.yaml in your project root:
Testing Provider Configuration
The test command performs a complete health check:
Authentication: Verifies credentials are available
Connectivity: Confirms the provider endpoint is reachable
Response: Validates the model returns a valid response
Environment Variables Reference
This command performs a simple inference test to verify:
Authentication is configured correctly
The provider is accessible
Model inference is working
Response time and performance
Usage Priority
When multiple authentication methods are available, sfp uses the following priority:
Environment Variables - Highest priority, recommended for CI/CD
Configuration File - From config/ai-assist.yaml
Troubleshooting
Provider Not Available
AWS Bedrock Specific Issues
Both Environment Variables Required
Authentication Failed
Verify both AWS_BEARER_TOKEN_BEDROCK and AWS_REGION are set
Check that your bearer token is valid and not expired
Ensure your AWS account has access to Claude models in Bedrock
API Rate Limits
If you encounter rate limits:
Anthropic: Check your usage at
OpenAI: Monitor at
Bedrock: Check AWS CloudWatch metrics
Model Not Found
Ensure you're using the correct model identifier for your provider:
Development Workflow
This guide walks through the complete development workflow using sfp in a modular Salesforce project following the Flxbl framework.
Overview
The development workflow in an sfp-powered project follows an iterative approach where developers work in isolated environments, make changes using source-driven development, and submit their work through pull requests that trigger automated validation and review environments.
Prerequisites
DevHub Access Required
Before starting development with sfp, ensure you have:
DevHub access - Required for:
Building packages (all types)
Creating scratch orgs
1. Starting a New Feature
Fetch a Development Environment
Every feature or story begins with a developer fetching a fresh environment from a pre-prepared pool. The frequency depends on your team's practice:
Scratch Orgs: Can be fetched for every story or feature
Sandboxes: Typically fetched at the start of an iteration or sprint
Fetch from Scratch Org Pool (Community Edition - Local Pools)
Fetch from Pool using sfp Server (sfp-pro - Server-Managed Pools)
Create a New Sandbox (if needed)
Authenticate to Your Environment
Once you have your environment:
2. Development Cycle
Pull Latest Metadata
Before making changes, ensure you have the latest metadata from your org:
The pull command will:
Retrieve metadata changes from your org
Apply reverse text replacements to convert environment-specific values back to placeholders
Update your local source files
Make Your Changes
Now you can work on your feature using your preferred IDE:
Modify existing metadata in package directories
Create new components using SF CLI or your IDE
Add new packages if needed:
Organize packages into logical groups using release configs (domains are conceptual, not explicit commands)
Push Changes to Your Org
Deploy your local changes to the development org:
The push command will:
Apply text replacements for environment-specific values
Deploy metadata to your org
Run tests if specified
Build and Test Locally
Build Artifacts
Test that your packages can be built successfully:
Run Apex Tests
Execute tests in your development org to validate your changes. sfp follows a package-centric testing approach:
For detailed information on test levels, coverage validation, output formats, and CI/CD integration, see .
Install to Your Org (Optional)
While developers rarely need to install built artifacts to their own orgs, you can test the installation:
3. Dependency Management
As you develop, you may need to manage package dependencies:
Analyze Dependencies
4. Submitting Your Work
Create a Pull Request
Once your feature is complete:
CI/CD Pipeline Takes Over
When you create a PR, the automated pipeline will:
Run sfp validate to verify your changes:
Create a review environment for acceptance testing:
Run quality checks:
Code coverage validation
Dependency validation
Review Environment Testing
The review environment URL is posted to your PR for stakeholders to test:
Product owners can validate functionality
QA can run acceptance tests
Other developers can review the implementation
5. Post-Merge
After your PR is approved and merged:
Artifacts are built from the main branch
Published to artifact repository
Ready for release to higher environments
Common Workflows
Working with Aliasified Packages
When working with environment-specific metadata:
Using Text Replacements
For configuration values that change per environment:
Then push/pull will automatically handle replacements:
Handling Destructive Changes
When you need to delete metadata:
Move components to pre-destructive/ or post-destructive/ folders
Push changes normally:
The destructive changes are automatically processed.
Troubleshooting
Pool is Empty
Community Edition (Local Pools)
sfp-pro (Server-Managed Pools)
Push/Pull Conflicts
Build Failures
DevHub Connection Issues
GitHub Copilot
✅ Fully Supported
Yes
Teams with existing Copilot subscriptions, no extra cost
# Add to your shell profile (.bashrc, .zshrc, etc.)
export ANTHROPIC_API_KEY="sk-ant-xxxxxxxxxxxxx"
# Verify the configuration works
sfp ai test --provider anthropic
enabled: true
provider: anthropic
# Model is optional - uses claude-sonnet-4-5-20250929 by default
export OPENAI_API_KEY="sk-xxxxxxxxxxxxx"
# Verify the configuration works
sfp ai test --provider openai
# In config/ai-assist.yaml
enabled: true
provider: openai
# Model is optional - uses gpt-4o by default
# Set both required environment variables
export AWS_BEARER_TOKEN_BEDROCK="your-bearer-token"
export AWS_REGION="us-east-1"
# Both variables must be set for authentication to work
# Verify the configuration works
sfp ai test --provider amazon-bedrock
# In config/ai-assist.yaml
enabled: true
provider: amazon-bedrock
model: anthropic.claude-sonnet-4-5-20250929-v1:0 # Default model
# Run the token generator script
./scripts/get-copilot-token.sh
# Set the token in your environment
export COPILOT_TOKEN="ghu_xxxxxxxxxxxx"
# Verify the configuration works
sfp ai test --provider github-copilot
# Add to your shell profile or CI/CD secrets
export COPILOT_TOKEN="ghu_xxxxxxxxxxxx"
# Test all configured providers
sfp ai test
# Test specific provider with default model
sfp ai test --provider anthropic
# Test Amazon Bedrock (uses default: anthropic.claude-sonnet-4-20250514-v1:0)
sfp ai test --provider amazon-bedrock
# Test GitHub Copilot (uses default: claude-sonnet-4)
sfp ai test --provider github-copilot
# Verify environment variables
echo $ANTHROPIC_API_KEY
# For AWS Bedrock - check both required variables
echo $AWS_BEARER_TOKEN_BEDROCK
echo $AWS_REGION
# For GitHub Copilot
echo $COPILOT_TOKEN
# Test provider connectivity
sfp ai test --provider <provider-name>
# This will NOT work (missing region)
export AWS_BEARER_TOKEN_BEDROCK="token"
# This will work (both variables set)
export AWS_BEARER_TOKEN_BEDROCK="token"
export AWS_REGION="us-east-1"
# Check your DevHub connection
sf org display --target-dev-hub
# List available scratch orgs in pool (alias: pool:list)
sfp pool scratch list --tag dev-pool
# Fetch a scratch org from the pool (alias: pool:fetch)
sfp pool scratch fetch --tag dev-pool --alias my-feature-org
# Initialize a pool if empty (aliases: prepare, pool:prepare)
sfp pool scratch init --tag dev-pool \
--targetdevhubusername mydevhub \
--config config/project-scratch-def.json \
--count 5
# List available instances (works for both scratch orgs and sandboxes)
sfp server pool instance list \
--repository myorg/myrepo \
--tag dev-pool
# Fetch an org from the pool (scratch or sandbox)
sfp server pool instance fetch \
--repository myorg/myrepo \
--tag dev-pool \
--assignment-id feature-123
# Extend org expiration if needed
sfp server pool instance extend \
--repository myorg/myrepo \
--tag dev-pool \
--assignment-id feature-123 \
--expiration-hours 48
# Unassign and return to pool when done
sfp server pool instance unassign \
--repository myorg/myrepo \
--tag dev-pool \
--assignment-id feature-123
# Create a new sandbox directly
sfp sandbox create --name feature-sandbox \
--type Developer \
--source-org production \
--alias my-feature-sandbox
# Open the org to verify access (sfp-pro)
sfp org open --targetusername my-feature-org
# Open in a specific browser (sfp-pro)
sfp org open --targetusername my-feature-org --browser chrome
# For community edition, use Salesforce CLI
sf org open --target-org my-feature-org
# Set as default for convenience (sfp-pro)
sfp config set target-org my-feature-org
# Set globally (sfp-pro)
sfp config set target-org my-feature-org --global
# Pull all changes from the org (using aliases: pull, source:pull, project:pull)
sfp pull --targetusername my-feature-org
# Pull with conflict resolution
sfp pull --targetusername my-feature-org --ignore-conflicts
# Pull a specific package
sfp pull --targetusername my-feature-org --package my-package
# Pull and see what replacements were reversed (sfp-pro)
sfp pull --targetusername my-feature-org --json
# Create a new source package (sfp-pro)
sfp package create source -n "feature-payment" \
-r "src/payment-processing" \
--domain
# Create an unlocked package
sfp package create unlocked -n "feature-payment" \
-r "src/payment-processing" \
-v mydevhub
# Create a data package
sfp package create data -n "reference-data" \
-r "data/reference-data"
# For community edition, manually add to sfdx-project.json
# Push all changes (using aliases: push, source:push, project:push)
sfp push --targetusername my-feature-org
# Push a specific package
sfp push --targetusername my-feature-org --package my-package
# Push ignoring conflicts
sfp push --targetusername my-feature-org --ignore-conflicts
# Push and see what replacements were applied (sfp-pro)
sfp push --targetusername my-feature-org --json
# Build all packages (DevHub required)
sfp build --devhubalias mydevhub
# Build a specific domain
sfp build --devhubalias mydevhub --domain sales
# Build a specific package
sfp build --devhubalias mydevhub --package payment-processing
# Build with different options
sfp build --devhubalias mydevhub \
--branch feature/payment \
--buildnumber 123 \
--diffcheck
# Note: DevHub is required even for source packages to resolve dependencies
# Test a specific package (recommended)
sfp apextests trigger -o my-feature-org -l RunAllTestsInPackage -n sales-core
# Test all packages in a domain
sfp apextests trigger -o my-feature-org -l RunAllTestsInDomain \
-r config/release-config.yaml
# Quick test during development
sfp apextests trigger -o my-feature-org -l RunSpecifiedTests \
--specifiedtests PaymentProcessorTest
# Test with code coverage validation
sfp apextests trigger -o my-feature-org -l RunAllTestsInPackage \
-n sales-core -c -p 80
# Install a single package
sfp install --target-org my-feature-org \
--artifacts artifacts \
--package payment-processing
# Install with skip testing for faster deployment
sfp install --target-org my-feature-org \
--artifacts artifacts \
--skipifalreadyinstalled
# Commit your changes
git add .
git commit -m "feat: implement payment processing module"
# Push to your feature branch
git push origin feature/payment-processing
# Create PR using GitHub CLI (optional)
gh pr create --title "Payment Processing Module" \
--body "Implements new payment gateway integration"
# This runs automatically in CI/CD
sfp validate org --target-org validation-org \
--mode thorough \
--coverageThreshold 75
# CI/CD creates an ephemeral environment
sfp pool scratch fetch --pool review-pool \
--alias pr-123-review
# Install the changes
sfp install --target-org pr-123-review \
--artifacts artifacts
# This happens automatically in CI/CD
sfp build --branch main
sfp publish --artifacts artifacts \
--npm-registry https://your-registry.com
# Pull from a specific environment
sfp pull --targetusername dev-sandbox
# The correct variant is automatically selected
# src-env-specific/main/dev/* contents are used
# Create preDeploy/replacements.yml in your package
replacements:
- name: "API Endpoint"
glob: "**/*.cls"
pattern: "%%API_URL%%"
environments:
default: "https://api.dev.example.com"
prod: "https://api.example.com"
# Push replaces placeholders with environment values
sfp push --targetusername my-feature-org
# Pull reverses replacements back to placeholders
sfp pull --targetusername my-feature-org
sfp push --targetusername my-feature-org
# Check pool status
sfp pool scratch list --tag dev-pool
# Replenish the pool (aliases: prepare, pool:prepare)
sfp pool scratch init --tag dev-pool \
--targetdevhubusername mydevhub \
--count 5
# Check pool status
sfp server pool status --repository myorg/myrepo --tag dev-pool
# Replenish pool (works for both scratch orgs and sandboxes)
sfp server pool replenish \
--repository myorg/myrepo \
--tag dev-pool
# Ignore conflicts during pull
sfp pull --targetusername my-feature-org --ignore-conflicts
# Ignore conflicts during push
sfp push --targetusername my-feature-org --ignore-conflicts
# Check for issues in specific package
sfp build --devhubalias mydevhub \
--package problematic-package \
--loglevel DEBUG
# Validate dependencies
sfp dependency explain --package problematic-package
# Re-authenticate to DevHub
sf org login web --alias mydevhub --set-default-dev-hub
# Verify DevHub is enabled
sf org display --target-dev-hub
# Check DevHub limits
sf limits api display --target-org mydevhub
Running Apex Tests
The apextests trigger command allows you to independently execute Apex tests in your Salesforce org. While the validate command automatically runs tests per package during validation, this command gives you direct control over test execution with support for multiple test levels, code coverage validation, and output formats.
Primary Testing Patterns
sfp follows a package-centric testing approach where tests are organized and executed at the package or domain level, rather than running all org tests together. This aligns with how the validate command works and provides better isolation and faster feedback.
Test Levels
RunAllTestsInPackage (Recommended)
Runs all tests within specified package(s). This is the primary testing pattern in sfp and matches how the validate command executes tests. Supports code coverage validation at both package and individual class levels.
This pattern matches how validate command executes tests - each package is tested independently with its own test classes. This provides:
Better test isolation and faster feedback
Package-level code coverage validation
Clear attribution of test failures to specific packages
RunAllTestsInDomain (Recommended for Domain Validation)
Runs tests for all packages defined in a domain from your release config. This is the recommended pattern for validating entire domains and matches how you would validate a domain for release.
This executes tests for each package in the domain sequentially, providing comprehensive domain validation. Use this when:
Validating changes across a domain before release
Testing related packages together as a unit
Performing end-to-end domain validation
RunSpecifiedTests
Runs specific test classes or methods. Useful for rapid iteration during active development.
Use during development for quick feedback cycles when working on specific features.
RunApexTestSuite
Runs all tests in a test suite defined in your org.
Useful for running pre-defined test groups or smoke test suites.
RunLocalTests
Runs all tests in your org except those from managed packages. This is the default test level in Salesforce but not the recommended pattern in sfp.
Note: While this is the Salesforce default, sfp recommends package-level or domain-level testing for better isolation and faster feedback. Use this only when you specifically need to run all org tests together, such as for compliance requirements or full org validation.
RunAllTestsInOrg
Runs all tests in your org, including managed packages. Rarely used due to long execution time.
Use only for complete org validation scenarios.
Code Coverage Validation
Individual Class Coverage
Validates that each Apex class in the package meets the minimum coverage threshold. Every class must meet or exceed the specified percentage.
Coverage threshold:
Default: 75%
Adjustable with -p flag
Applied per class, not as an average
Output includes:
List of all classes with their coverage percentages
Classes that meet the threshold
Classes that fail to meet the threshold
Package Coverage
Validates that the overall package coverage meets the minimum threshold. The average coverage across all classes must meet or exceed the specified percentage.
Coverage calculation:
Aggregates coverage across all classes in package
Calculated as: (total covered lines / total lines) * 100
Only classes with Apex code count toward coverage
Coverage vs No Coverage
Running tests without coverage flags still executes tests but doesn't fetch or validate coverage data:
Note: Fetching coverage data adds time to test execution, so only use it when needed.
Output Formats
Note: The dashboard output format is a new feature introduced in the November 2025 release of sfp-pro.
Raw Format (Default)
Standard Salesforce API output with JUnit XML and JSON results. This is the default format.
Generates:
.testresults/test-result-<testRunId>.json - Raw Salesforce test results
.testresults/test-result-<testRunId>-junit.xml - JUnit XML format
.testresults/test-result-<testRunId>-coverage.json - Coverage data (if coverage enabled)
Dashboard Format
Available in: sfp-pro November 2024 release and later
Structured JSON format optimized for dashboards, metrics systems, and reporting tools. Unlike the raw Salesforce API output, the dashboard format provides enriched, pre-processed data that's ready for consumption by external systems.
Generates all raw format files plus:
.testresults/<testRunId>/dashboard.json - Structured test results
# Run specific test classes
sfp apextests trigger -o dev-org -l RunSpecifiedTests \
--specifiedtests AccountTest,ContactTest
# Run specific test methods
sfp apextests trigger -o dev-org -l RunSpecifiedTests \
--specifiedtests AccountTest.testCreate,ContactTest.testUpdate
The compliance check functionality ensures your Salesforce metadata adheres to organizational standards and best practices. This feature helps maintain code quality, security, and consistency across your Salesforce project by enforcing configurable rules.
Overview
Compliance checking provides a comprehensive framework for:
Enforcing coding standards and best practices
Preventing security vulnerabilities like hardcoded IDs and URLs
Maintaining API version consistency
How It Works
The compliance checker:
Loads rules from your configuration file (defaults to config/compliance-rules.yaml)
Scans metadata components using Salesforce's ComponentSet API
Applies rules based on metadata type and field specifications
Configuration
Compliance checking is configured through YAML files that define rules and their enforcement:
Configuration File Structure
Create a compliance rules file using the generate command:
This creates config/compliance-rules.yaml with sample rules:
Built-in Rules
The system includes several built-in rules that can be enabled:
Rule ID
Description
Metadata Types
Default
Documentation & Metadata Quality
Rule ID
Description
Metadata Types
Default
Custom Rules
Define custom rules to match your specific organizational requirements:
Rule Configuration Options
Field
Description
Required
Values
Supported Operators
Operator
Description
Example
Field Path Specifications
XML Field Paths
For XML metadata files, use dot notation to specify field paths:
Content Analysis
Use the special _content field to analyze file content:
Understanding Results
The compliance check provides detailed violation reports with multiple output formats:
Console Output
Violation Details
Each violation includes:
File Path: Exact location of the violation
Line Number: Specific line where the issue occurs (when applicable)
Rule Name: Which rule was violated
Integration with CI/CD
Integration is limited only to GitHub at the moment. The command needs GITHUB_APP_PRIVATE_KEY and GITHUB_APP_ID to be set in environment variables for results to be reported as GitHub checks.
When integrating compliance checking in your CI/CD pipeline:
Enforce Compliance Standards:
Generate Reports:
GitHub Actions Integration:
Scoping Compliance Checks
Use the same scoping options as other analysis commands:
By Package
By Domain
By Source Path
By Changed Files
Analyze only specific changed files:
In GitHub Actions PR context, the analyzer automatically detects and analyzes only changed files when no package, domain, or source path filters are specified.
Output Formats
The compliance checker supports multiple output formats:
Console: Human-readable terminal output with color coding
Markdown: Detailed reports suitable for documentation
JSON: Machine-readable format for integration with other tools
Common Compliance Scenarios
API Version Management
Ensure all components use recent API versions:
Security Hardening
Prevent security vulnerabilities:
Profile Security
Restrict dangerous permissions:
Logging and Debugging
Use different log levels to control output verbosity:
Debug logging shows:
Rules being processed
Files being scanned
Field extraction details
Rule evaluation results
Troubleshooting
Rule Not Triggering
Verify Field Path: Ensure the field path matches the XML structure
Check Metadata Types: Confirm the rule applies to the correct metadata types
Validate Operators: Ensure the operator logic matches your expectations
False Positives
Refine Rule Conditions: Adjust operators or values to be more specific
Scope Rules Appropriately: Use metadata type filters to target specific components
Create Exceptions: Disable rules for specific packages or paths when needed
Performance Issues
Scope Analysis: Use package, domain, or path filters to reduce scope
Optimize Rules: Complex regex patterns can slow down content analysis
Exclude Large Files: Consider excluding generated or vendor files
Configuration Examples
Organization Standards
Documentation Standards
Validating metadata field values against organizational policies
Generating detailed violation reports with remediation guidance
Evaluates content and field values using configurable operators
Reports violations with file locations, severity levels, and helpful messages
flow-inactive-check
Detects inactive or draft flows
Flow
Disabled
permissionset-view-all-data
Prevents ViewAllData permission
PermissionSet
Disabled
permissionset-modify-all-data
Prevents ModifyAllData permission
PermissionSet
Disabled
permissionset-author-apex
Detects AuthorApex permission
PermissionSet
Disabled
permissionset-customize-application
Detects CustomizeApplication permission
PermissionSet
Disabled
validation-rule-missing-description
Ensures validation rules have descriptions
ValidationRule
Disabled
enabled
Whether the rule is active
No
true/false (default: false)
metadata
Metadata types to check
Yes
Array of metadata type names
field
Field path to evaluate
Yes
Dot-notation path or "_content"
operator
Comparison operator
Yes
See operators table below
value
Expected value for comparison
Yes
String, Number, Boolean
severity
Violation severity level
Yes
error, warning, info
message
Custom violation message
No
String
greater_than
Numeric field is greater than value
apiVersion > 58.0
less_than
Numeric field is less than value
apiVersion < 60.0
greater_or_equal
Numeric field is greater than or equal
apiVersion >= 59.0
less_or_equal
Numeric field is less than or equal
apiVersion <= 59.0
regex
Field matches regular expression
Content matches [a-zA-Z0-9]{15}
Severity: Error, Warning, or Info level
Message: Descriptive explanation and remediation guidance
Actual Value: The found value that triggered the violation
Expected Value: What the rule expected to find
GitHub: Special format for GitHub Checks API integration
Enable Debug Logging: Use --loglevel debug to see detailed evaluation
# SFP Compliance Rules Configuration
extends: default
rules:
- id: no-hardcoded-ids
enabled: true
comment: Enable this rule to prevent hardcoded Salesforce IDs
- id: no-hardcoded-urls
enabled: false
comment: Enable this rule to prevent hardcoded Salesforce URLs
- id: profile-no-modify-all
enabled: false
comment: Enable this rule to prevent profiles with Modify All Data permission
- id: custom-api-version
name: Minimum API Version Check
enabled: true
metadata:
- ApexClass
- ApexTrigger
field: ApexClass.apiVersion
operator: greater_or_equal
value: 59.0
severity: warning
message: Component should use API version 59.0 or higher
rules:
- id: minimum-api-version
name: Enforce Minimum API Version
description: All components must use API version 59.0 or higher
enabled: true
metadata:
- ApexClass
- ApexTrigger
field: ApexClass.apiVersion
operator: greater_or_equal
value: 59.0
severity: warning
message: Component should use API version 59.0 or higher
# For ApexClass metadata XML
field: ApexClass.apiVersion
# For nested fields
field: ApexClass.packageVersions.majorNumber
# For Profile permissions
field: Profile.userPermissions.ModifyAllData
field: _content
operator: regex
value: '[a-zA-Z0-9]{15}|[a-zA-Z0-9]{18}' # Salesforce ID pattern
📋 Compliance Check Results
═══════════════════════════
Rules Checked: 3/5
Found 5 violations:
❌ Errors (2):
• src/classes/MyClass.cls-meta.xml:3
Component should use API version 59.0 or higher
Rule: Minimum API Version Check
⚠️ Warnings (3):
• src/classes/Controller.cls:15
Hardcoded Salesforce IDs found - use Custom Settings, Custom Metadata, or SOQL queries instead
Rule: No Hardcoded Salesforce IDs
- id: no-hardcoded-credentials
enabled: true
metadata: [ApexClass]
field: _content
operator: regex
value: '(password|secret|key)\s*=\s*["\'][^"\']+["\']'
severity: error
message: Remove hardcoded credentials - use Named Credentials or Custom Settings
- id: no-modify-all-data
enabled: true
metadata: [Profile]
field: Profile.userPermissions.ModifyAllData
operator: equals
value: true
severity: error
message: Profile should not have Modify All Data permission
# Basic progress information
sfp project:analyze --compliance-rules config/compliance-rules.yaml --loglevel info
# Detailed debugging information
sfp project:analyze --compliance-rules config/compliance-rules.yaml --loglevel debug