Azure DevOps
The Azure DevOps integration lets codev work with your Azure DevOps repositories — reading code, opening and updating pull requests, and posting validation results — and surfaces the Azure Boards work items referenced in your commits.
This page covers the full path: create the Service Principal in Microsoft Entra, register it in codev, onboard your repository, and activate features. A new organization can be ready for its first build by following the steps in order.
What the Azure DevOps integration does
| Capability | Supported |
|---|---|
| Read repositories (clone the tracked branches for builds and validation) | ✅ |
| Open and update pull requests, add and remove labels | ✅ |
| Post validation and analysis results as PR/commit status checks and rich PR comments | ✅ |
| Detect Azure Boards work item keys in commit messages and surface them on builds, release candidates, and releases | ✅ |
| Create and update Azure Boards work items (used by codev's automation flows) | ✅ |
| Report deployments to a native Boards panel | ❌ (no Azure equivalent of Jira's Deployments panel) |
You bring your own Azure DevOps
There is no flxbl-managed Azure DevOps connection — you always connect your own, on both the cloud and self-hosted instances. Until you register a Service Principal, codev cannot read your repositories or post results.
Step 1 — Create the Service Principal in Entra
Azure DevOps connects with a Service Principal: an application registered in Microsoft Entra ID (Azure AD) that codev authenticates as. You create it once and reuse it across projects.
- In the Azure portal, open Microsoft Entra ID > App registrations and register a new application. Give it a display name you will recognise later (for example
codev-integration) — you search for this name when granting access in Azure DevOps. - From the app's Overview, note the Application (Client) ID and the Directory (Tenant) ID.
- Under Certificates & secrets, create a client secret and copy its value immediately — Entra shows it only once.
- In Azure DevOps, add the Service Principal to your organization: Organization Settings > Users > Add users, enter the application's name, and assign an access level (Basic is enough).
- Grant it access to the projects codev works with. Organization-level membership lets codev read repositories and post results; configuring webhooks additionally requires Project Administrator access (see Step 4).
The Service Principal authenticates with the Client Secret — codev stores the Organization URL, Tenant ID, Client ID, and Client Secret, and exchanges them for short-lived tokens against your Entra tenant. Rotate the secret in Entra and update it in codev under Edit credentials.
Step 2 — Register the integration in codev
Go to Settings > Organization > Integrations > Azure DevOps. Only organization owners can manage integrations. The page lists the setup instructions, your existing integrations, and the form to add a new one.
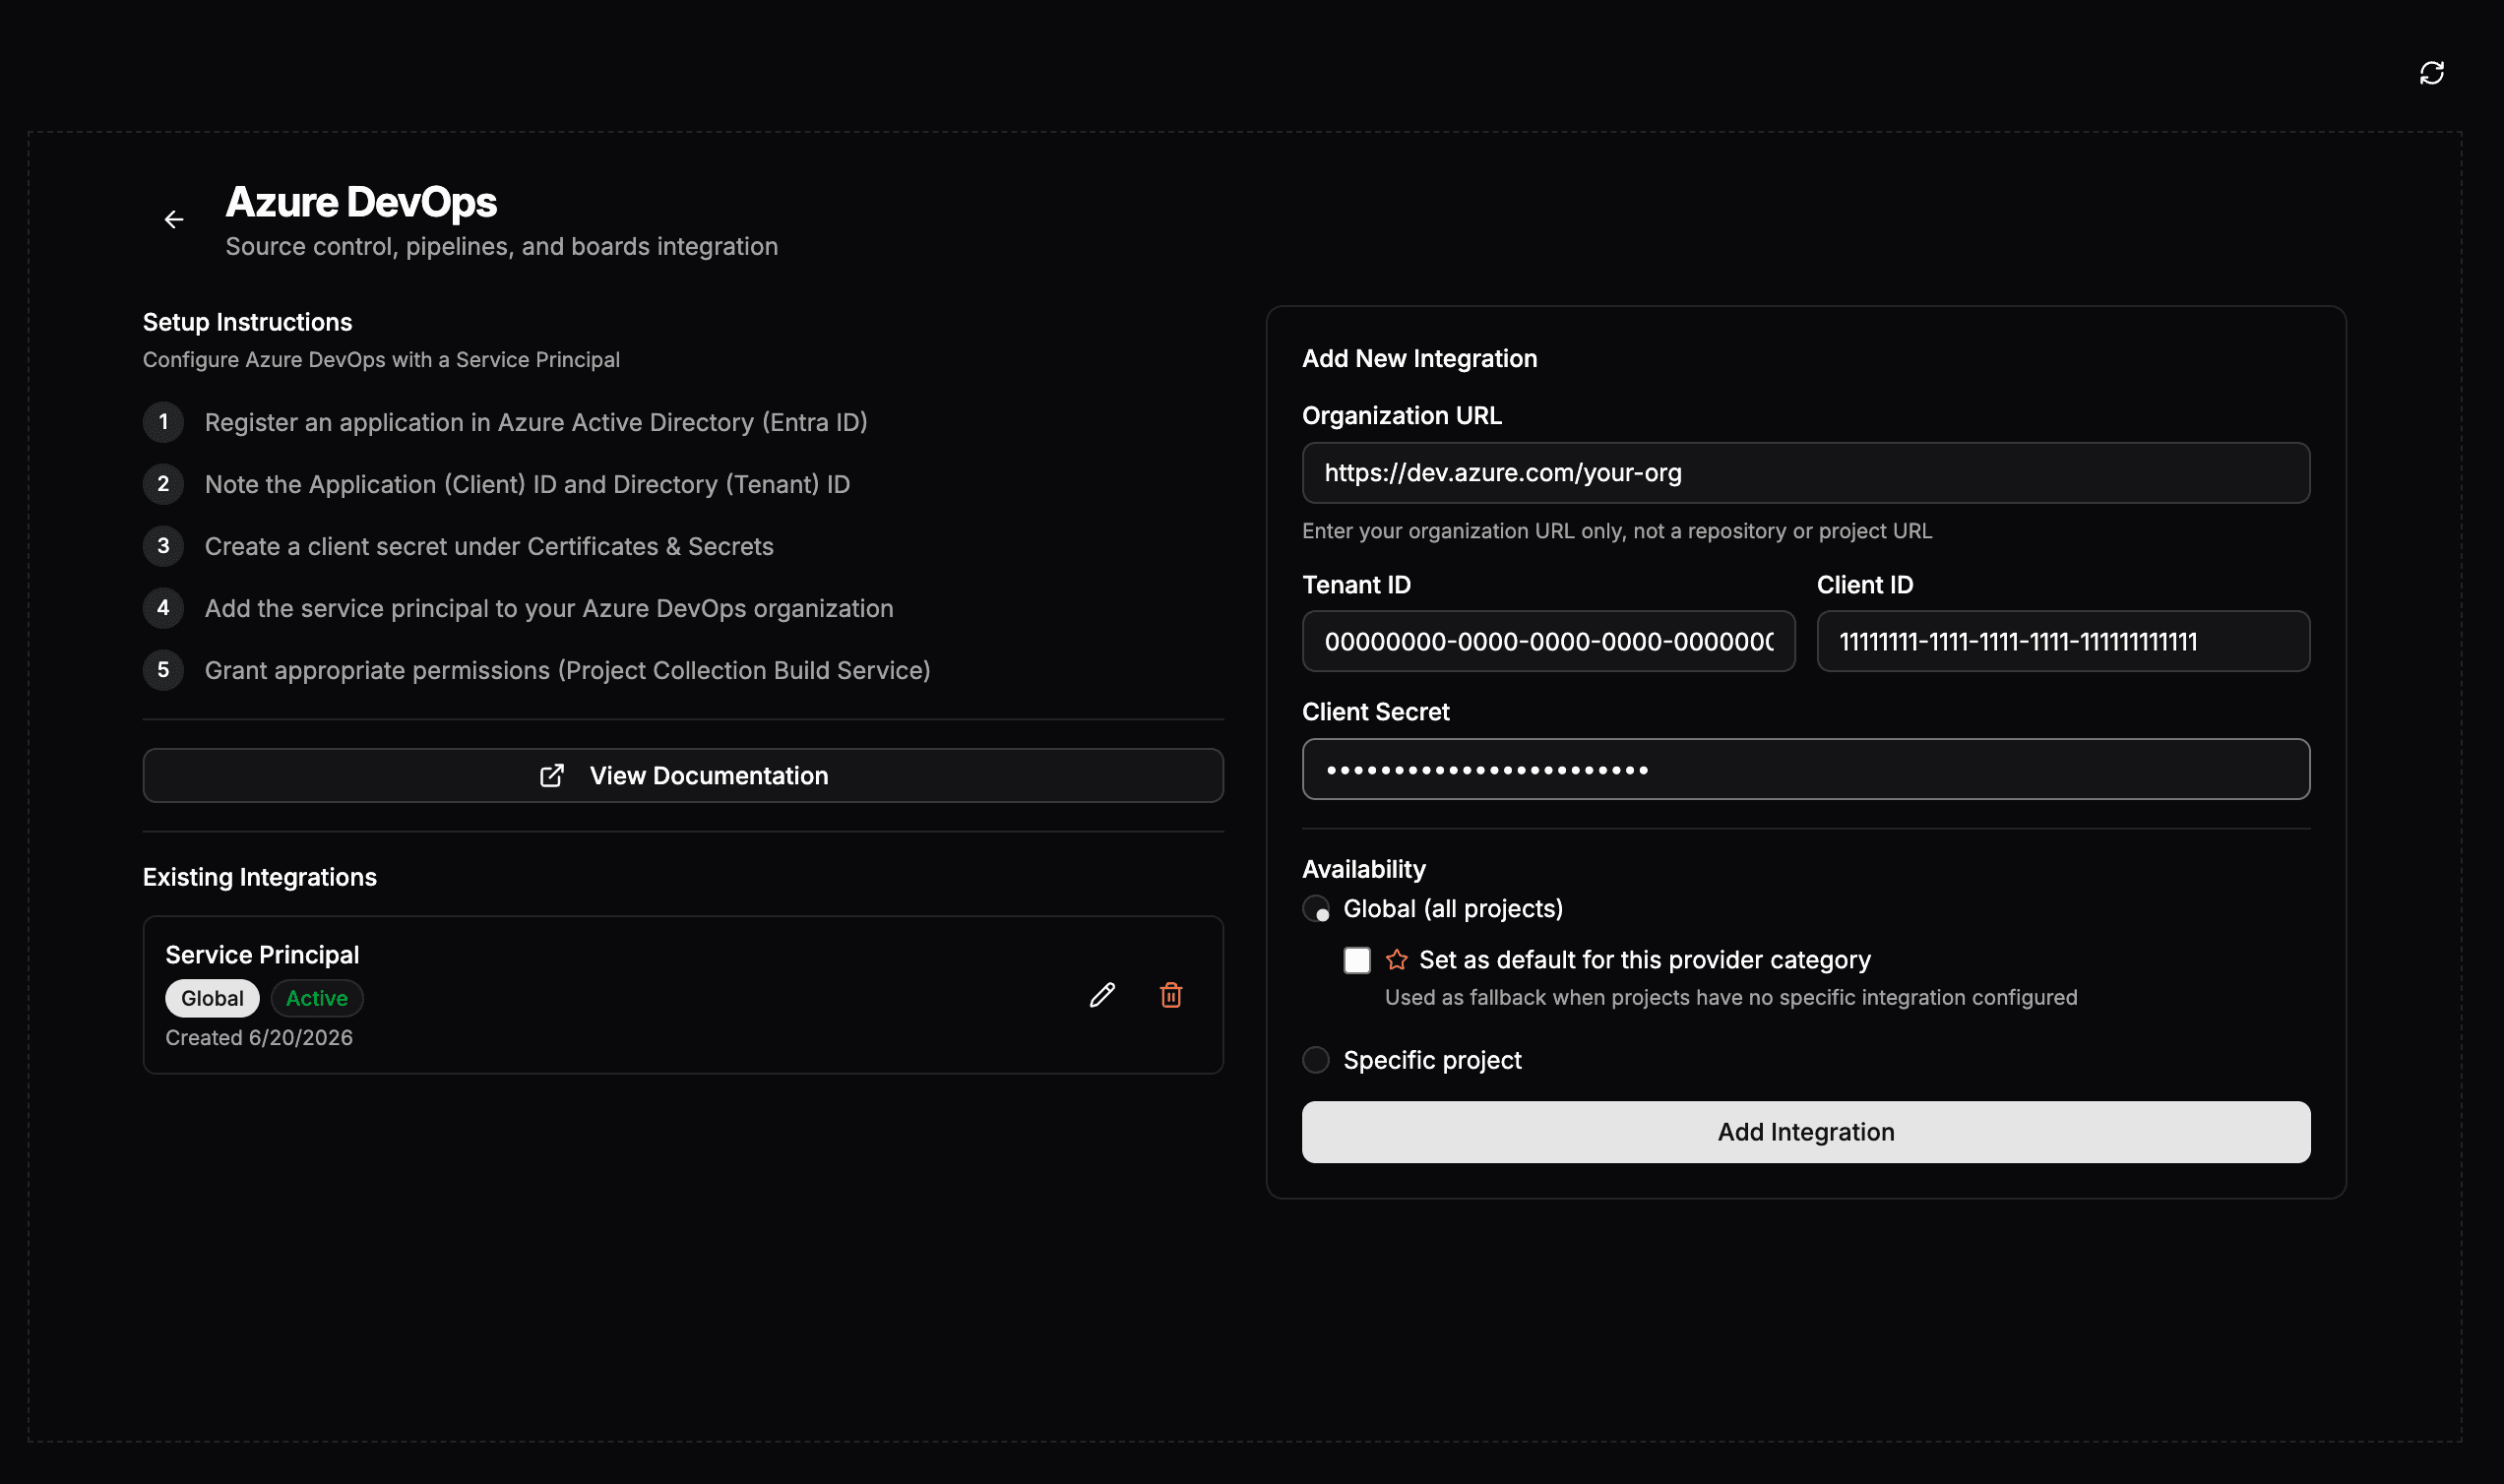
Under Add New Integration, enter:
| Field | What you provide |
|---|---|
| Organization URL | Your organization URL only, e.g. https://dev.azure.com/your-org — not a project or repository URL. |
| Tenant ID | The Directory (Tenant) ID from Step 1. |
| Client ID | The Application (Client) ID from Step 1. |
| Client Secret | The client secret value from Step 1. |
Set Availability to Global (all projects) — optionally marking it the default for Azure DevOps — or to a specific project, then click Add Integration. Existing integrations are listed with their scope, default marker, and status, and can be edited or removed at any time.
Scoping and precedence
Each integration is either Global (all projects) or scoped to a specific project, and a global integration can be marked the default. When codev needs Azure DevOps credentials for a project, it picks the most specific match:
- An Azure DevOps integration scoped to that project
- The integration marked default for Azure DevOps
- A global Azure DevOps integration
Step 3 — Onboard the repository
Every project in codev starts from a repository. Open the project switcher and choose Create new project, then paste your Azure DevOps repository URL in the form https://dev.azure.com/<org>/<project>/_git/<repo>. codev derives the Project Identifier (org/project/repo) from the URL and detects Azure DevOps as the platform. Select the branches to track and click Create Project.
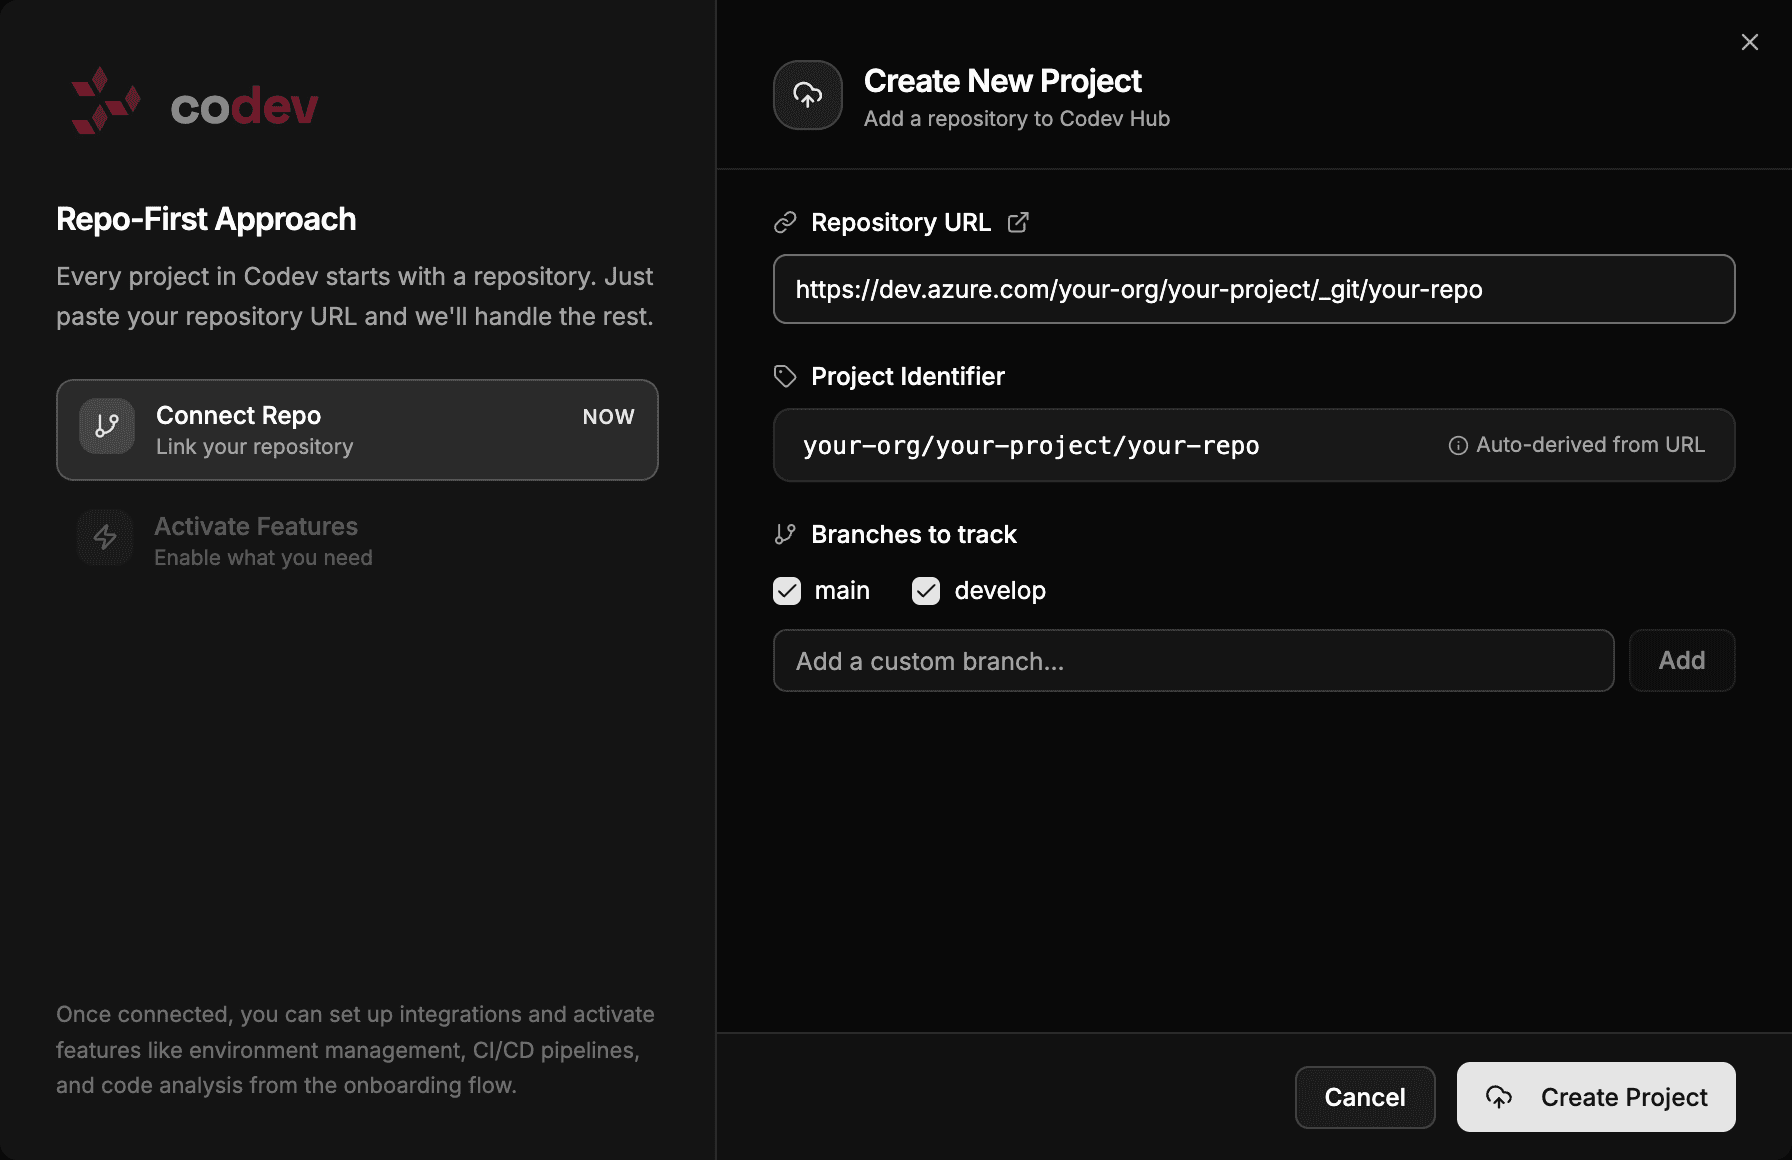
After the project is created, codev opens Activate Features. Each feature area — CI/CD, Pools, Inspect, Ops, and the rest — lists the prerequisites it needs, so you enable only what you use.
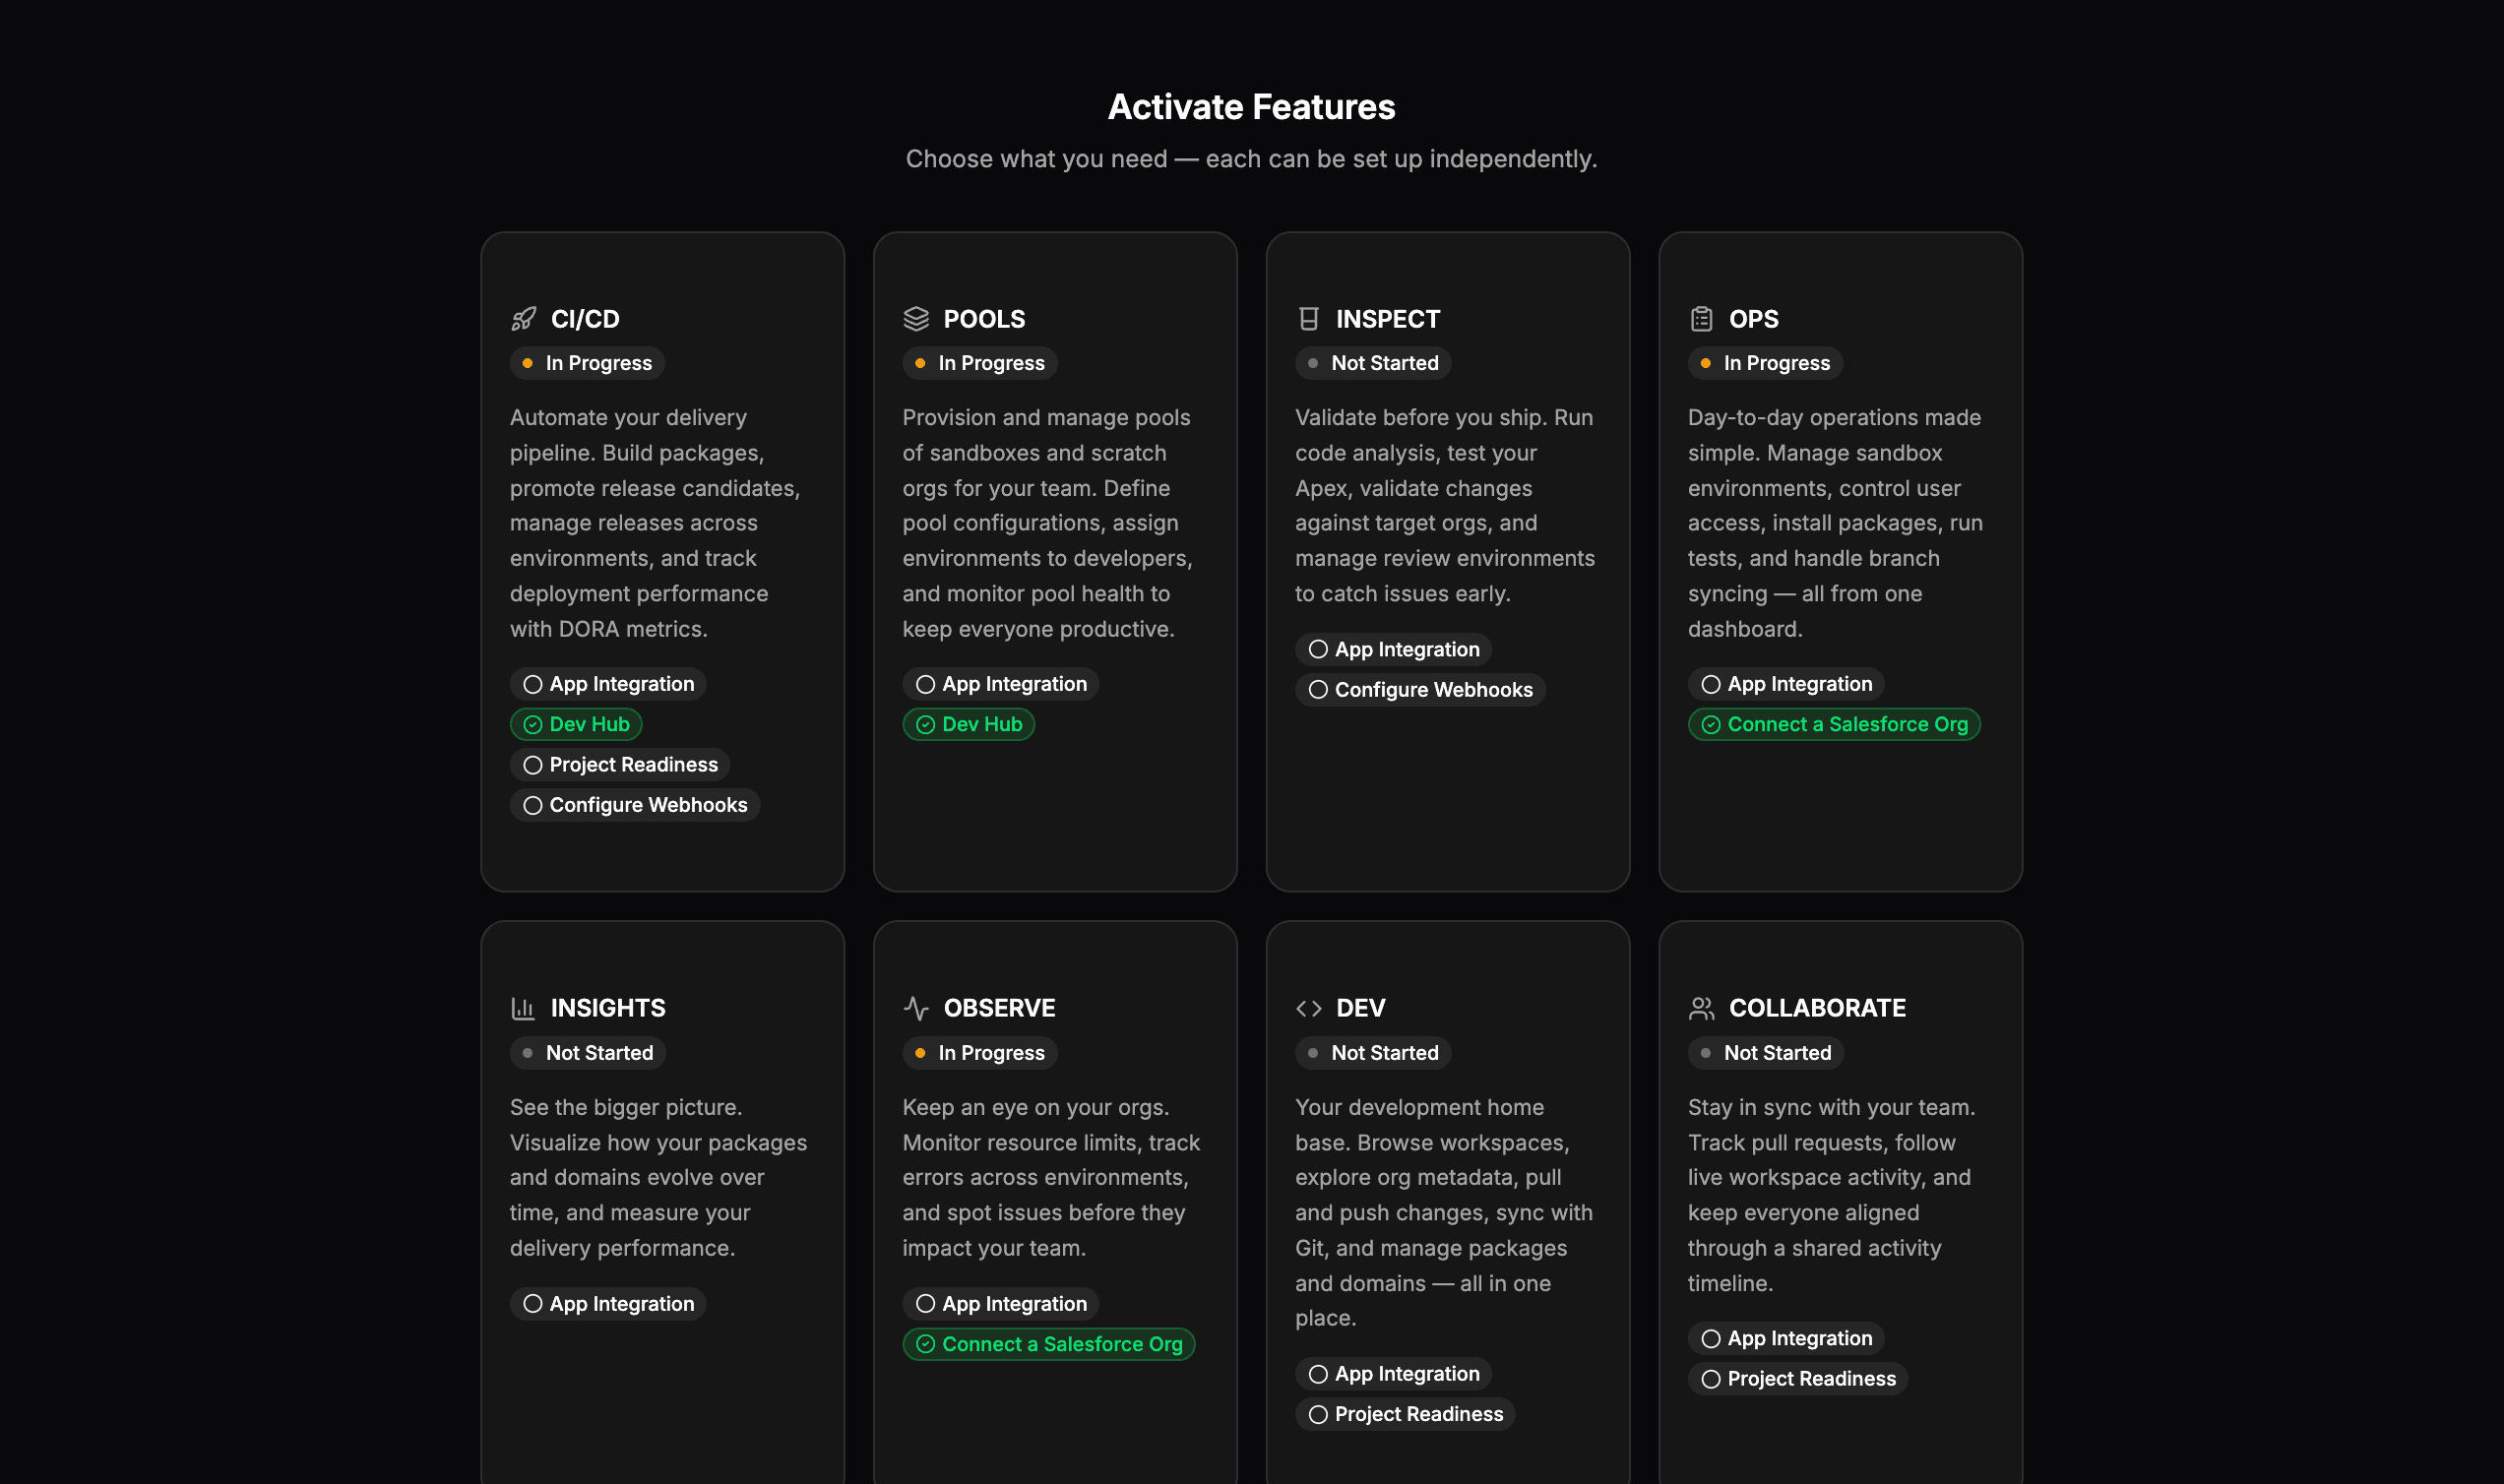
Step 4 — Activate features and configure webhooks
Open a feature such as CI/CD and follow Set Up CI/CD. The wizard walks the prerequisites in order:
- App Integration — confirms the Azure DevOps Service Principal is connected and runs a health check against your organization. A failed check (for example a
404) usually means the Organization URL is wrong or the Service Principal cannot reach that project. - Dev Hub — register at least one Salesforce environment.
- Project Readiness — Test Readiness verifies the repository has the configuration sfp expects (
sfdx-project.json, packages, release configs). - Configure Webhooks — registers the Service Hook subscriptions codev needs.
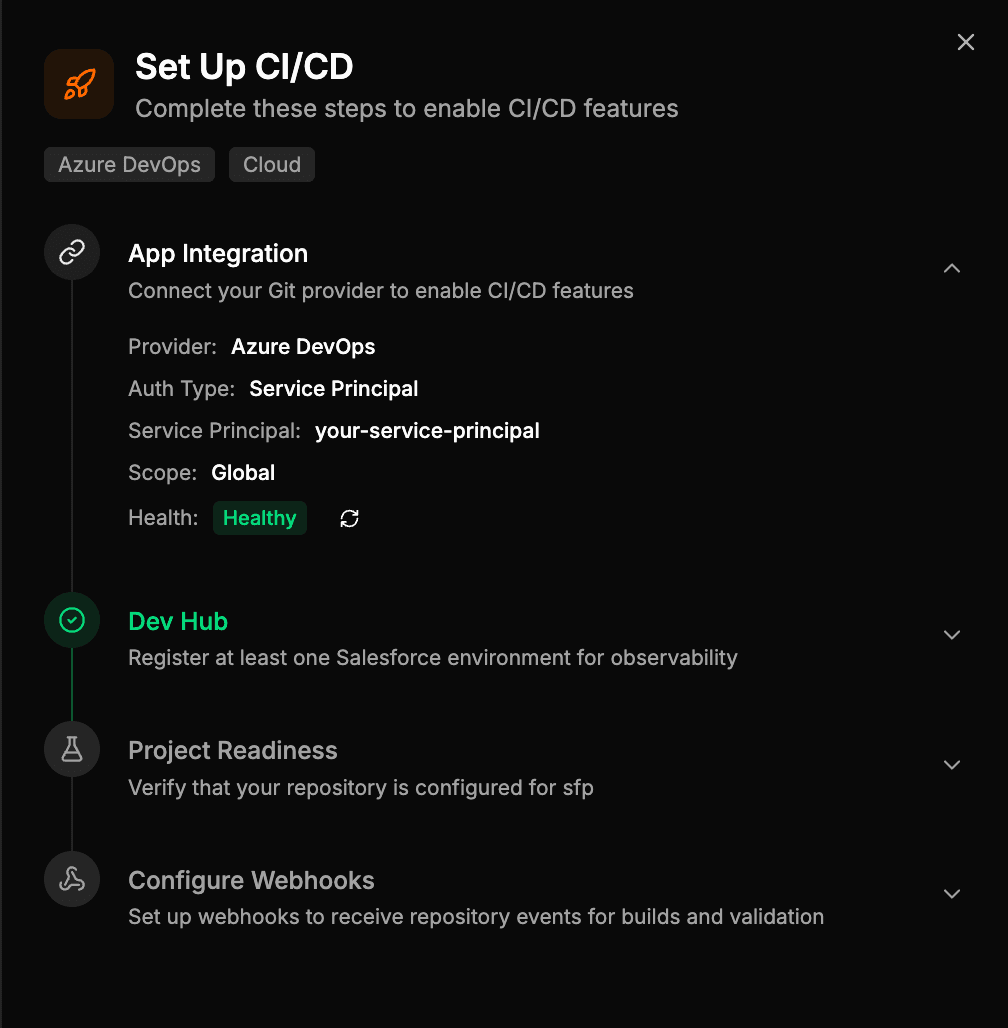
codev creates the subscriptions for you; you do not add them in Azure DevOps by hand. The events it configures are:
| Event | Triggers |
|---|---|
git.pullrequest.created | A pull request is opened |
git.pullrequest.updated | A pull request is updated |
git.pullrequest.merged | A pull request is merged |
ms.vss-code.git-pullrequest-comment-event | A comment is added to a pull request |
git.push | Commits are pushed |
workitem.commented | A work item is commented on |
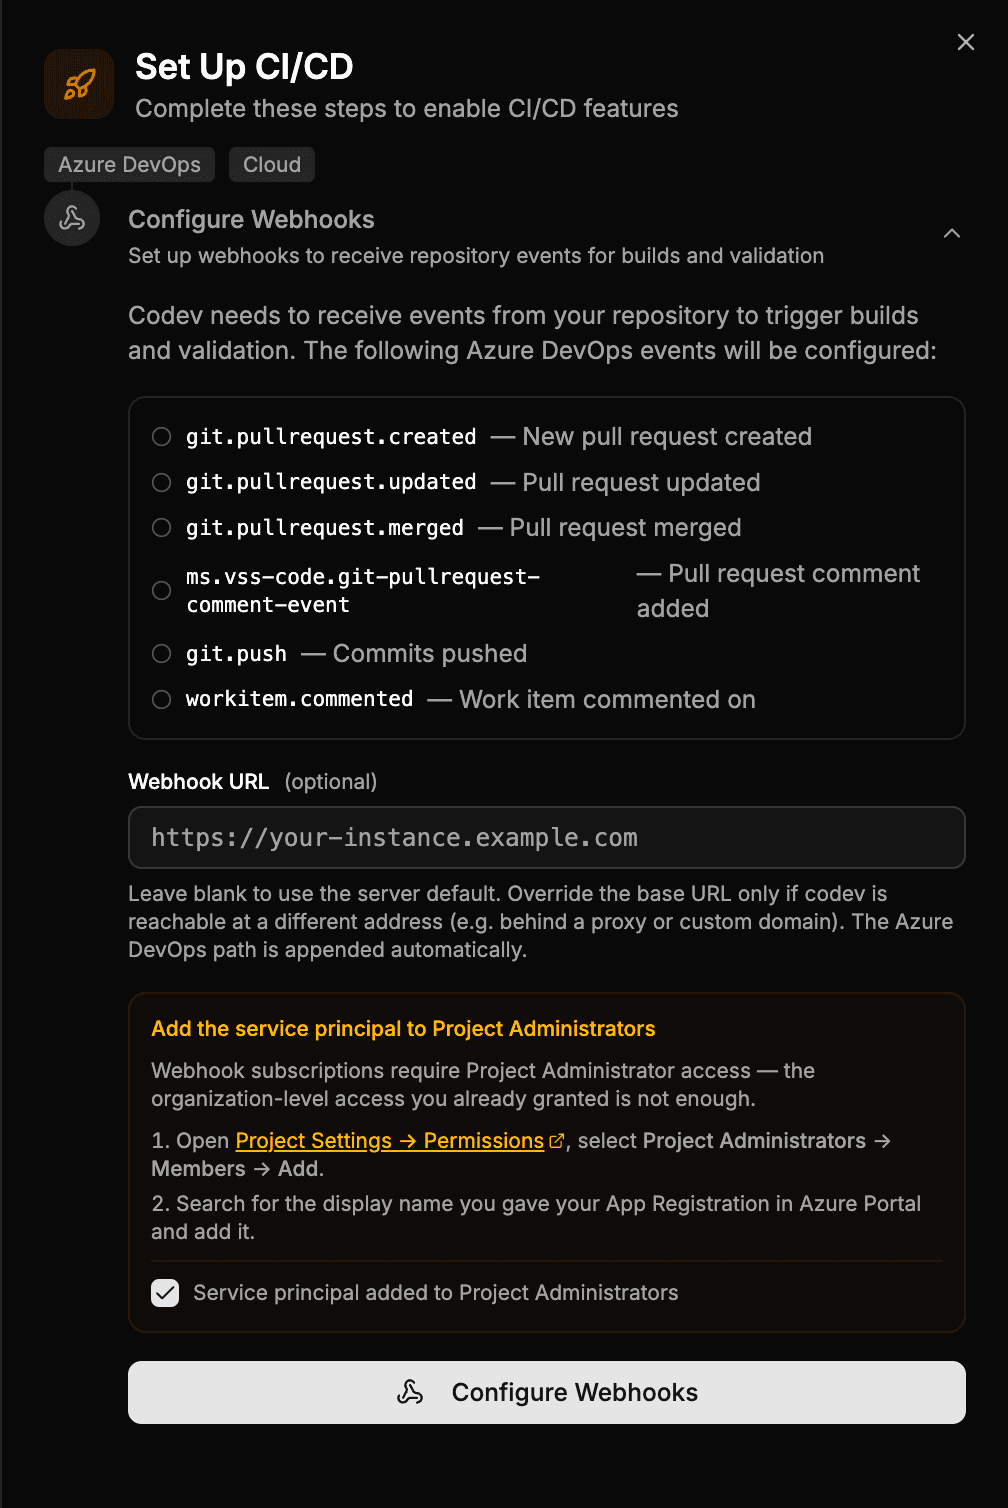
The Service Principal needs Project Administrator access to register webhooks. The organization membership from Step 1 is not enough to create Service Hook subscriptions. In Azure DevOps, open Project Settings > Permissions, select Project Administrators > Members > Add, and add the display name you gave the App Registration. Then tick Service principal added to Project Administrators in the wizard and run Configure Webhooks.
Leave Webhook URL blank to use the server default. Override the base URL only when codev is reachable at a different address — for example behind a proxy or a custom domain; the Azure DevOps path is appended automatically.
Showing work items
codev extracts Azure Boards work item references from your commit messages using the AB#123 format and surfaces them where you plan and ship — on release candidates (under Work Items) and in the release request flow. When a release creates or links a work item, the confirmation shows a direct View on Azure DevOps link to the Boards item.
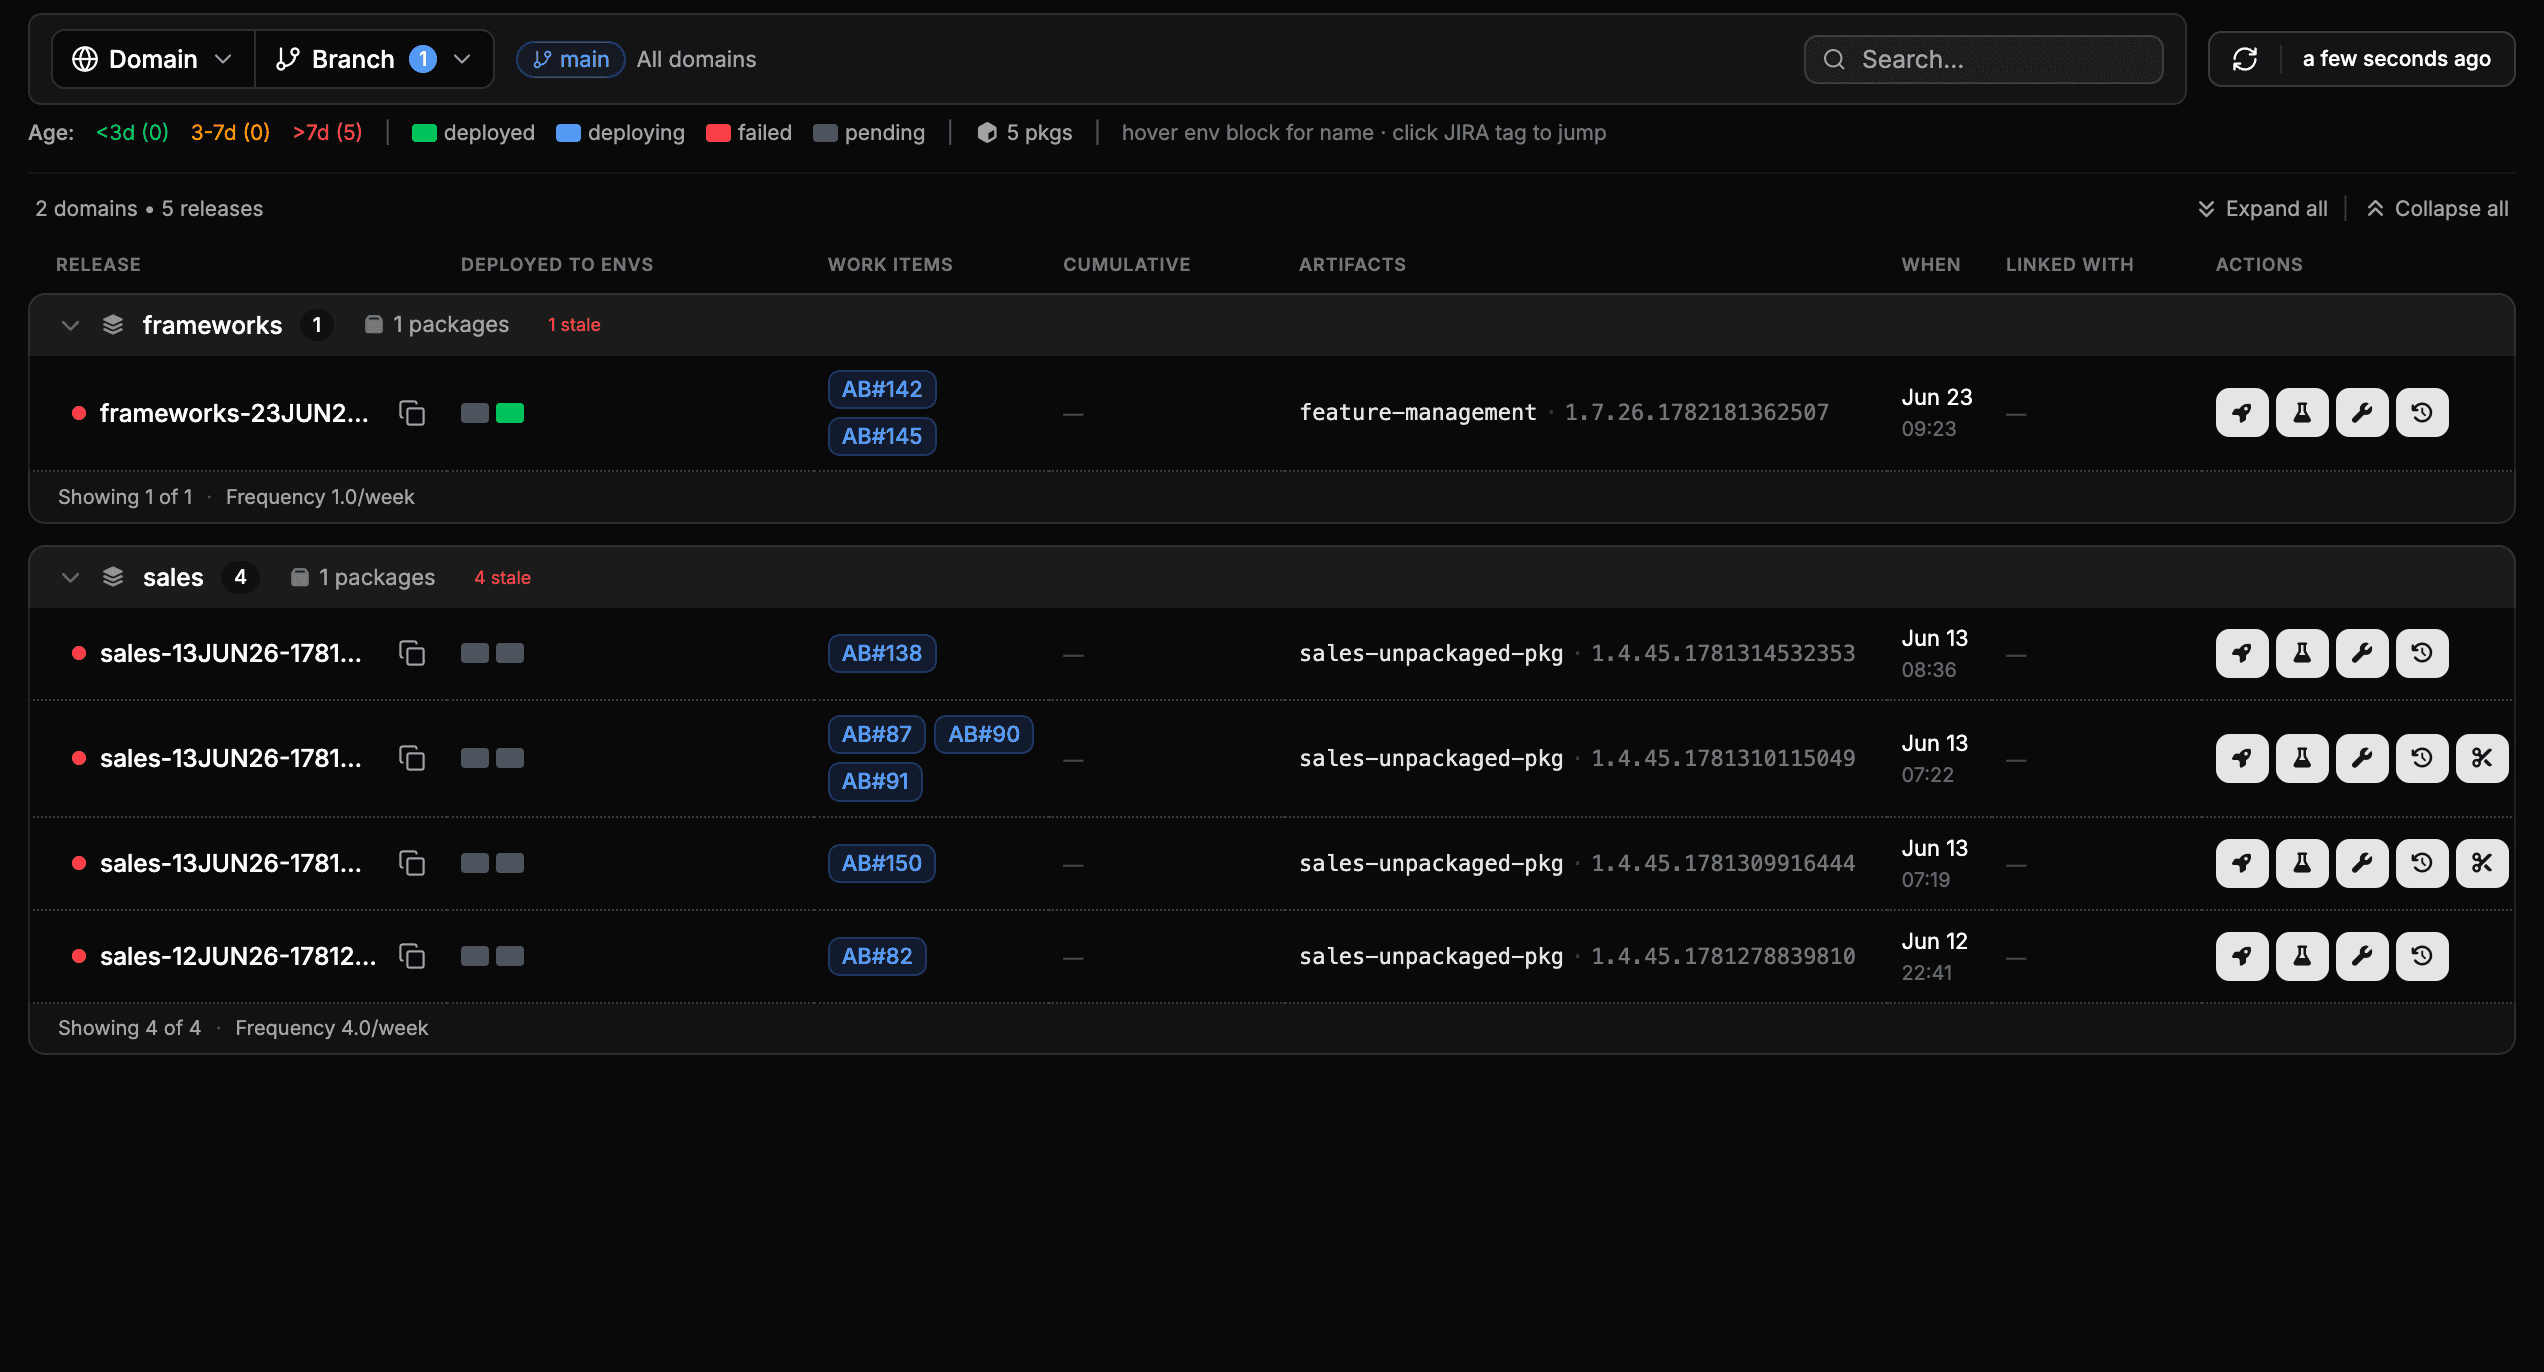
AB# work items appear against each release candidate; click a key to open the item in Azure Boards.Which project and area paths work items are read from is part of each project's configuration (the organization URL, project name, and optional area-path filters).
Self-hosting
The Service Principal method works the same on a self-hosted instance. When codev runs inside Azure Pipelines, server-level options such as the pipeline access token are covered in the sfp server documentation.
Once the Service Principal is connected, each user links their own Azure DevOps identity so codev can act as them.
If your team uses GitHub instead, the source control integration works the same way through a GitHub App.