Jira
The Jira integration connects codev to your Atlassian Jira site so that the work items referenced in your commits are visible throughout your delivery pipeline — and, optionally, so that codev reports deployment and build status back to the matching Jira issues.
You configure it under Settings > Organization > Integrations > Jira. Only organization owners can manage it.
What the Jira integration does
The integration works in two directions: reading work items, and, optionally, writing deployment and build status back. Atlassian issues a different credential for each direction, and no single Jira credential does both.
| Capability | Supported | Needs |
|---|---|---|
| Read a Jira issue and show its summary, status, assignee, and a link | ✅ | Basic Auth, or a service account's OAuth credential |
| Search issues with filters (project, status, assignee, type) | ✅ | Basic Auth, or a service account's OAuth credential |
| Detect Jira issue keys in commit messages and surface them on builds, release candidates, and releases | ✅ | Any Jira integration |
| Report deployments to Jira's Deployments panel | ✅ | A Jira site OAuth credential + write-back enabled |
| Report builds to Jira's Builds panel | ✅ | A Jira site OAuth credential + write-back enabled |
| Create, edit, transition, or close issues | ❌ | Use Jira Automation (see below) |
codev never edits your issues directly. To move an issue's status when it is deployed, drive a Jira Automation rule from the deployment data codev writes back.
Authentication methods
The integration form offers two authentication methods. The OAuth Client Credentials method accepts two kinds of Atlassian credential, and what it can do depends on which one you enter.
| Method | Credential | What it powers |
|---|---|---|
| Basic Auth (API Token) | Your Atlassian email and an API token | Reading issues and searching. |
| OAuth Client Credentials | An OAuth 2.0 credential of an Atlassian service account | Reading issues and searching. Jira rejects its build and deployment data. |
| OAuth Client Credentials | A Jira site OAuth credential, created by a Jira admin | Writing deployment and build status to Jira's DevOps panels. It cannot read issues. |
codev uses a single OAuth integration for everything it does over OAuth: it reads with it when no Basic Auth integration is registered, and writes back with it. Register at most one OAuth integration, and choose the combination for what you need:
| You need | Register |
|---|---|
| Work items only | A service account's OAuth credential, or Basic Auth |
| Work items and write-back | Basic Auth to read, and a Jira site OAuth credential to write back |
| Write-back only | A Jira site OAuth credential. Issue keys are still detected in commits, but their summary, status and assignee do not load. |
OAuth is Atlassian Cloud only. Both OAuth credentials target Jira Cloud sites (*.atlassian.net). Basic Auth works against any reachable Jira site that accepts an API token.
You bring your own Jira
Unlike GitHub on the cloud instance, there is no flxbl-managed Jira connection. Jira is always something your organization connects itself — on both the cloud and self-hosted instances. Until you register a Jira integration, work items are not read and nothing is written back.
Adding the integration
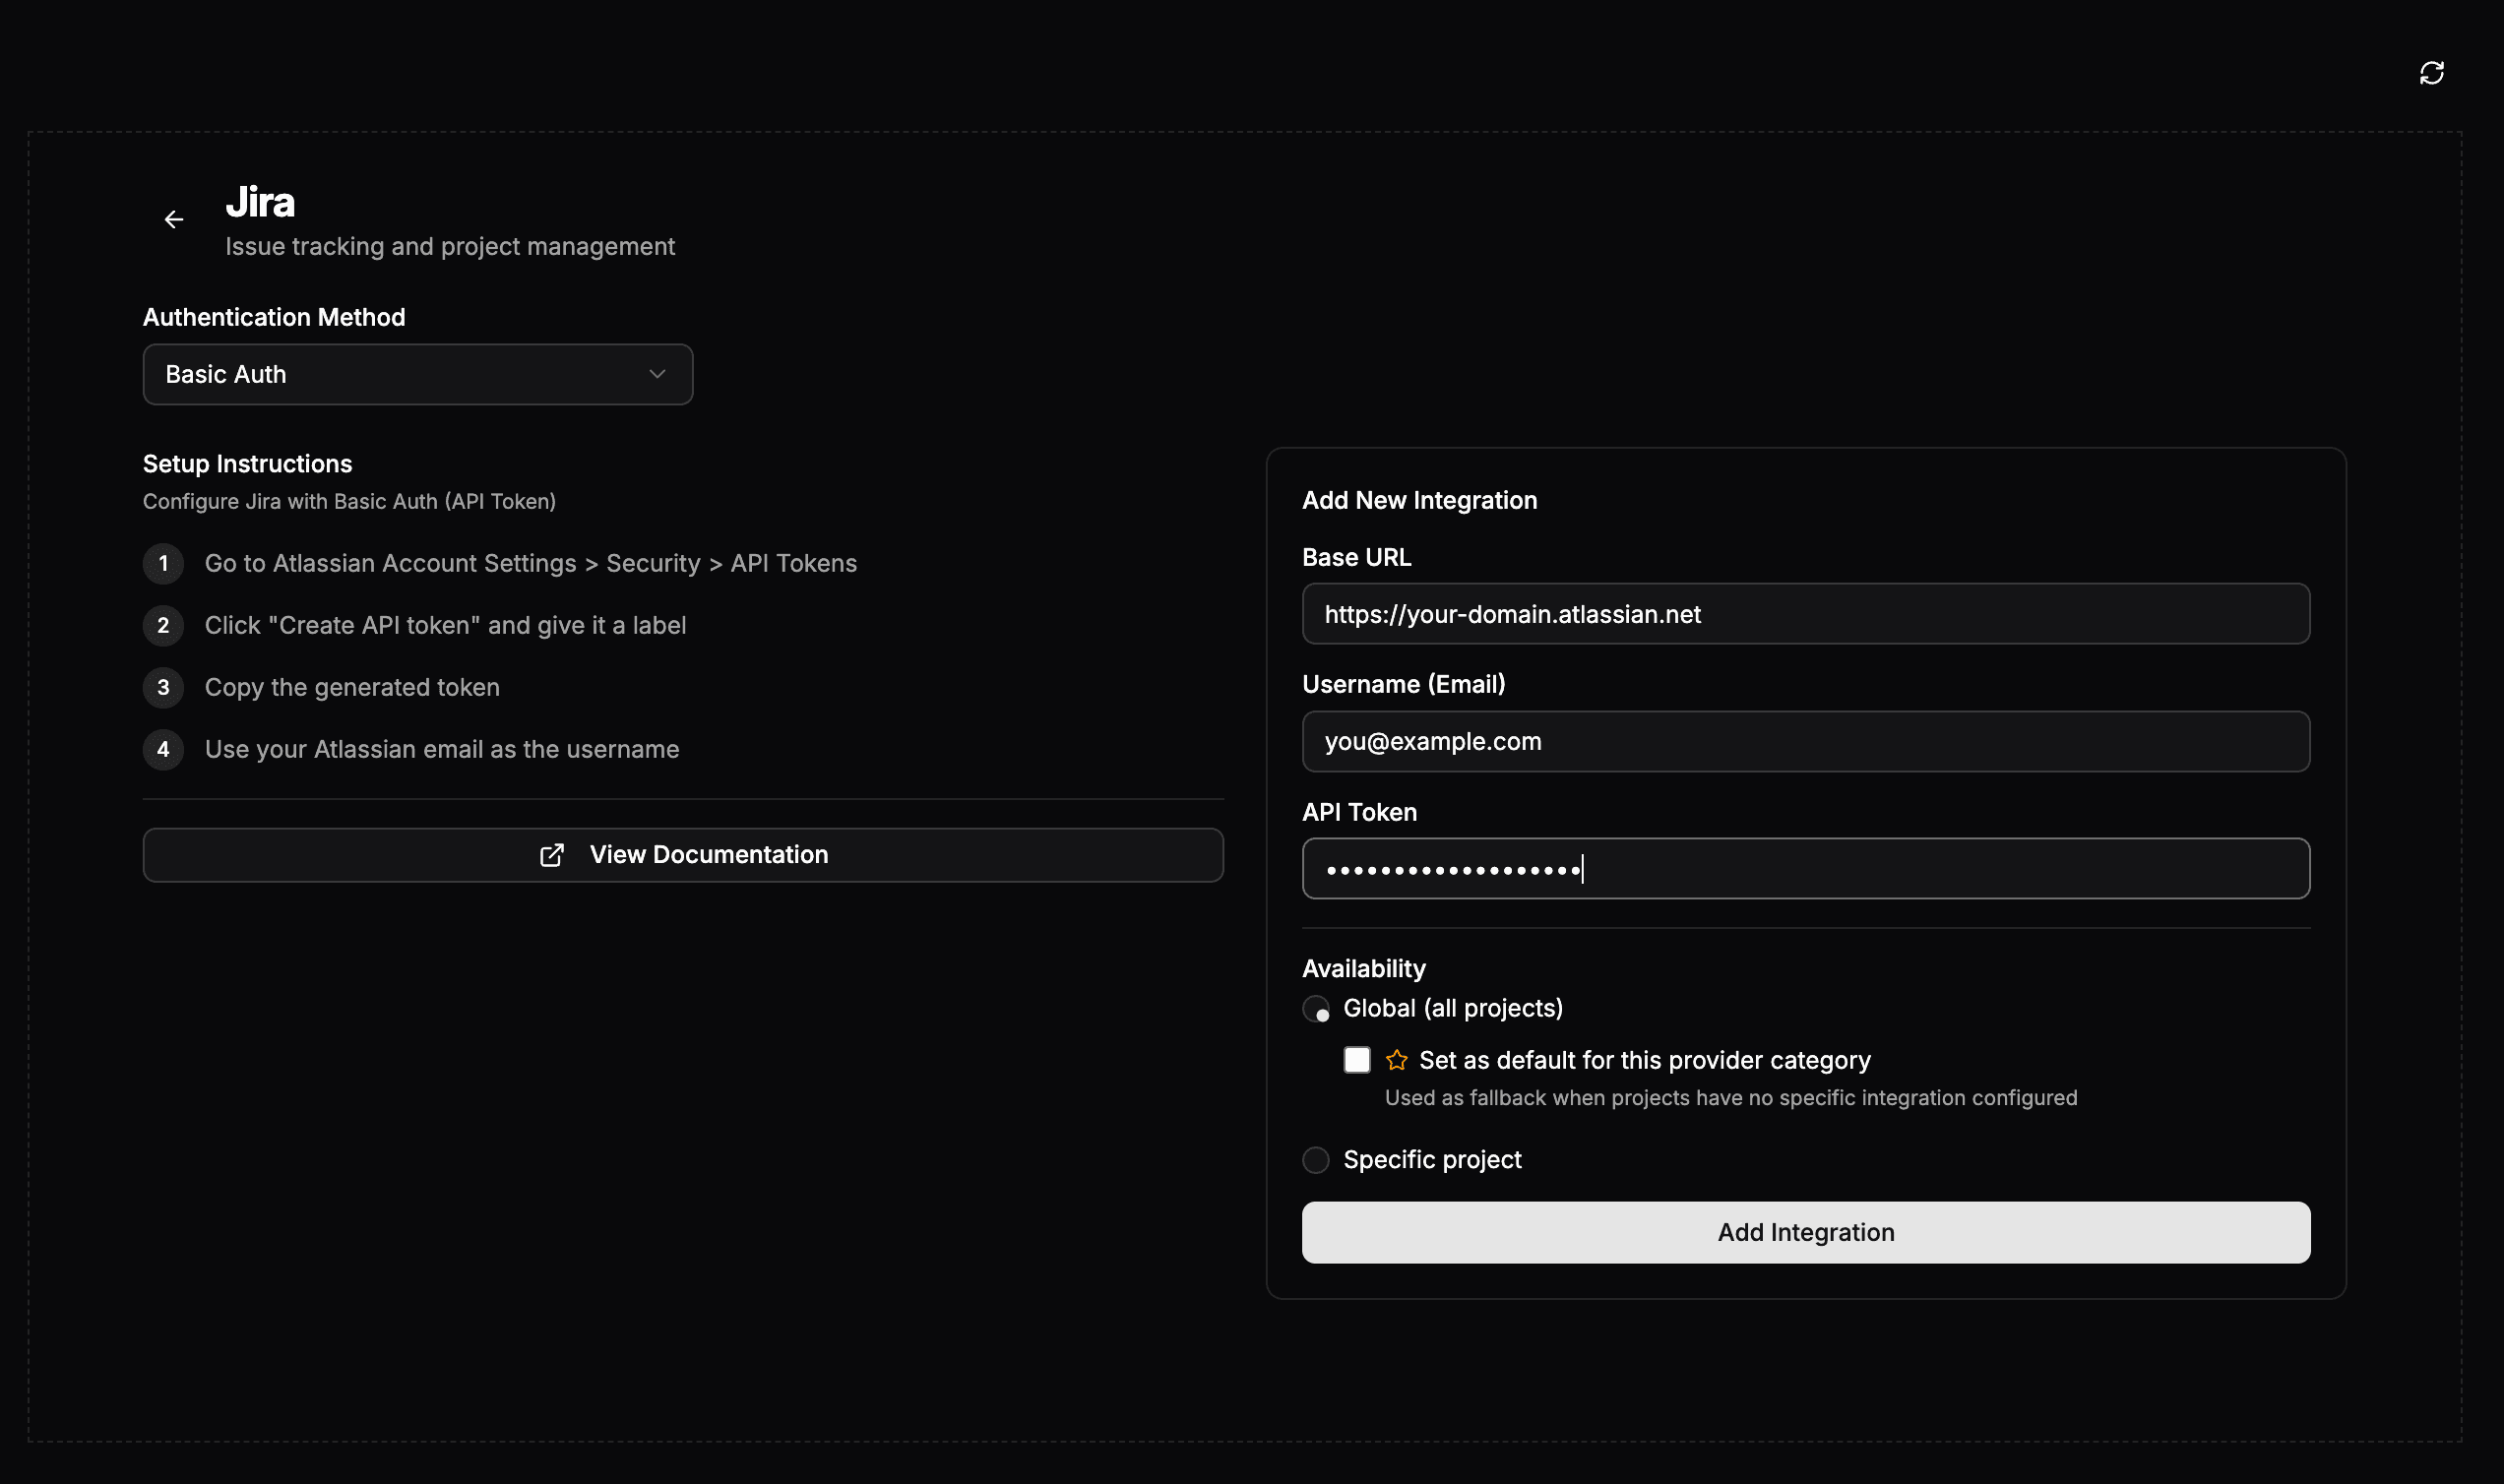
Each integration holds one credential. To read work items and write status back, add the integration twice with the same Base URL: once with Basic Auth (API Token) and once with OAuth Client Credentials holding a Jira site OAuth credential.
- Go to Settings > Organization > Integrations > Jira.
- Under Add New Integration, choose the Authentication Method.
- Fill in the credentials:
- Basic Auth (API Token) — your site Base URL (
https://your-domain.atlassian.net), your Atlassian email as the Username, and an API Token created at Atlassian Account Settings > Security > API tokens. - OAuth Client Credentials — your site Base URL, and the Client ID and Client Secret of either a service account's OAuth credential (see Reading with a service account) or a Jira site OAuth credential (see Creating the write-back credential).
- Basic Auth (API Token) — your site Base URL (
- Set Availability to Global (optionally marking it the default for Jira) or to a specific project.
- Click Add Integration.
Existing integrations are listed with their method, scope, default marker, and status, and can be edited or removed at any time.
Reading with a service account
An Atlassian service account is an account that does not belong to a person. Its OAuth 2.0 credential reads issues without a personal API token. An organization admin creates it in Atlassian Administration (admin.atlassian.com); Atlassian describes the steps in Create an OAuth 2.0 credential for a service account.
- In your organization, go to Directory > Service accounts and select Create a service account.
- Give it a name and, on the app roles step, the User role on your Jira site.
- Open the service account, select Create credentials, and choose OAuth 2.0.
- Name the credential and select the scopes
read:jira-workandread:jira-user. - Copy the Client ID and Client Secret into the OAuth Client Credentials fields on the codev Jira integration form, along with your site Base URL. Atlassian shows the secret only once.
The service account reads only the projects it can browse in Jira.
This credential cannot write back. Jira rejects its deployment and build data with 403 (Provider '<client id>' not installed), even with the write:deployment-info:jira and write:build-info:jira scopes, because only a Jira site OAuth credential or an installed Jira app can send that data.
Creating the write-back credential
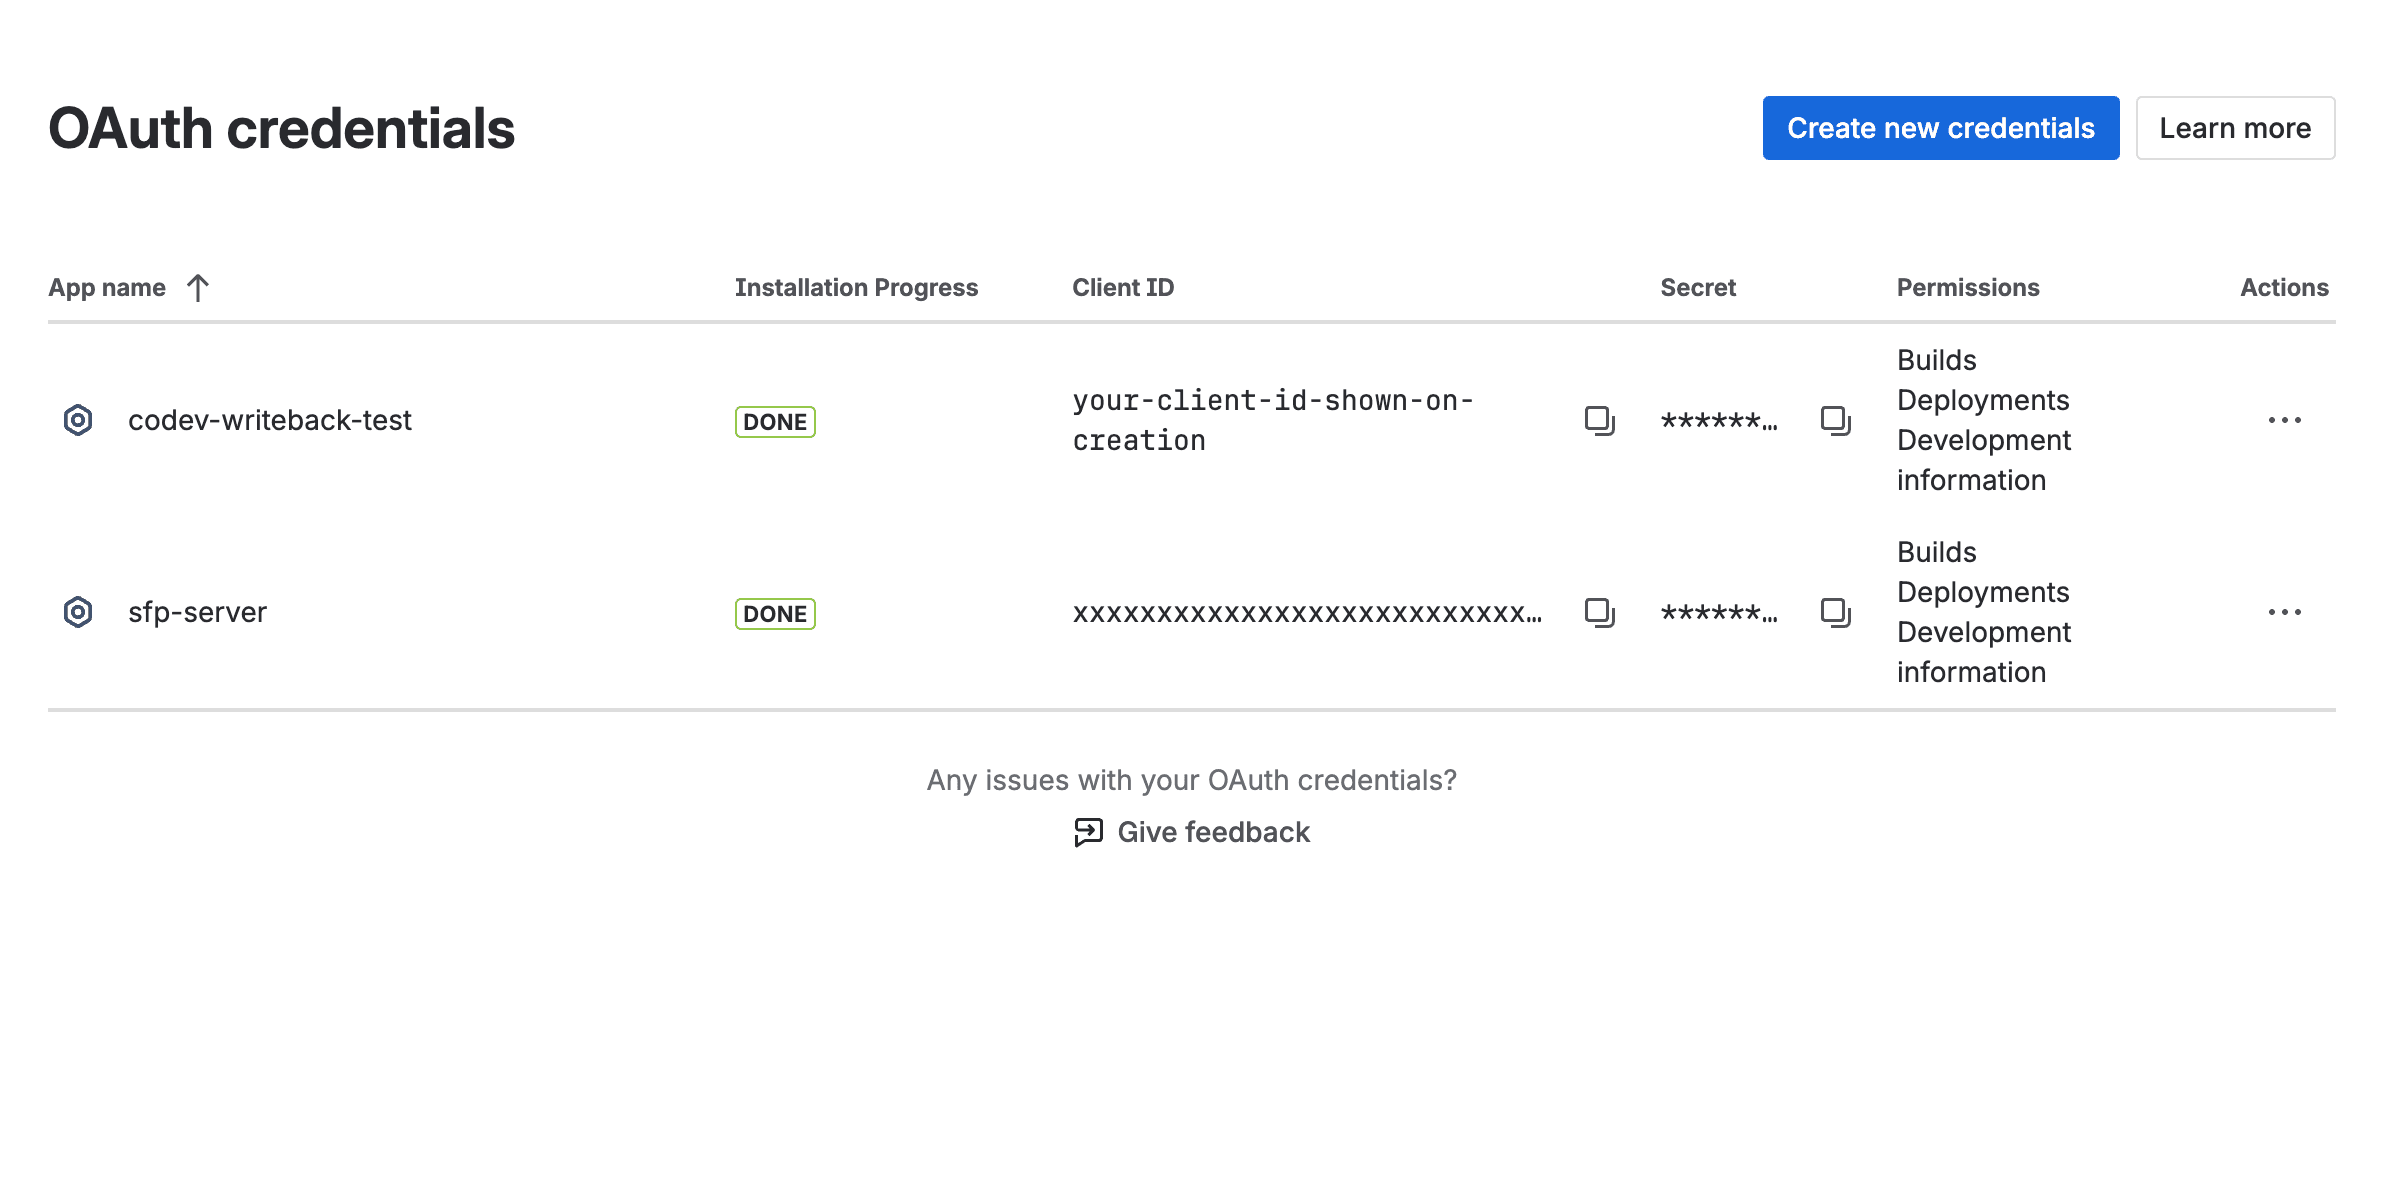
Write-back authenticates to Jira's DevOps APIs (Deployments and Builds) with a Jira site OAuth credential. A Jira site admin creates it in Jira — not in the Atlassian Developer Console, and not as a service account.
- In Jira, open the settings gear (top right) > Apps, then OAuth credentials in the left sidebar. The direct URL is
https://your-domain.atlassian.net/secure/admin/oauth-credentials— the/jira/settings/...routes do not reach this page. - Select Create new credentials.
- Give it a name and a Server base URL (your codev instance URL), and grant both the Deployments and Builds permissions. Both are required; a credential missing either one is accepted on this page but rejected when codev writes.
- Copy the generated Client ID and Client Secret into the OAuth Client Credentials fields on the codev Jira integration form, along with your site Base URL.
Create the credential on this site OAuth credentials page, not as an OAuth 2.0 app in the Atlassian Developer Console (developer.atlassian.com). A Developer Console app is a three-legged (user-authorization) app, so Atlassian does not issue it a client-credentials token: the token request fails with invalid_client (grant_type is not enabled for client). No scope or permission change on the app fixes this.
Scope
Each integration is either Global (all projects) or scoped to a specific project, and a global integration can be marked the default for Jira. codev does not apply that scope to Jira: it loads every active Jira integration and reads with the first Basic Auth integration (else the first OAuth integration), and writes back with the first OAuth integration, whatever their scope. Register at most one integration of each method.
Showing work items
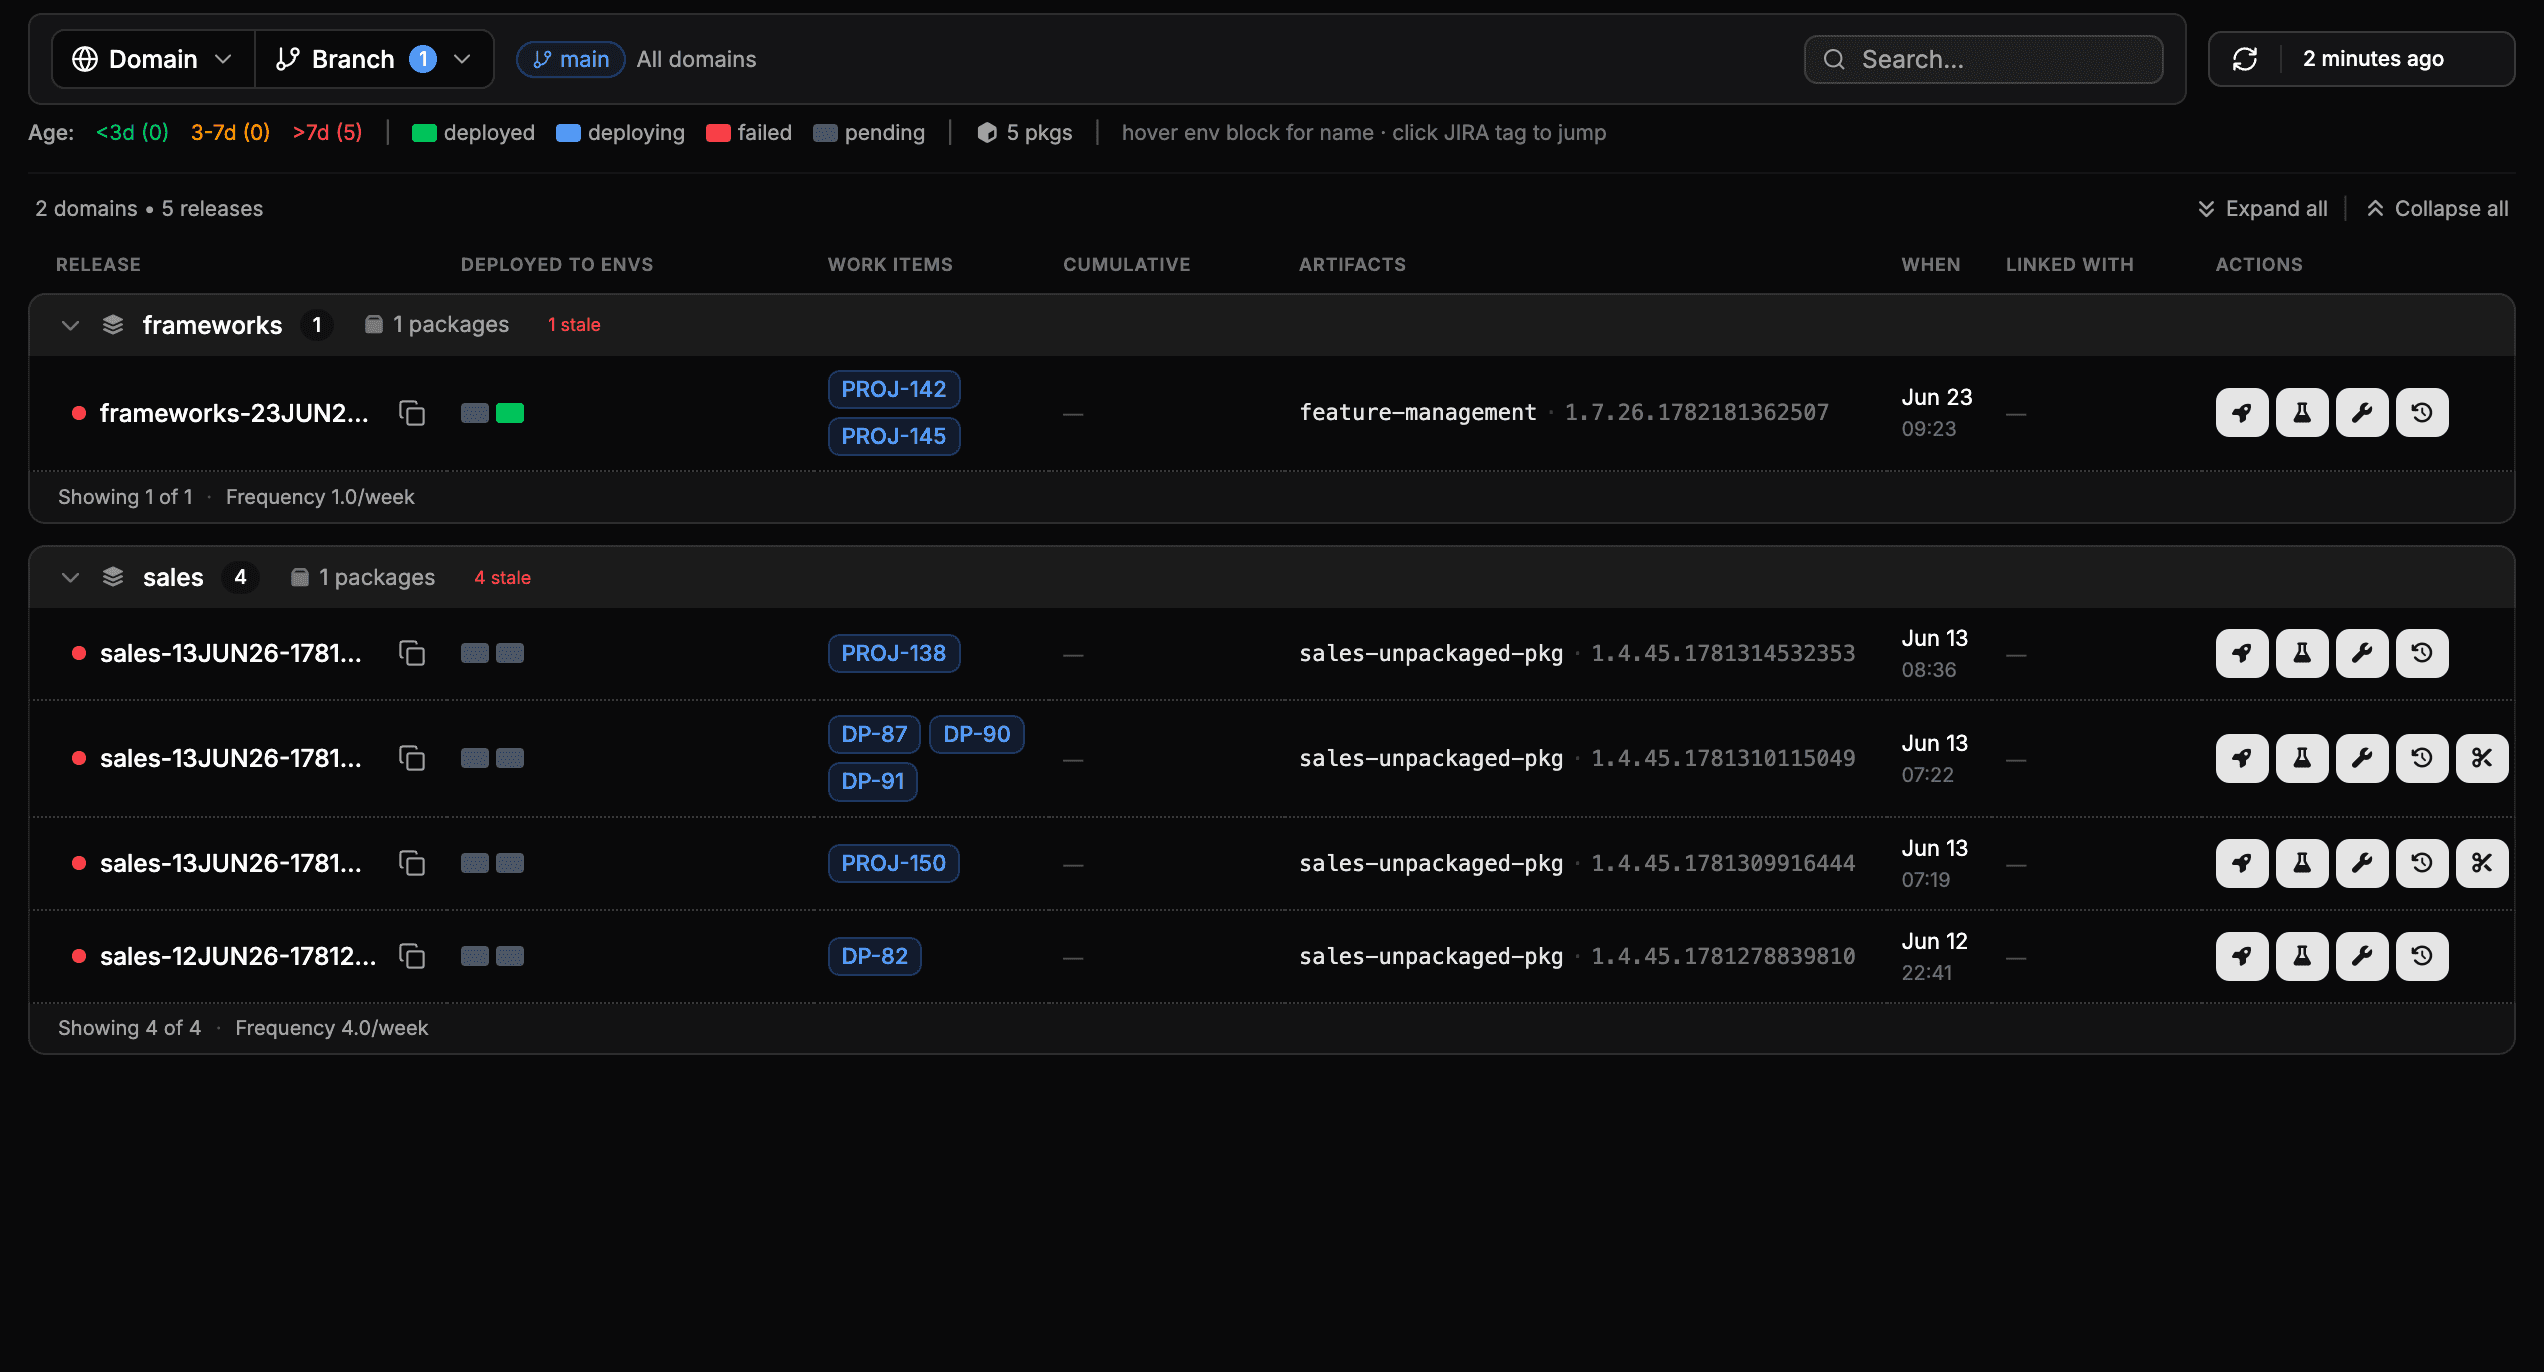
Once an integration that reads issues is registered, codev extracts Jira issue keys from your commit messages (for example, DP-123 or [PROJ-456]) and surfaces them where you plan and ship. For the full set of recognised commit-message formats — and a common pitfall, since an issue key in round parentheses is not detected — see Work items. Detected keys are surfaced:
- On a release candidate, under the Work Items tab, grouped by source with the Jira issues shown as clickable keys.
- In the release request flow, as indicative work items, so you can see which issues a release will deploy and whether the deployment is full or partial.
How keys are detected and linked is part of each project's configuration:
| Setting | What it controls |
|---|---|
jiraProjects | Limits work items to specific project keys, e.g. ["DP", "PROJ"]. |
baseUrl | The browse URL used to build issue links, e.g. https://your-domain.atlassian.net/browse. |
workItemRegexFilter | A custom pattern for issue keys when the default ABC-123 style does not fit, e.g. (FGK|FFK)-[0-9]{3,4}. |
Writing status back to Jira
Write-back is optional. It is active for a project only when both conditions are met:
- An OAuth Client Credentials integration holding a Jira site OAuth credential is registered, and
- Write-back is enabled in the project's configuration.
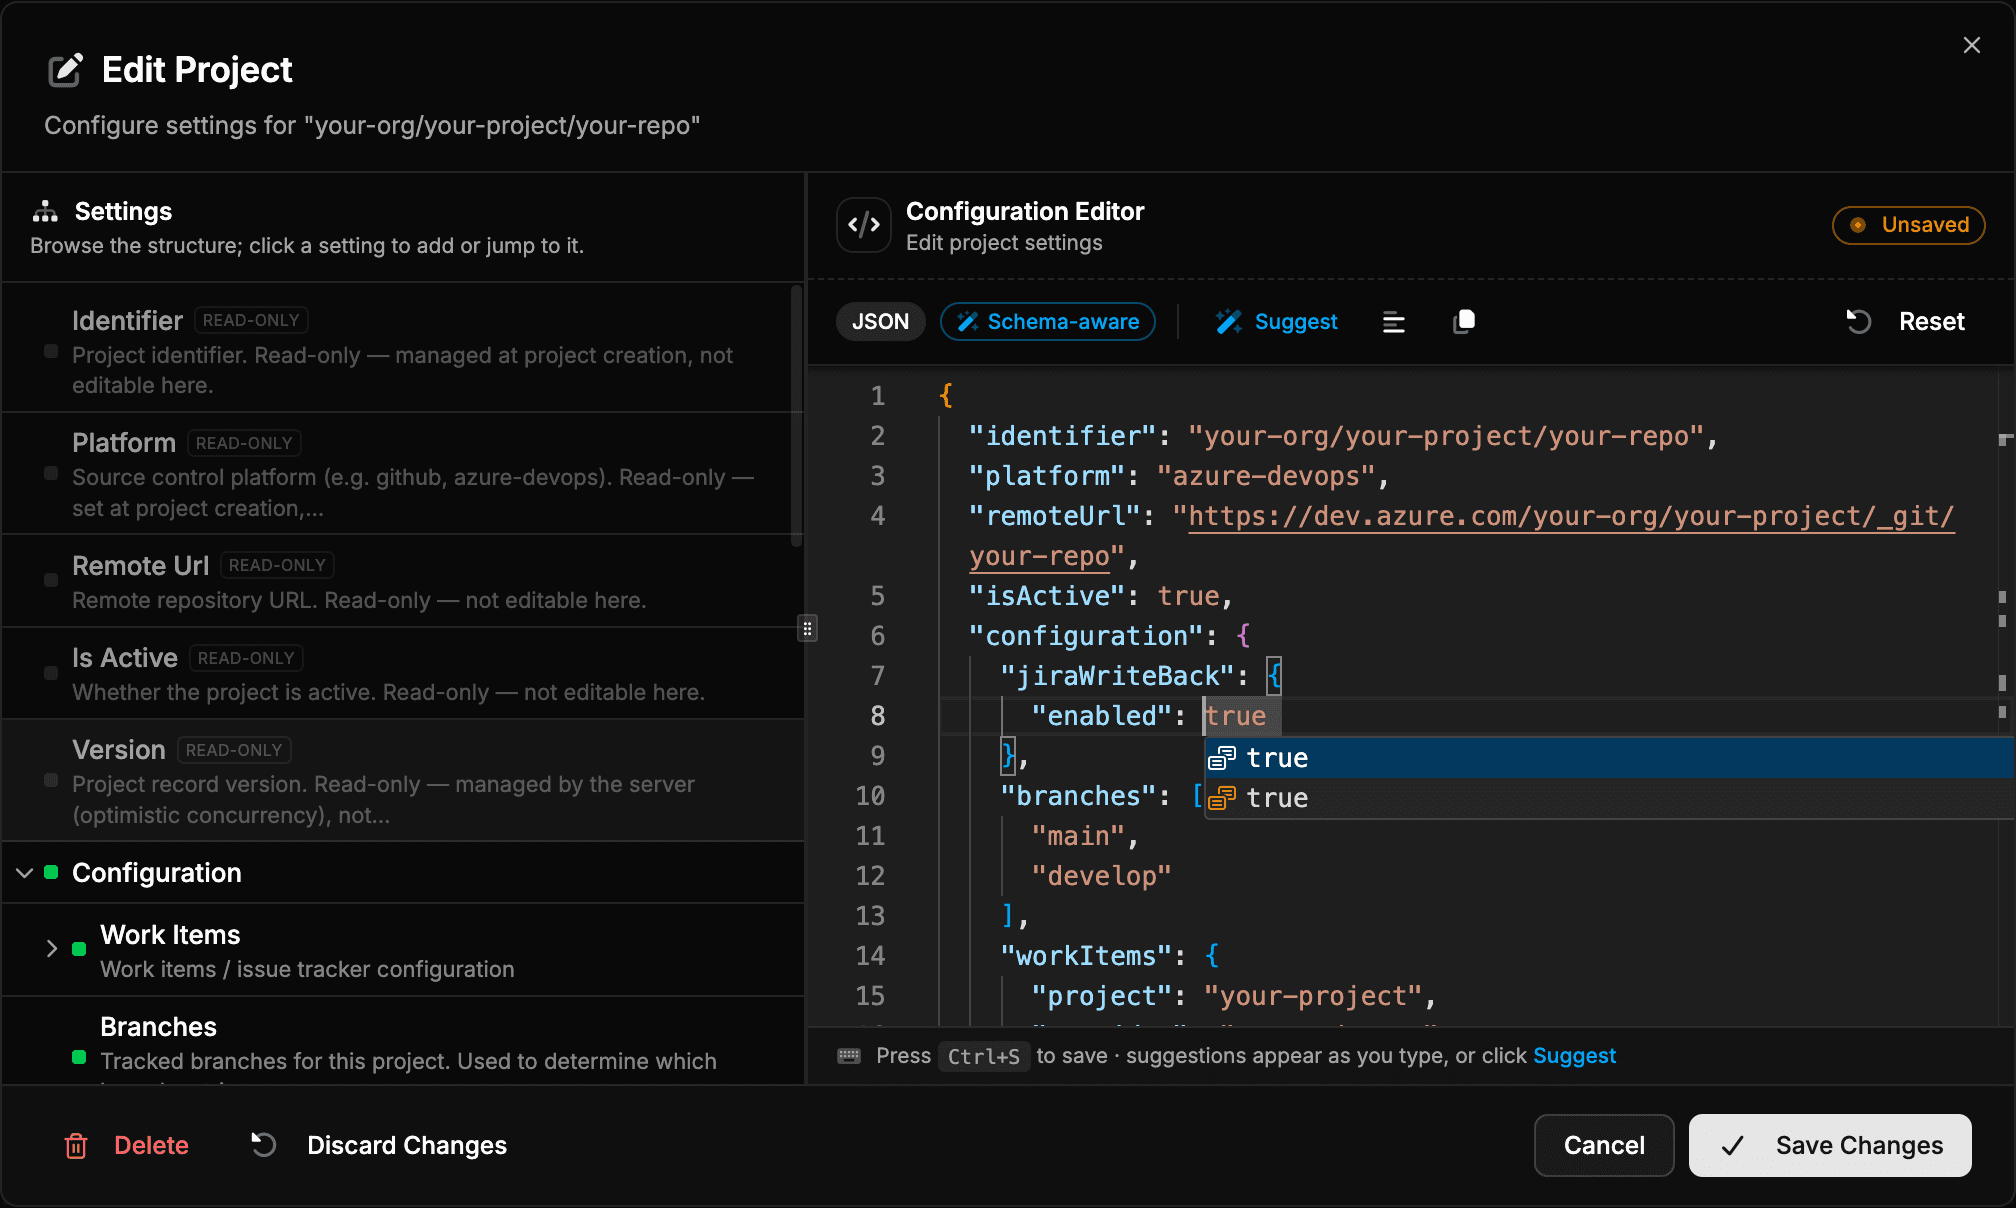
jiraWriteBack.enabled set to true.When active, codev reports to Jira as your pipeline runs:
| Event | What appears in Jira |
|---|---|
| A release is deployed to an environment | A deployment entry in the Deployments panel of every issue referenced in the release, marked successful or failed, with the environment and a link back to codev. |
| A release is finalized | A successful deployment entry for the production environment on every issue referenced in the release. |
| A build completes | A build entry in the Builds panel of the referenced issues, with a link to the run. |

codev maps your environments to Jira's environment types — review and dev environments as development, test and snapshot as testing, and release as staging.
It can take a few minutes to appear. Jira indexes deployment and build data asynchronously, so the Deployments and Builds entries may not show on an individual issue immediately — they usually appear within a few minutes, and can take longer the first time a new credential reports data. The project-level Development > Deployments view is the most reliable place to confirm the data has arrived.
Moving issues automatically. codev writes deployment and build data but does not transition issues itself. Use a Jira Automation rule that reacts to the deployment data — for example, transition an issue to Done when it is deployed to your release environment.
Troubleshooting
Issue keys appear, but their summary and status never load. No Basic Auth (API Token) integration is registered, so codev reads issues with the OAuth integration. If that holds a Jira site OAuth credential, Jira refuses the reads with 401 (Unauthorized; scope does not match): the credential has no read access. Add a Basic Auth integration, or, if you do not use write-back, replace the credential with a service account's — see Adding the integration.
Deployments and builds don't appear, and the server reports a 403 from Jira. The OAuth integration holds a service account's credential. Jira answers its deployment and build data with Provider '<client id>' not installed, since it accepts that data only from a Jira site OAuth credential or an installed Jira app. Replace it with a Jira site OAuth credential — see Creating the write-back credential — and add a Basic Auth integration to keep reading work items.
Deployments and builds don't appear in Jira. The usual causes:
- The credential is a Developer Console (three-legged) OAuth app rather than the site OAuth credentials (client-credentials) app. Atlassian refuses to issue it a token — the token request fails with
400(invalid_client,grant_type is not enabled for client) — so nothing is sent to Jira. Create a credential on the OAuth credentials page — see Creating the write-back credential — and replace the Client ID and Client Secret on the codev OAuth integration. - The OAuth credential is missing the Deployments or Builds permission. A token is issued, but Jira rejects the write. Re-open it at Settings > Apps > OAuth credentials, confirm both are granted, and — if you recreate it — re-enter the new Client ID and Client Secret on the codev form.
- Write-back is registered but not enabled for the project, so codev sends nothing to Jira — see Writing status back to Jira.
A deployment or build doesn't show on an individual issue. Jira indexes this data asynchronously. Confirm it arrived on the project-level Development > Deployments view, which updates before the per-issue panels.
A referenced issue key isn't detected. Check the project's jiraProjects and workItemRegexFilter settings, and note that a key inside round parentheses is not detected — see Work items.
Self-hosting
The two methods work the same on a self-hosted instance, with the same Cloud-only restriction on OAuth. Server-level configuration is covered in the sfp server documentation.
Once an integration that reads issues is registered, see how detected issue keys appear across your pipeline.