Creating and configuring pools
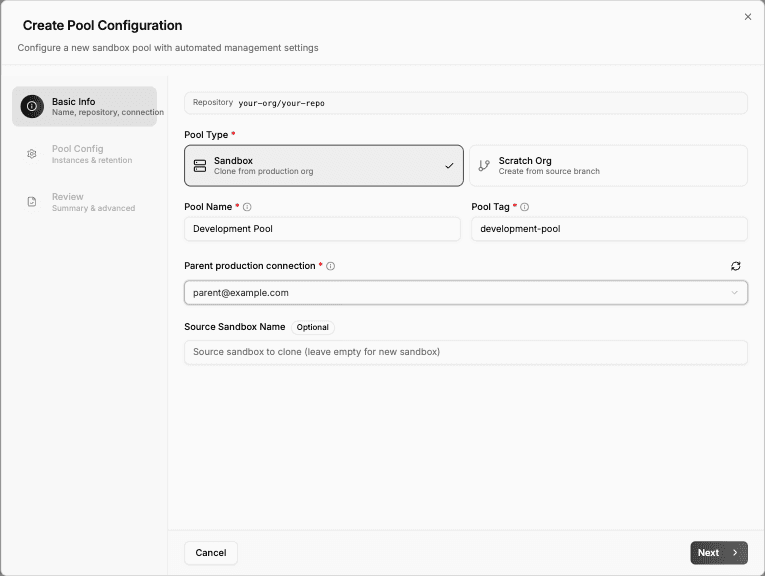
Click Create Pool on the Pools page to launch the creation wizard. It walks you through three steps.
Step 1: Basic info
- Pool type — choose Sandbox (clone from production org) or Scratch Org (create from source branch). This determines how environments are provisioned and what lifecycle they follow.
- Pool name — a human-readable label (e.g., "Development Pool").
- Pool tag — a unique identifier used to reference this pool (e.g.,
development-pool). This is the key that connects everything — monitoring jobs, fetch requests, and configuration all reference the pool by its tag. - Repository — the repository this pool is associated with. For scratch org pools, codev clones this repository and installs its packages into each new scratch org.
- Parent production connection (sandbox pools) — the production user used to provision and manage the sandboxes and authenticate ephemeral review environments. Dev Hub enablement is not required.
- DevHub connection (scratch org pools) — the Dev Hub user used to create and manage scratch orgs.
- Source sandbox name (sandbox pools only) — which sandbox to clone from. Leave empty to create fresh sandboxes from production.
Connection permissions
Use a dedicated user for each purpose. The selected username identifies the authenticated user; two users in the same production org remain separate choices.
For sandbox pools, ask your Salesforce administrator to grant Manage Dev Sandboxes for Developer and Developer Pro sandboxes, or Manage Sandboxes for all sandbox types, together with the API access required by your authentication method. A System Administrator profile is not required solely for sandbox management. Confirm available licenses and any source-sandbox access requirements. See Salesforce sandbox permissions.
For scratch pools, the user needs the relevant Dev Hub permissions. Packaging requires its own permissions. Restricted licenses have additional limitations; see Dev Hub connections before choosing a user for automated pools.
Keep a sandbox pool's parent production connection available for its full lifetime, including refresh, deletion, and review-environment authentication. Pool access does not configure or select a production deployment environment.
Step 2: Pool config
This step controls how many environments the pool maintains and how long they live.
- Min available instances — the floor. codev automatically provisions new environments whenever available count drops below this number. Set this based on how many developers typically need environments at the same time.
- Max total instances — the ceiling. The pool will never exceed this number, even during replenishment. This protects your org limits.
- Days to keep unassigned — how long an available (but unfetched) environment stays in the pool before being removed. This prevents stale environments from accumulating.
- Expiration strategy — what happens when an environment reaches the end of its lifecycle:
- Delete Expired — remove it from the pool and delete it from Salesforce. This is the most common choice.
- Auto Refresh — refresh the sandbox and return it to the pool as a fresh environment. Useful for sandbox pools where you want to recycle rather than recreate.
- Flag Expired — mark it as expired but leave it for manual review. Use this if you want human oversight before deletion.
- Notify Only — send a notification but take no automatic action.
- Pool status — toggle the pool active or inactive. Inactive pools stop monitoring and provisioning.
Step 3: Review
Review the summary and the generated YAML configuration. You can edit the YAML directly if you need to tweak settings not exposed in the wizard. Click Create to provision the pool.
Once created, codev immediately begins provisioning environments up to the minimum capacity. For scratch org pools, this involves cloning your repository, installing dependencies, and deploying packages into each new org — all handled automatically. You can track progress on the Monitoring page.
Editing a pool
Click the edit action on any pool row to change its configuration. You can adjust instance limits, retention settings, and expiration strategy at any time. Changes take effect on the next monitoring cycle.
You can also view and edit the raw YAML configuration by clicking into the pool detail page and switching to the Pool Config (YAML) tab.
Deleting a pool
Click the delete action on a pool row to remove it. This stops monitoring and provisioning for the pool. Existing instances are cleaned up according to the expiration strategy.