Managing Release Candidates
Once you have release candidates on the Release Candidates page, you can deploy them, test them, or use them as the basis for a hotfix. This page walks through each action.
Release
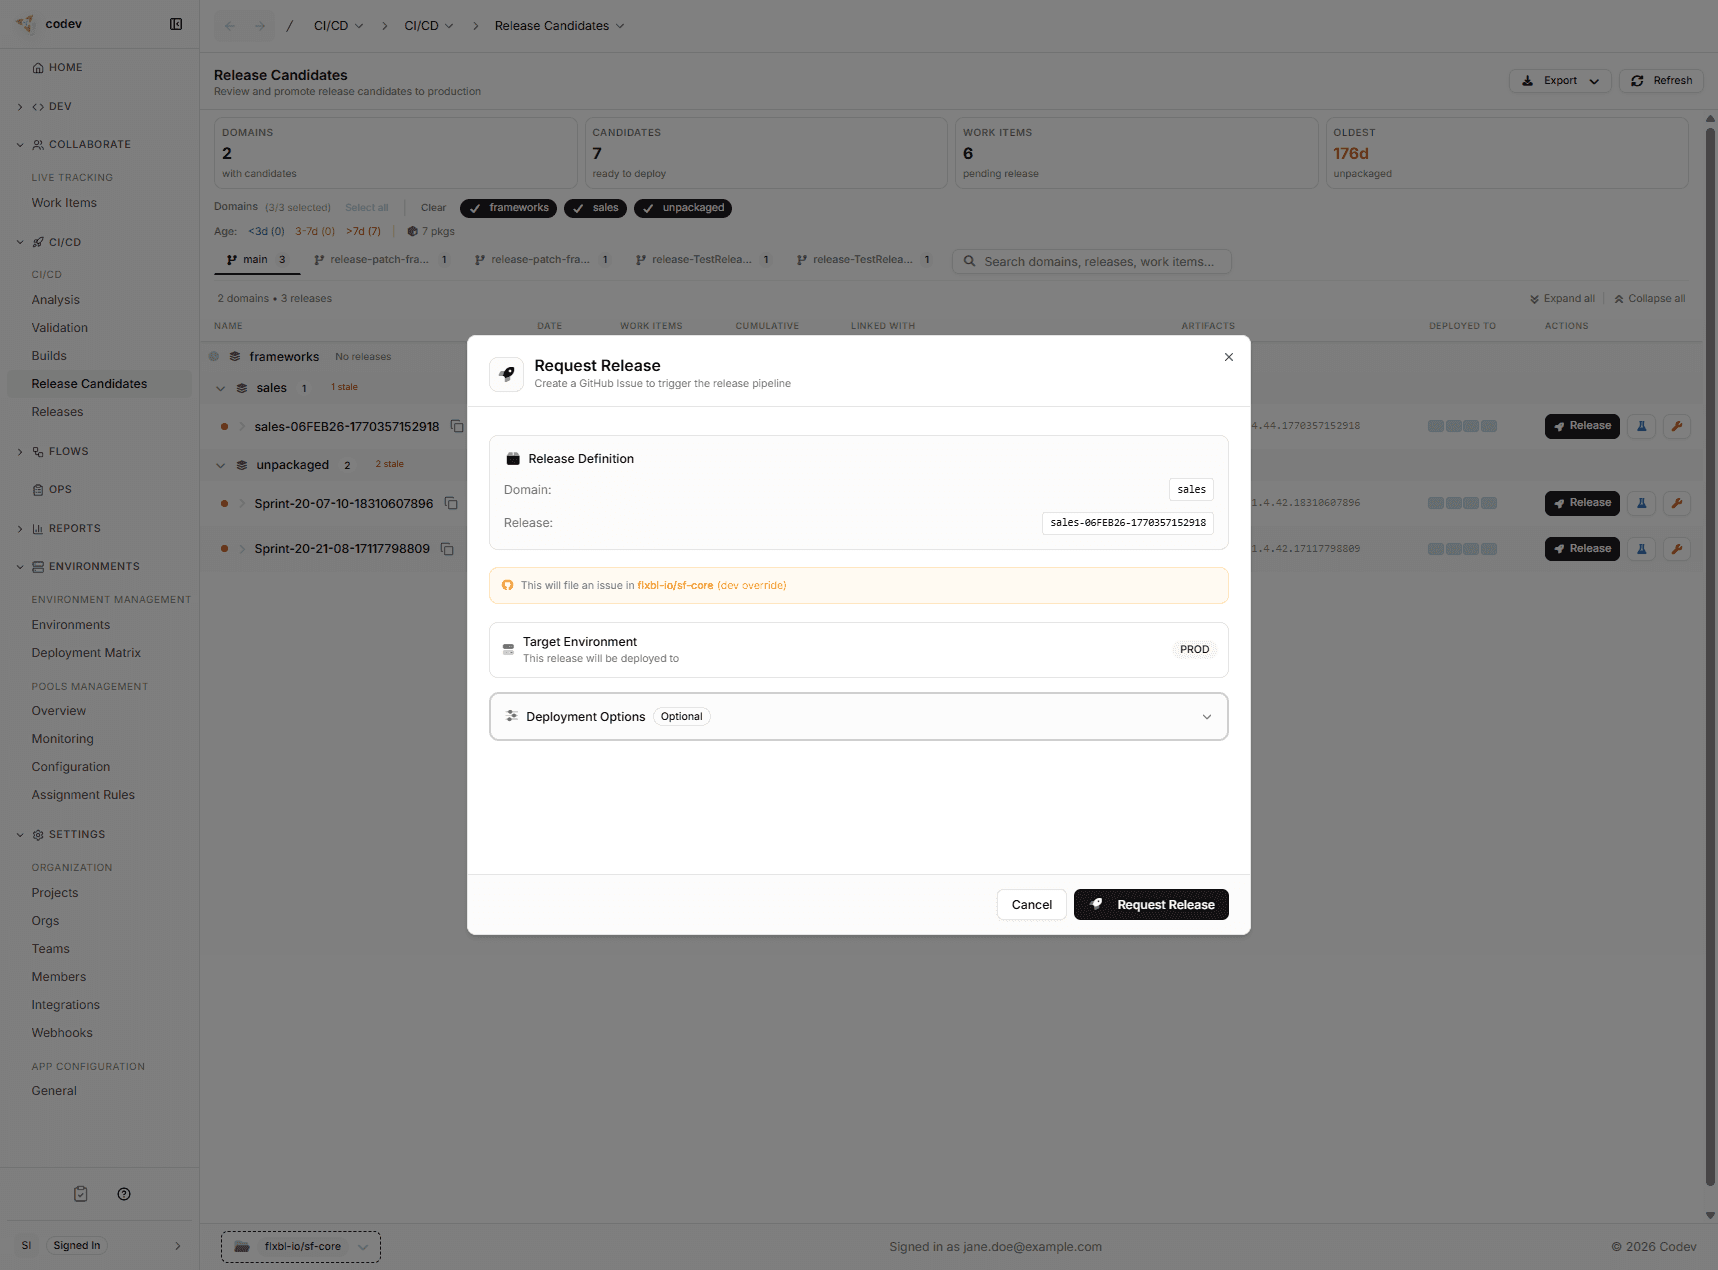
Use Release when you want to deploy a candidate to an environment — typically staging, UAT, or production.
How it works
- Click Release on the release candidate you want to promote.
- The dialog shows you the release definition (domain and release name) and a list of indicative work items that will be included.
- Work items are color-coded:
- Green — this release will fully deploy the work item
- Orange — only a partial deployment (other domains still need releasing for the work item to be complete)
- Grey — the work item is linked to a release candidate in a different domain
- If the release candidate has linked release candidates in other domains, you can select or deselect them.
- Review Pre/Post Steps shows the manual deployment steps the candidate carries for each target environment, and which are still outstanding there.
- Confirm the target environment and click Request Release.
What happens after you click Request Release
codev kicks off the release workflow:
- A dry run validates the release — confirming which packages will be deployed and checking compatibility with the target environment.
- The request enters an approval gate. Designated approvers on your team receive a notification and can review, approve, or reject from Workflows > Pending Approvals.
- If the environment gates on manual deployment steps, the release then waits until its outstanding pre-deployment steps are completed in that environment. See Gating releases on pre-deployment steps.
- codev then locks the target environment, deploys the packages, and unlocks it.
- The release appears on the Releases page.
Releasing to multiple environments
If your release candidate has multiple target environments, each environment gets its own approval gate and deploys independently. The whole process is tracked in Workflows > Runs.
Independent means exactly that: a failure in one environment does not stop, cancel, or roll back the deployment to another. Each environment runs its own approval, locks its own org, and deploys on its own — a rejected approval for staging has no effect on production, and a deployment error in one sandbox leaves the others untouched.
The overall release request reflects the combined result:
- Every environment deployed — the run shows Completed.
- No environment deployed (all failed, rejected, or expired) — the run shows Failed.
- A mix — the run shows Partial. Open the run's sub-flows to see each environment's own outcome; rejected and expired approvals count as non-successes.
See Run statuses for what each status means.
The approval gate ensures that nobody deploys to production without review. If your team wants to skip approval for certain environments (like a dev sandbox), that can be configured in your workflow settings.
Get on Sandbox
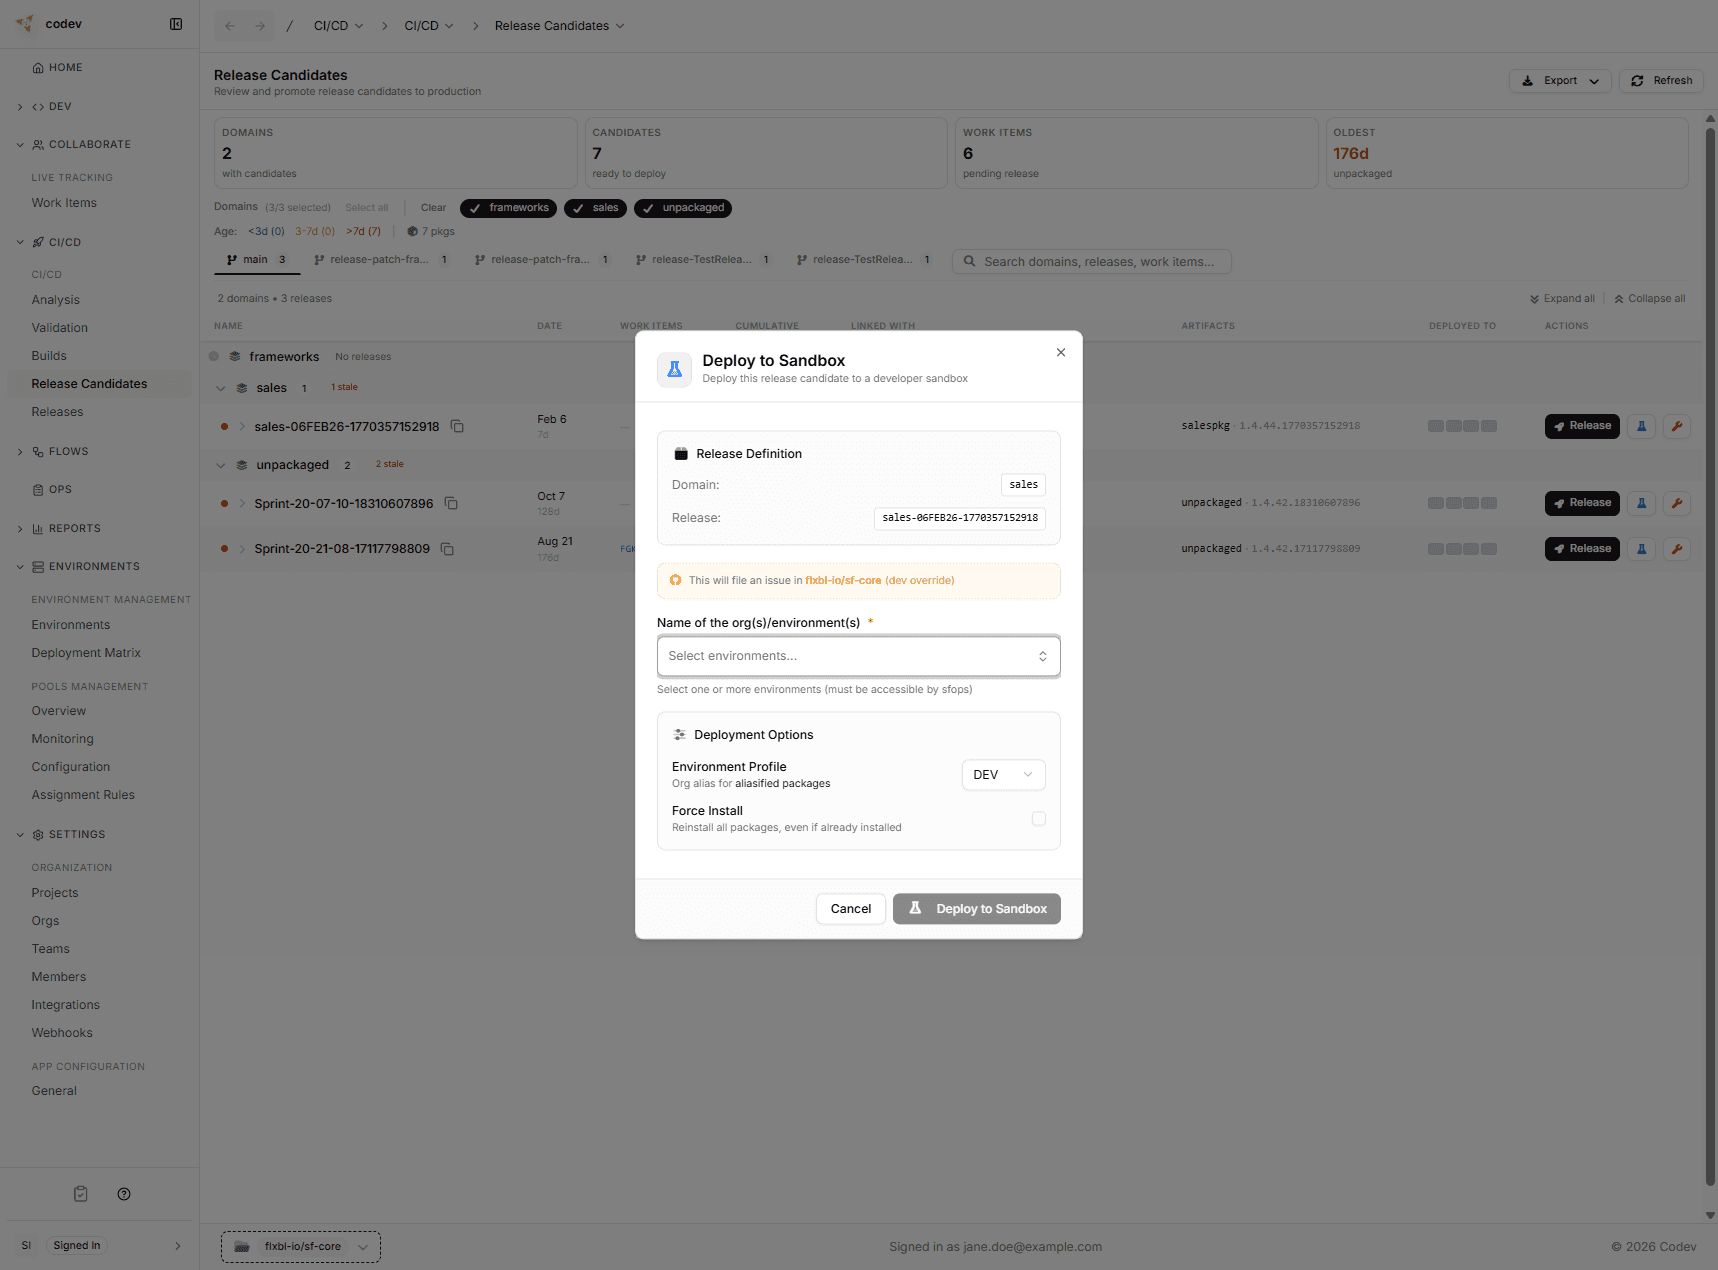
Use Get on Sandbox when you want to test a release candidate before formally releasing it. This deploys directly — no approval gate, no waiting.
How it works
- Click the sandbox deploy action on the release candidate row.
- Choose one or more target sandbox environments.
- Select an environment profile (default: DEV).
- Optionally enable Force Install to reinstall packages even if they are already present in the target org.
- Click Deploy to Sandbox.
The deployment starts immediately and you can track it in Workflows > Runs.
Patch
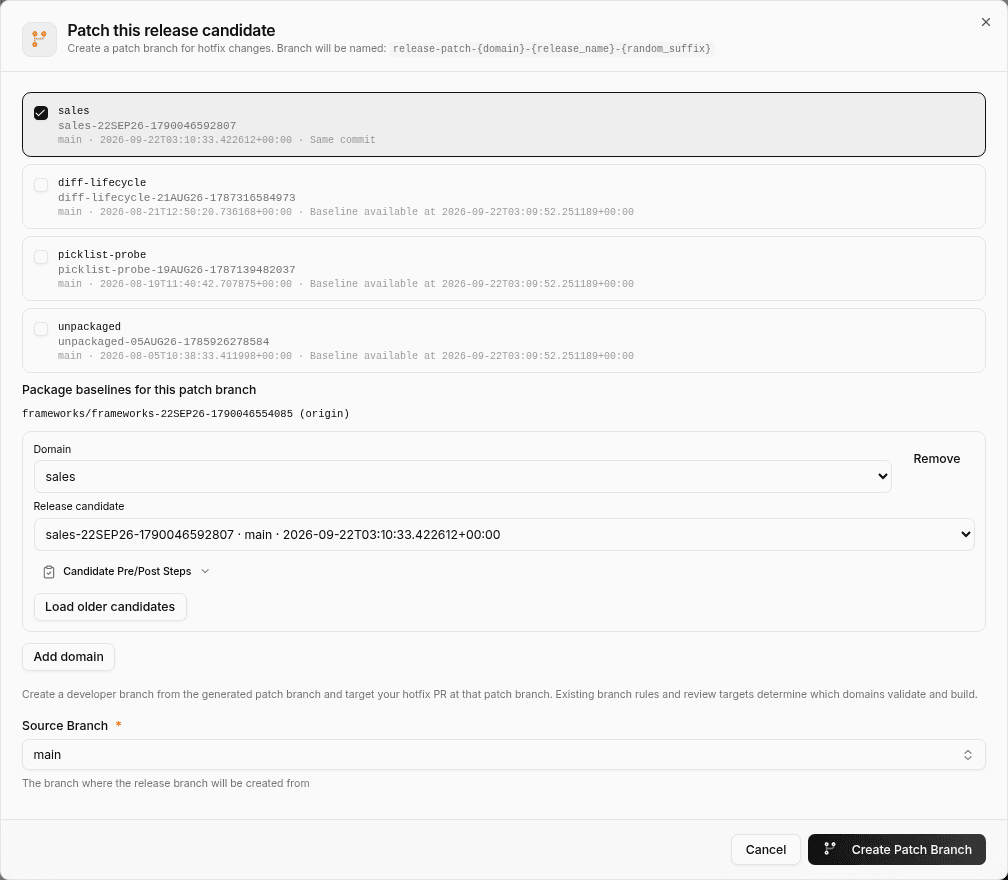
Use Patch when you need a hotfix. This creates a new branch from the exact state of a release candidate, so you can fix a production issue without picking up all the other changes that have been merged since.
A patch branch can also carry release candidates from other domains. Add a companion candidate when the fix spans more than one domain, or when another domain's packages must match one of its candidates rather than the source branch.
How it works
- Click the patch action on the release candidate row. This is the originating candidate; its domain and release name go into the branch name.
- Optionally select companion candidates from other domains, one per domain. Available companions lists suggestions; select a row to add it.
- To use a candidate that is not suggested, click Add domain, choose the domain, and choose a Release candidate. Load older candidates pages further back through the domain's history, including finalized candidates.
- Confirm the source branch (default: main).
- Click Create Patch Branch.
codev creates one new branch in your repository from the source branch, with the packages of every selected candidate set to the versions in that candidate. Packages that are not part of a selected candidate keep their state on the source branch. The branch appears as a separate tab on the Release Candidates page. Developers push their fix to this branch, and when the fix is merged, codev builds a new release candidate for each domain the change affects — which can then be released through the normal flow.
If any selected candidate's artifacts cannot be fetched, the request fails and no branch is created.
Companion suggestions
Suggestions are listed in this order, and each row states why it was suggested:
| Reason | Meaning |
|---|---|
| Same commit | The candidate was built from the same commit as the originating candidate |
| Shared work items | The candidate shares one or more work items with the originating candidate |
| Baseline available at | The most recent candidate in that domain on the same branch at the time the originating candidate was created. Shown only for a domain with no other suggestion |
Work-item and baseline suggestions consider the five most recent eligible candidates per domain, on the same branch as the originating candidate and created before it. Candidates that were aborted, or that do not record a version for every package, are not offered as suggestions or under Add domain.
A suggestion indicates that two candidates are associated; it does not check that they work together. Validation of the pull requests into the patch branch does that.
Validating and deploying changes on the patch branch
Patch branches are named release-patch-<domain>-<release>-<suffix> after the originating candidate, so a single wildcard pattern such as release-patch-* matches every patch branch. Two optional setups connect a patch branch to environments:
- Validate the pull requests. A pull request opened against the patch branch is validated like any other. Add a review environment assignment rule with a Branch Pattern of
release-patch-*so each PR is allocated a pool environment or a dedicated org for change validation. - Deploy the patch build. When the fix merges, codev builds the new release candidates. Set an environment's Branch field to
release-patch-*to have that build deploy to the environment automatically — see Deploying to environments by branch. Otherwise, release the candidates when you are ready.
Unbundle
Use Unbundle to remove specific commits from a release candidate — codev rebuilds the candidate without them, keeping everything else. Because it replays your other changes and resolves any conflicts automatically, it has important limitations and is best used on a recent candidate.
See the dedicated Unbundle page for how it works, conflict resolution, and when a revert PR is the better choice.
Release candidate lifecycle
Release candidates move through these statuses as your team works with them:
- Active — ready to be released or tested
- Released — deployed to at least one environment
- Superseded — a newer release candidate exists for the same domain (this one is still deployable if needed)
You can still release a superseded RC. The status is informational — it tells you a newer version is available, but it does not block you from deploying an older one if needed.