Getting Started
First-time codev setup — what a Dev Hub, an SFDX auth URL, and the GitHub App are, and the onboarding steps in order, from creating a project to the pull-request flow. No prior Salesforce DevOps exper
This page walks through setting up codev for the first time, assuming no prior experience with Salesforce development tooling. It explains the repository connection, Dev Hub user, and Salesforce authentication used when setting up CI/CD for a GitHub-backed project. The basic setup validates changes against a sandbox; scratch orgs and pools are optional on top. The shared steps (project, GitHub App, Dev Hub) look the same in every feature's setup wizard, so this guide is also the reference for those. If you already know what these are, you can go straight to Step 1.
What you need before you start
| You need | What it is | Where it comes from |
|---|---|---|
| A codev login | Access to your organization's codev instance (https://<your-org>.flxbl.io or your self-hosted URL) | Your codev administrator, or flxbl.io for a cloud instance |
| A Git repository | The repository that holds (or will hold) your Salesforce source code | GitHub or Azure DevOps. This guide uses GitHub; for Azure DevOps see Azure DevOps |
| A Salesforce org with Dev Hub enabled | Usually your production org, or a Developer Edition org for evaluation | See What is a Dev Hub? below |
| The Salesforce CLI | The sf command-line tool, used once during setup to produce an auth URL | Salesforce CLI install guide |
Concepts
What is a Dev Hub?
A Dev Hub is a Salesforce org with the Dev Hub feature turned on. Enabling it lets that org create and manage scratch orgs (short-lived, disposable Salesforce environments) and supports package development. codev uses a Dev Hub connection for scratch orgs and packaging. Sandbox pools use a parent production connection, independently of whether Dev Hub is enabled in that org.
You do not create a Dev Hub from scratch — you enable the feature on an org you already have:
- Log in to your production org (or a Developer Edition org if you are evaluating).
- Open Setup, search for Dev Hub.
- Turn on Enable Dev Hub. If you plan to use scratch org pools, also review the active scratch org limits shown there.
Enabling Dev Hub is not reversible, but it does not change any behavior of the org itself — it enables scratch org development.
The Salesforce org and the authenticated user serve different purposes. A Dev Hub user can have restricted access even when the Dev Hub is your production org. Register dedicated users with permissions for their intended work:
| Purpose | Connection |
|---|---|
| Scratch orgs and packaging | A Dev Hub user with the required scratch org and package-development permissions |
| Sandbox pools and ephemeral review environments | A user in the parent production org with sandbox-management permissions and available sandbox licenses |
| Production deployments | The user explicitly connected to your production deployment environment |
The Dev Hub user and sandbox-management user can be different users in the same production org. Keep the parent production connection available throughout managed sandbox provisioning, lifecycle operations, and review-environment authentication. Do not substitute a limited Dev Hub user for that connection.
Salesforce offers a Limited Access license for package developers, with feature and API restrictions. Connecting such a user does not establish compatibility with every codev scratch-pool operation; verify the permissions and supported operations before using it for pools.
What is an SFDX auth URL?
An SFDX auth URL is a single string, starting with force://, that carries everything needed to authenticate to one Salesforce org — it is how you hand codev a connection to an org without sharing a password. The Salesforce CLI produces it after you log in once on your machine:
# 1. Confirm the CLI is installed
sf --version

# 2. This opens a browser window; complete the Salesforce login there.
#    The CLI stores the session under the alias `my-devhub`.
sf org login web --alias my-devhub

# 3. Only after step 2 succeeds: print that org's auth URL
sf org auth show-sfdx-auth-url --target-org my-devhub

# (Already logged in earlier? `sf org list` shows your authenticated orgs
#  and their aliases — use one of those in step 3 instead.)
Step 3 works only for an org the CLI is already logged into — it prompts for confirmation, then prints the force://... value. That whole string is the credential you paste into codev. It is only available for orgs authorized through a web login (step 2), not the JWT flow.
Older CLI versions use a different command. Before the Salesforce CLI releases of May 27, 2026, the auth URL came from sf org display --verbose --target-org my-devhub (the Sfdx Auth Url row of the output). From those releases onward that field is redacted, and sf org auth show-sfdx-auth-url is the supported way to retrieve it. If one command is not recognized or prints a redacted value, use the other.
Treat an auth URL like a password: whoever has it can act as that user in that org. codev encrypts auth URLs at rest and never shows them again after registration. Prefer logging in as a dedicated service account (an integration user) rather than your personal user, so the connection does not break when an individual leaves or changes their password.
What is the GitHub App?
codev works on your repository — it reads source code, posts validation results as checks, and comments on pull requests. It does this through a GitHub App, GitHub's mechanism for granting an application scoped access to selected repositories.
On the cloud instance, GitHub is already connected through flxbl's installed GitHub App; during onboarding you only approve which repositories it can see. On a self-hosted instance you register your own app — see GitHub for the full authentication reference.
Step 1: Create a project
A project in codev is one repository plus the branches you want codev to track. Sign in, and if this is a fresh instance you land on project creation directly; otherwise open the project selector (top left) and choose to create a new project.
- Paste your Repository URL (for example
https://github.com/your-org/your-repo). codev detects the platform and derives the Project Identifier from the URL. - Under Branches to track, select the branches codev should watch for merges and pull requests — typically
main, plus any long-lived release branches. - Click Create Project.
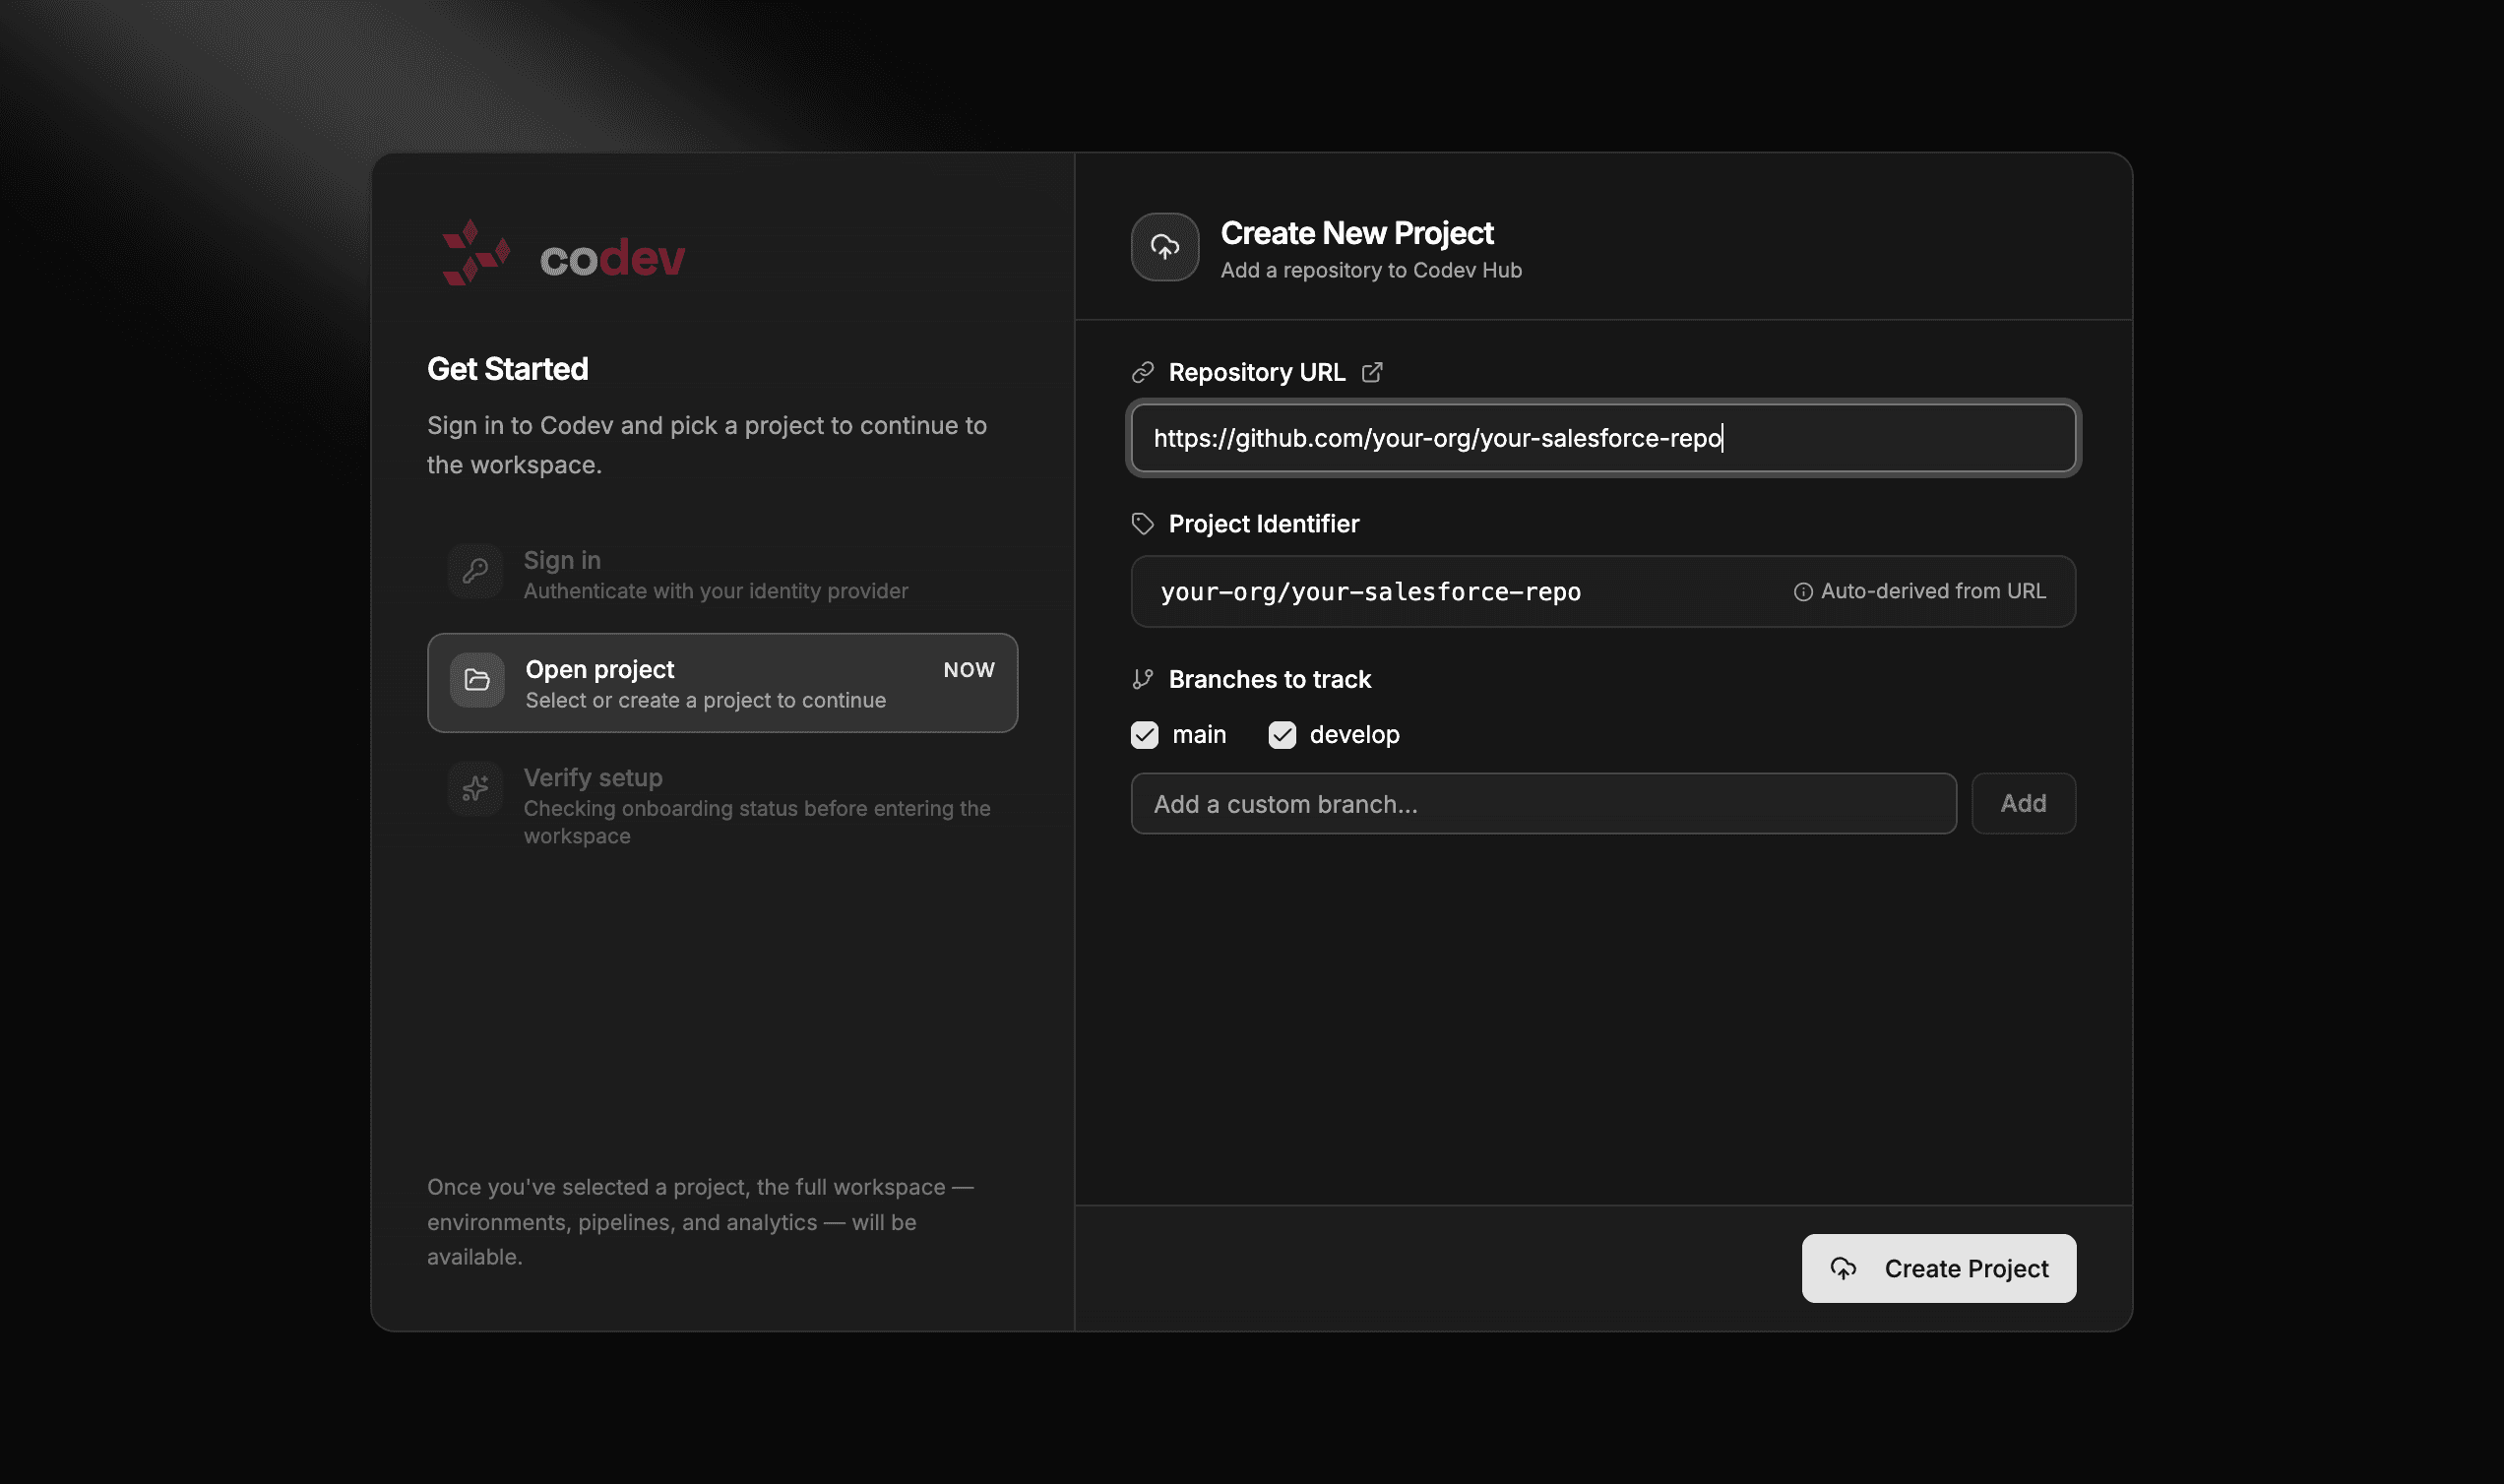
Step 2: Activate features
Creating a project lands you on the Activate Features page. codev is modular: each feature area (CI/CD, Pools, Inspect, Ops, and so on) is activated independently, and each card lists the setup steps it needs — steps like App Integration or Dev Hub are shared, so completing one for a feature completes it everywhere.
This guide follows CI/CD, whose wizard covers every shared step. Each feature has its own guide at the start of its section.
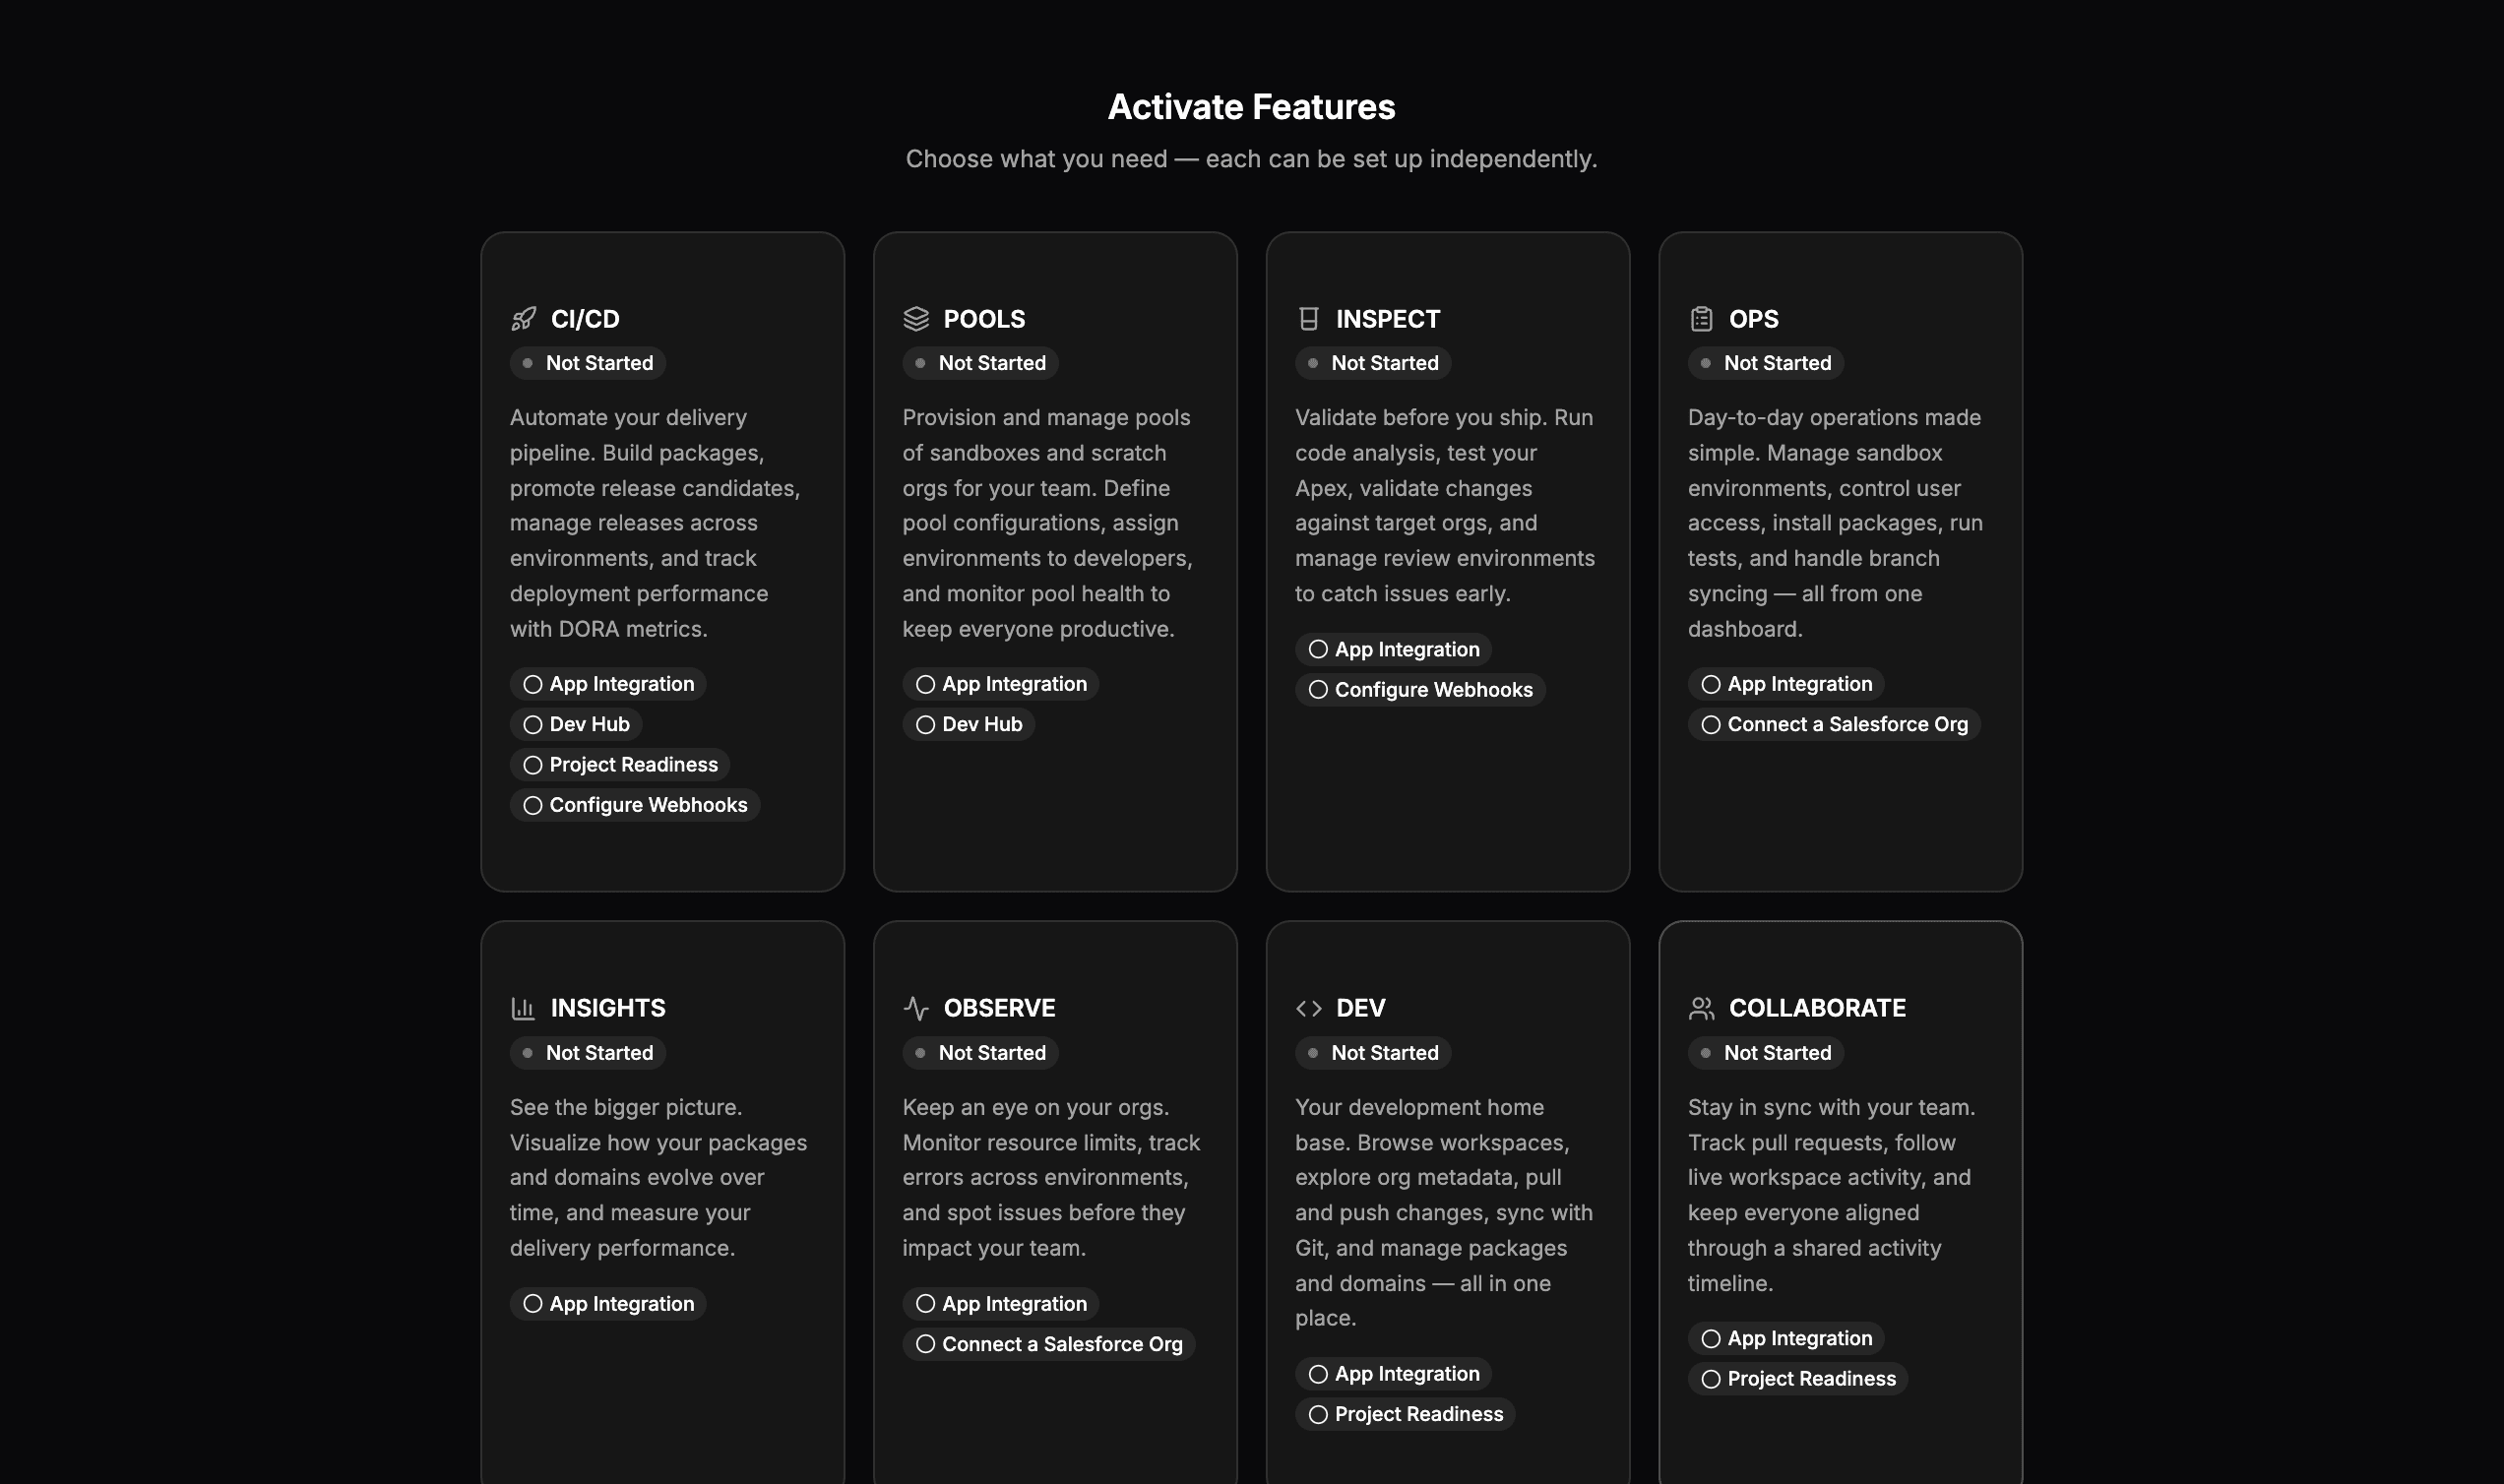
Clicking a card opens its setup wizard, with one collapsible section per step:
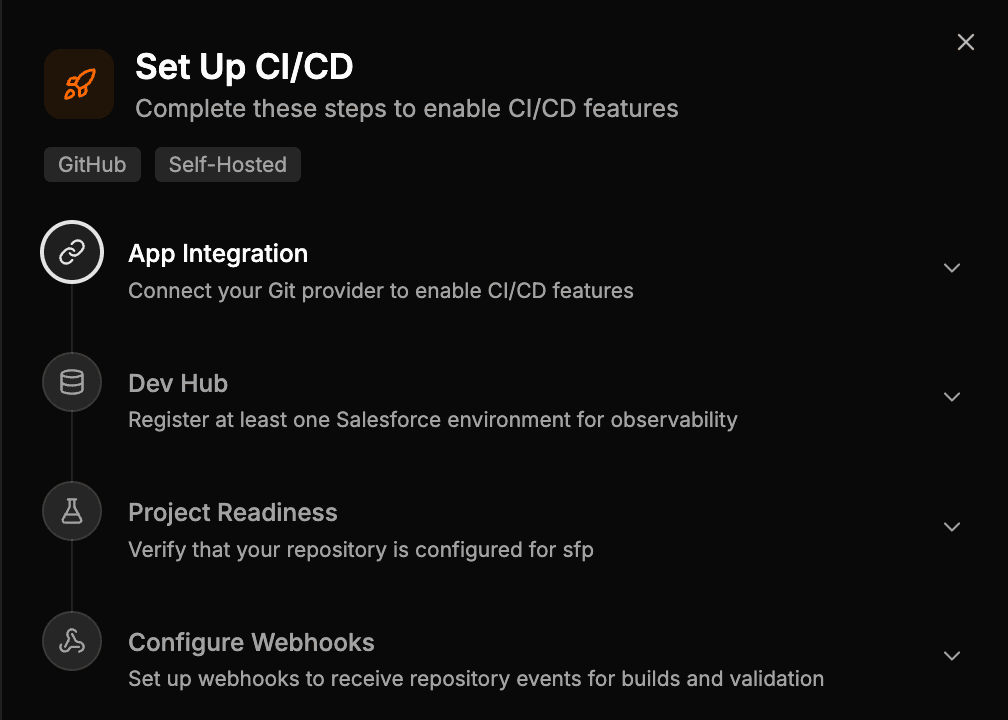
Step 3: Connect GitHub (App Integration)
The first wizard step, App Integration, connects your Git provider. On the cloud instance, click Install GitHub App:
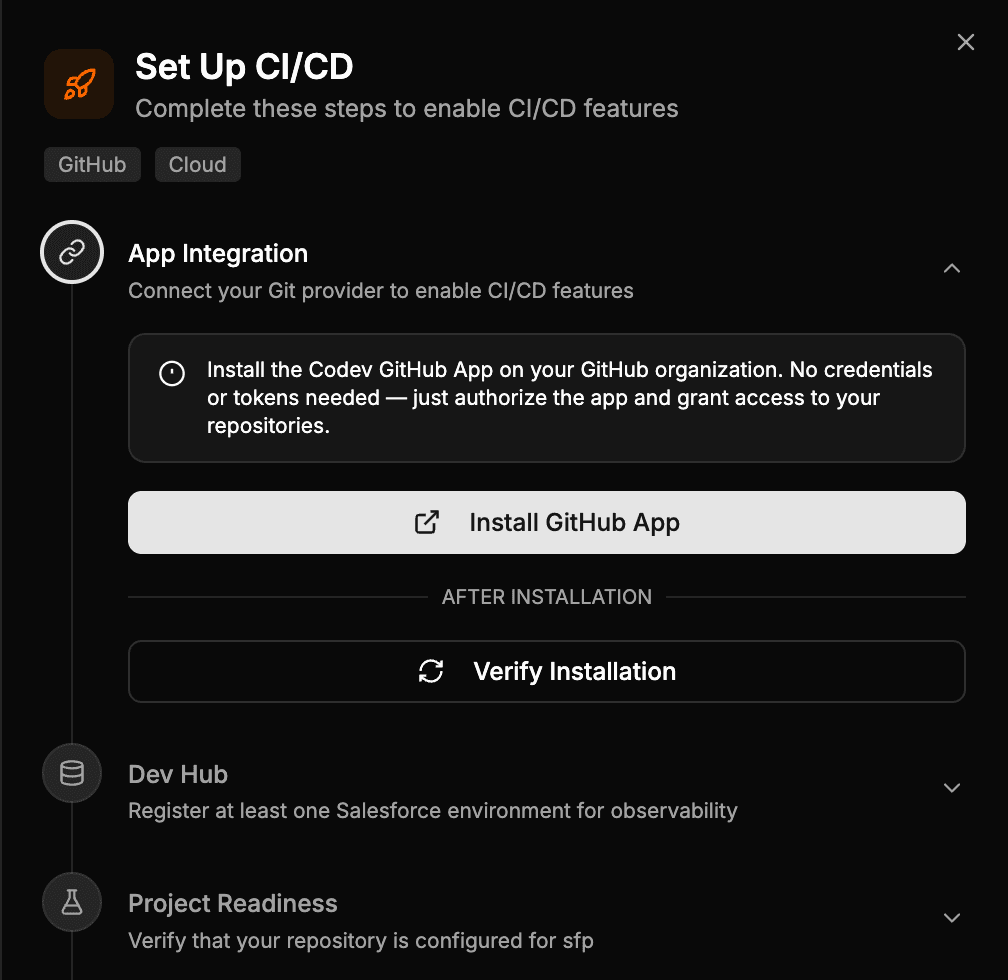
GitHub opens its installation page for the app. This is where you choose which repositories codev can work on: pick your organization, then either All repositories or Only select repositories with the repositories you want — include at least the one you used in Step 1. Click Install & Authorize.
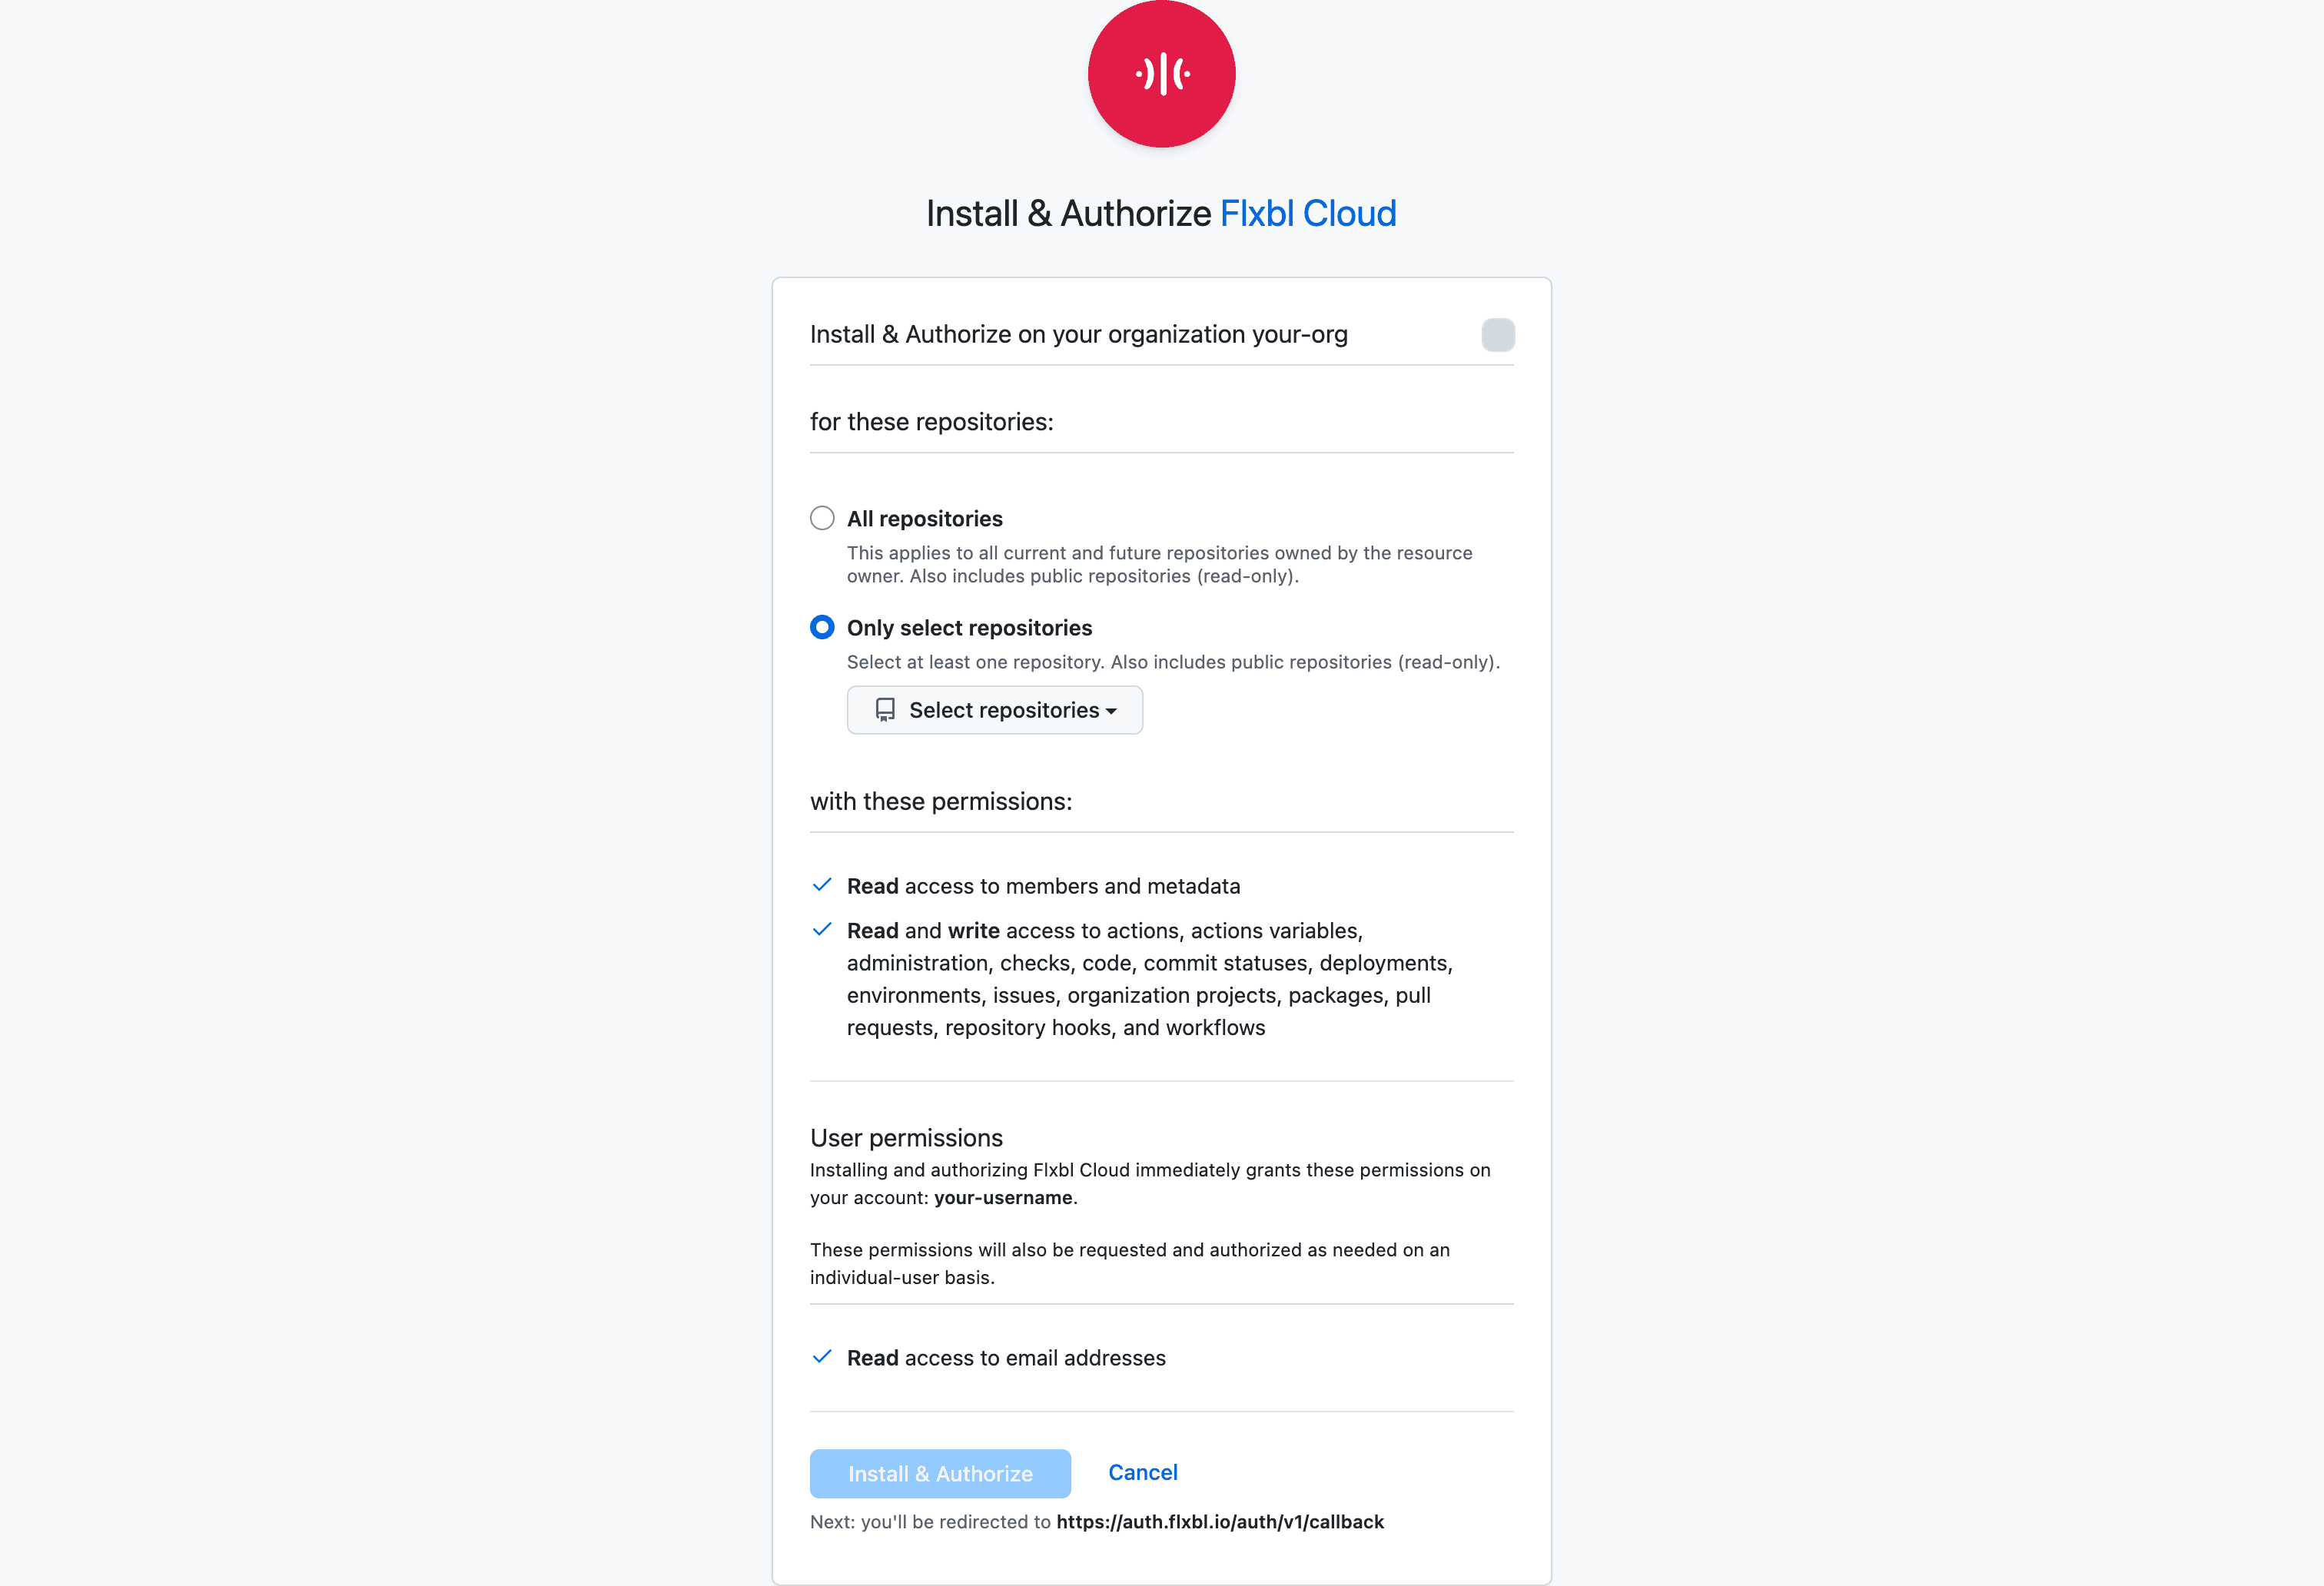
Back in the wizard, click Verify Installation and the step marks itself complete. This is a one-time, organization-level step — the next project you create finds it already done.
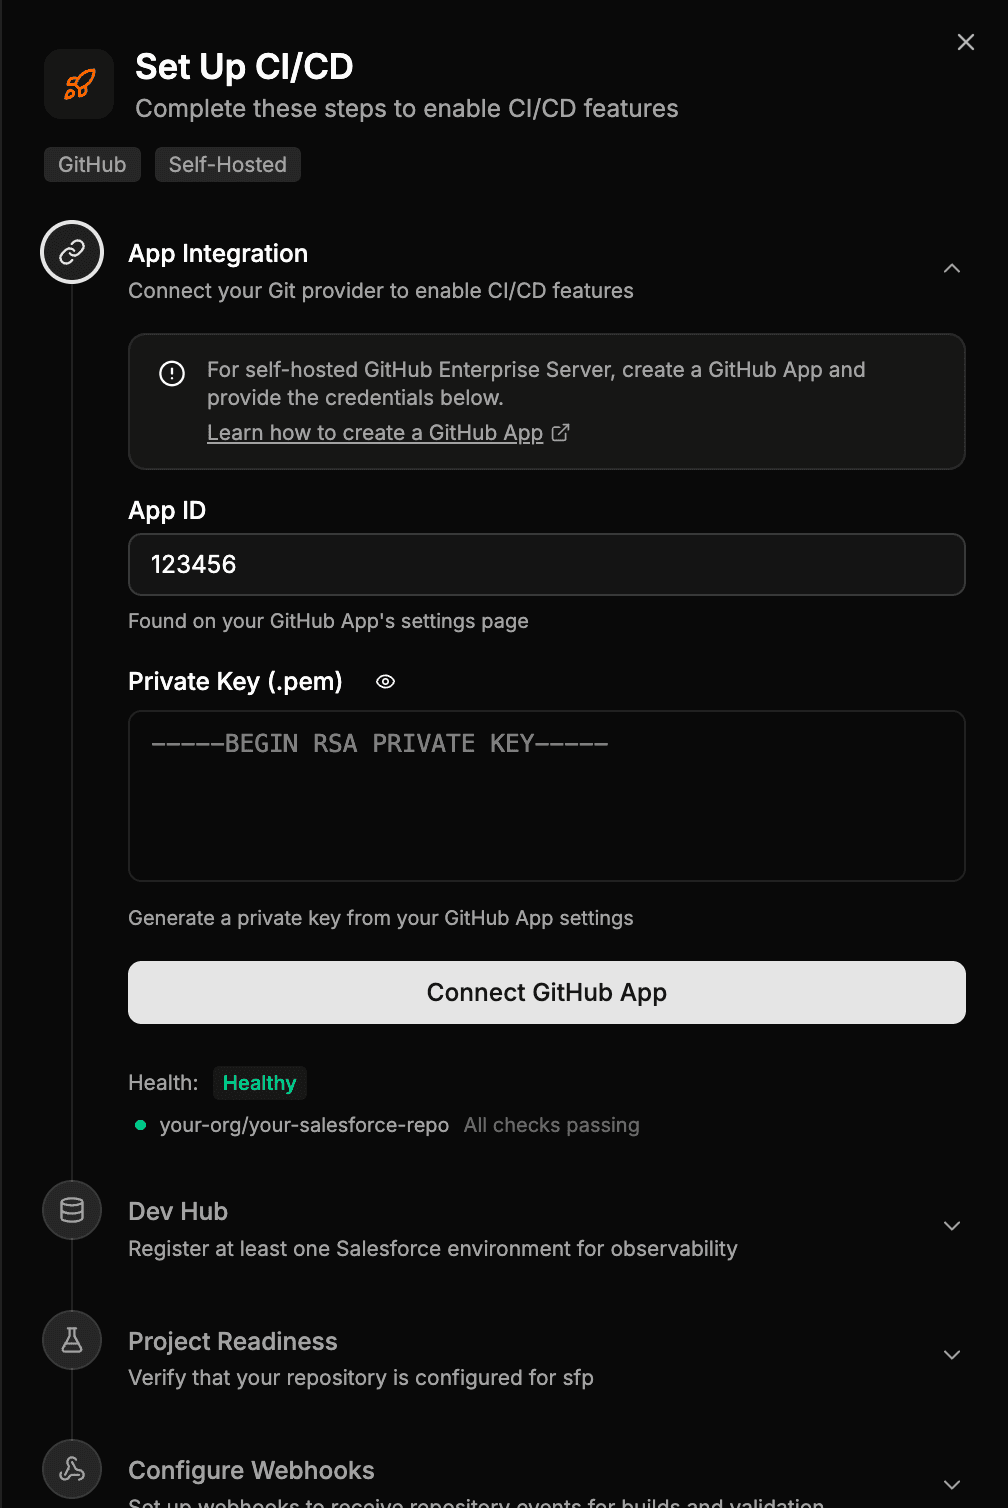
On a self-hosted instance there is no managed app, so the same step takes your own GitHub App's credentials instead — the App ID and its private key (.pem), both from the app's settings page on GitHub. How to create that GitHub App (and everything else about GitHub authentication) is covered on the integration page:
Step 4: Connect your Dev Hub
The Dev Hub step registers your Dev Hub org with codev. Click Connect Dev Hub, then in the dialog choose the SFDX Auth URL tab:
- On your machine, produce the auth URL with the CLI commands from What is an SFDX auth URL? — the dialog also walks through this under How to get your SFDX Auth URL (on a current CLI, use
sf org auth show-sfdx-auth-urlwhere the dialog showssf org display --verbose). - Paste the
force://...string into the SFDX Auth URL field. - Click Connect Dev Hub. This dialog registers the connection as a Dev Hub.
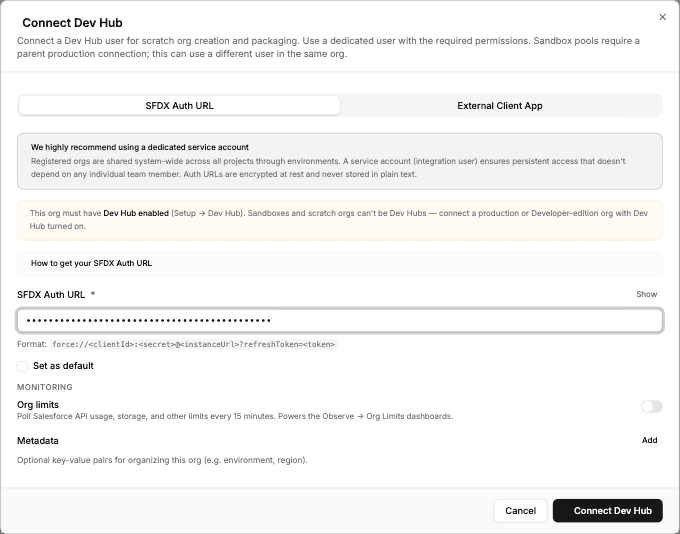
Registered orgs are shared across all projects on the instance through environments, so a Dev Hub connected once serves every project.
The dialog's External Client App tab registers the org with a consumer key and private key instead of an auth URL, using the JWT bearer flow. That credential has no refresh token to expire, and is the option available in orgs created from Spring '26, where Salesforce no longer offers classic Connected App creation. See Connecting an org with an External Client App.
Step 5: Readiness check and webhooks
Two steps remain in the wizard:
- Project Readiness runs a check of your repository's structure — that it is a valid sfp project with
sfdx-project.json, package directories, and release configs codev can build. Click Test Readiness; each check reports individually, and a failing check names what is missing. If the repository is not configured yet, you do not have to fix it by hand: the step offers Configure Project, which analyzes the repository and opens a pull request with the required changes (sfdx-project.jsonpackage entries and generated release configs). Review and merge that PR, then click Recheck Readiness. For how an sfp project is laid out, see the sfp docs. - Configure Webhooks subscribes codev to repository events, so a merge starts a build and a pull request starts validation without anyone triggering them by hand. Click Configure Webhooks; codev registers the webhook on the repository through the GitHub App.
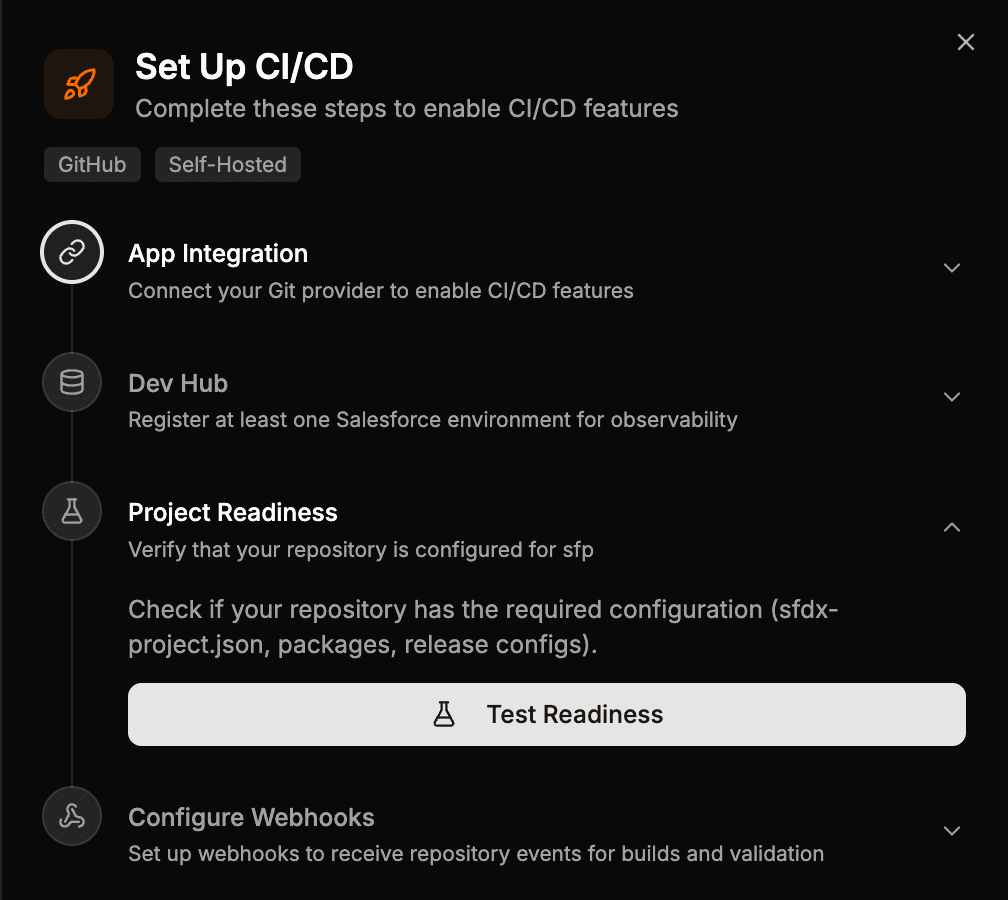
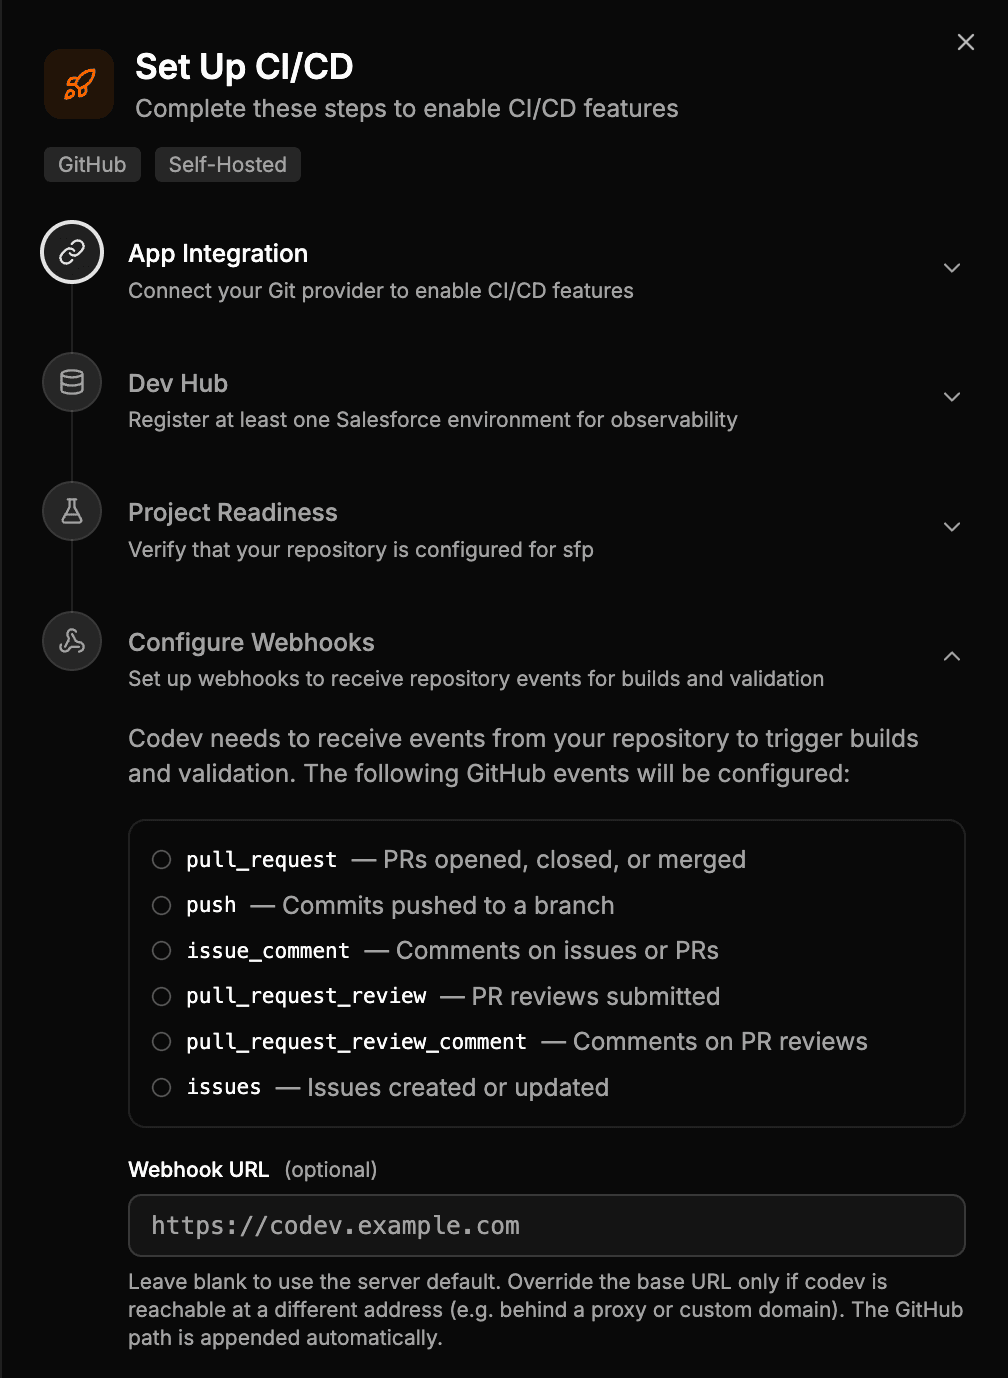
When every step in the wizard shows complete, the feature is active. The remaining sections cover the setup that comes after: environments, pools, and the pull-request flow they enable.
Server workflows are off by default. Configuring webhooks subscribes codev to repository events, but the built-in workflows that act on them — build on merge, change validation, and change analysis — start disabled. Turn each on from its Workflow Settings dialog:
- Builds page → Enable server builds (build on merge)
- Change Validation page → Enable server change validation
- Analysis page → Enable server change analysis
Until a workflow is enabled, its events are received but recorded as Skipped — no build, validation, or analysis runs.
Step 6: Register your environments
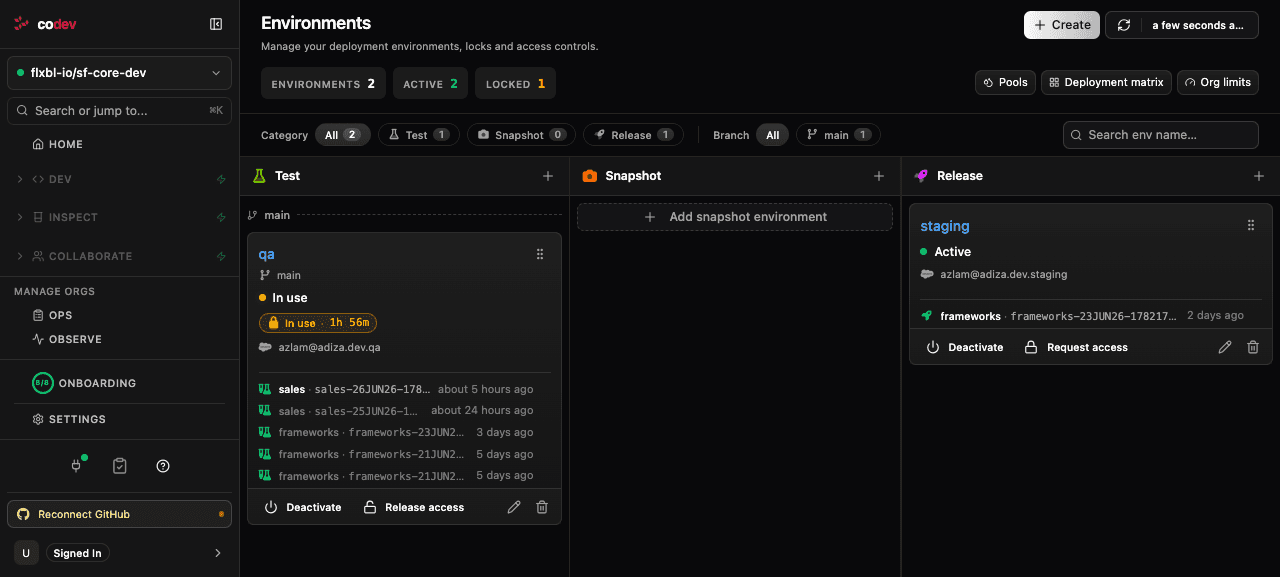
An environment in codev is a registered Salesforce org with a role. You register the org (its SFDX auth URL, same mechanics as the Dev Hub in Step 4), then create an environment for it under Environments, choosing one of three categories:
| Category | Role |
|---|---|
| Test | Receives builds automatically when code merges to the branch it tracks — the first place merged code lands |
| Snapshot | A known-good copy of a branch, kept current — the source that sandbox pools clone from, and where hotfixes are validated |
| Release | The formal promotion targets — staging, UAT, production |
Each environment tracks a branch (an exact name or a pattern like release/*), which is how codev knows where a build should deploy. Use Create, or the + on a category card, name the environment, pick its category and org, and set the branch it tracks.
From pull request to release
With environments in place and the server workflows enabled (see the note above), the day-to-day flow runs on its own. When a developer opens a pull request:
- Change analysis and change validation start on their own — the webhooks from Step 5 tell codev about the PR; no one triggers anything.
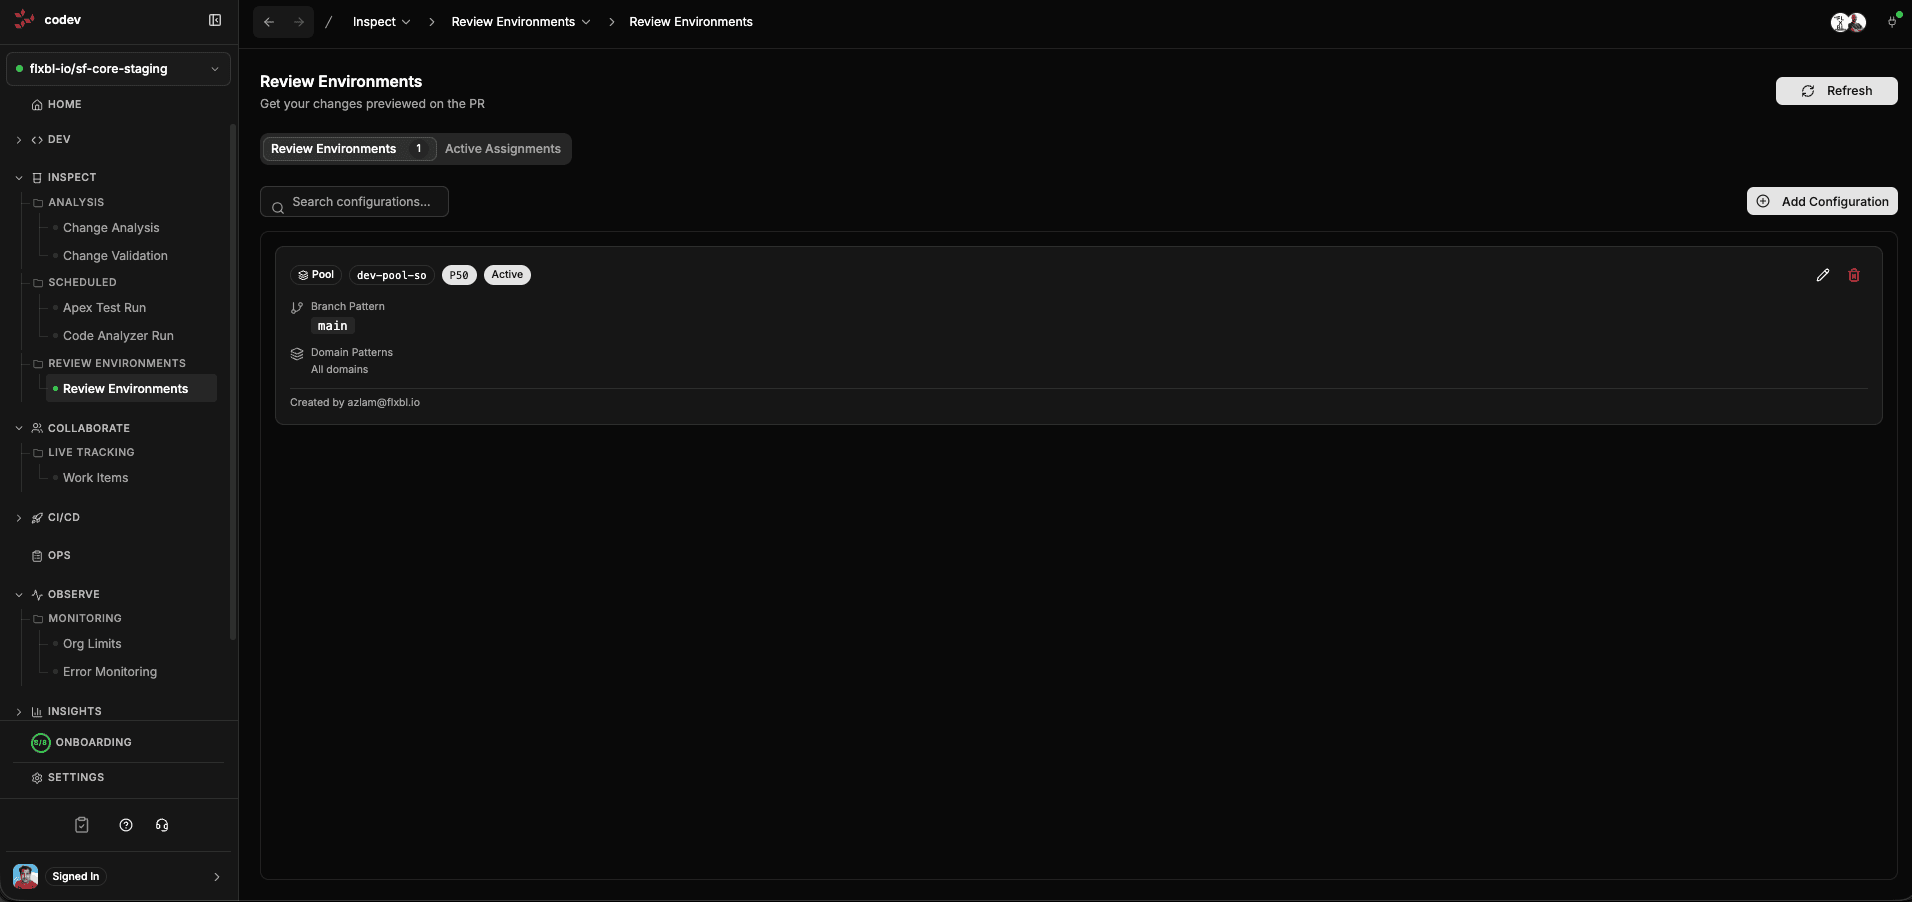
- codev assigns a review environment — in the simplest setup a dedicated sandbox, or an environment drawn from a pool — chosen by the assignment rule matching the PR's branch and the domains it touches. codev deploys the changed packages to it and runs the Apex tests there, before merge.
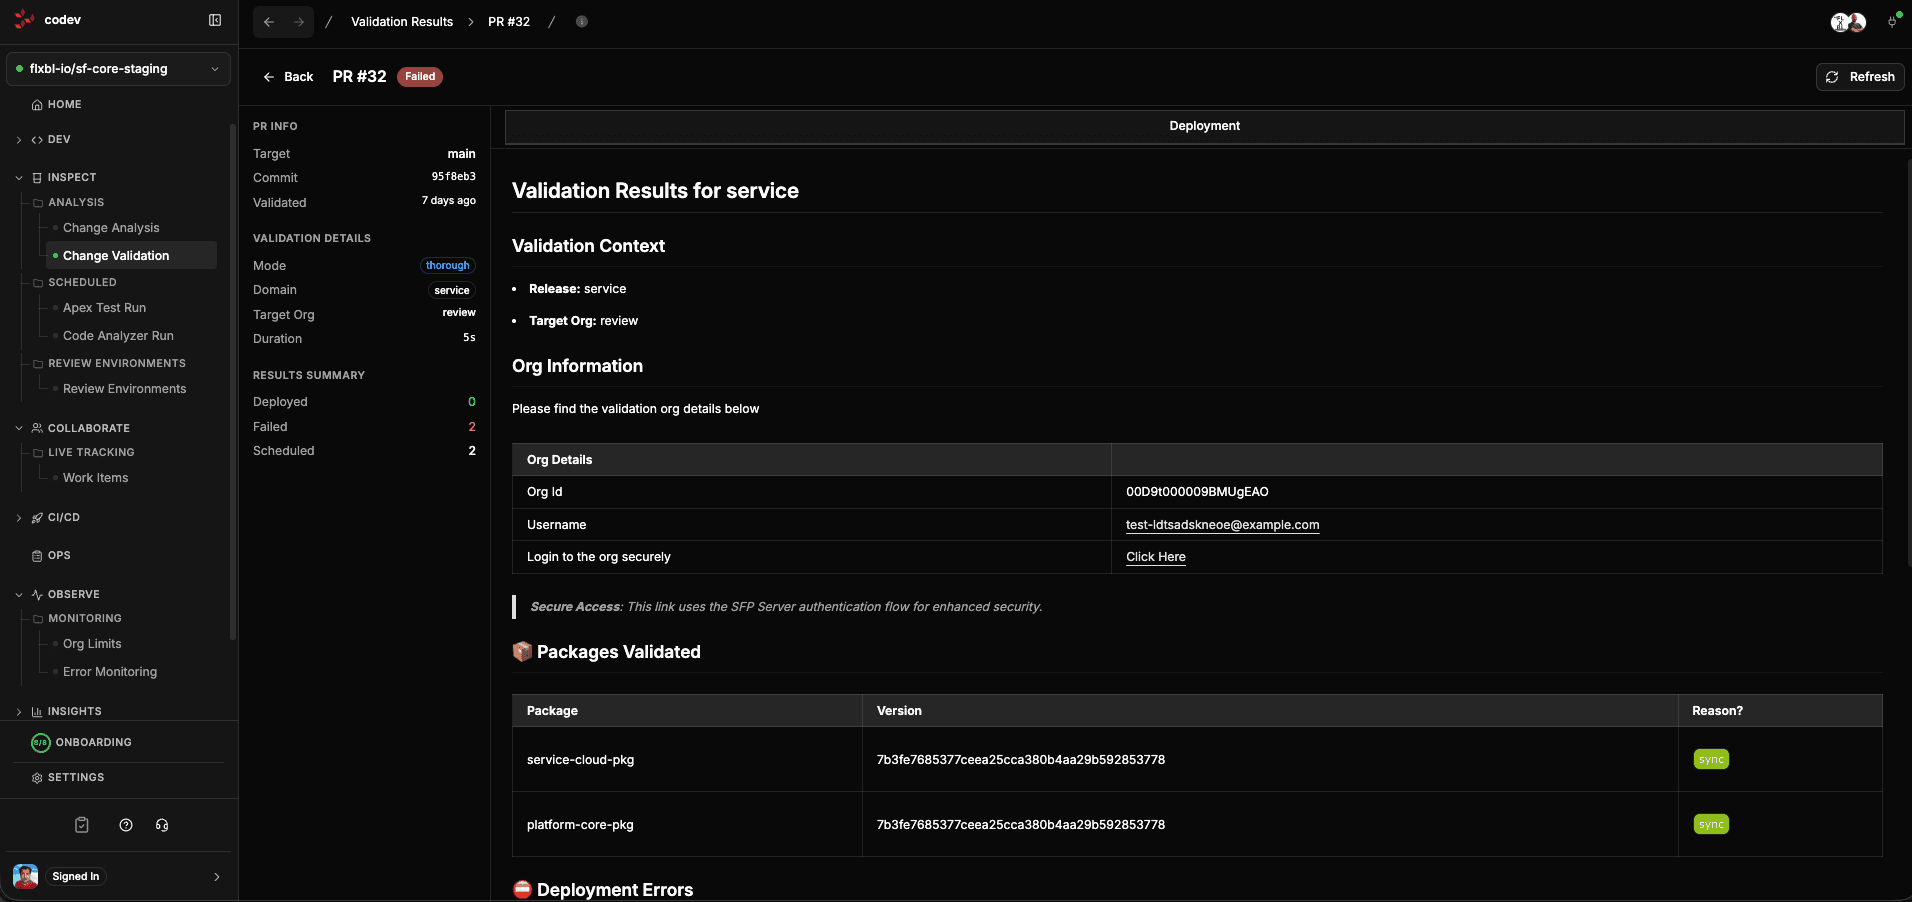
- The result comes back to the pull request as a check with pass/fail and test coverage, and the PR is labeled (
validation-succeeded/validation-failed). Reviewers can open the assigned review environment to click through the change in a live org.
- On merge, codev builds the affected packages into versioned artifacts, deploys them to the Test and Snapshot environments tracking that branch, and rolls them into a release candidate.
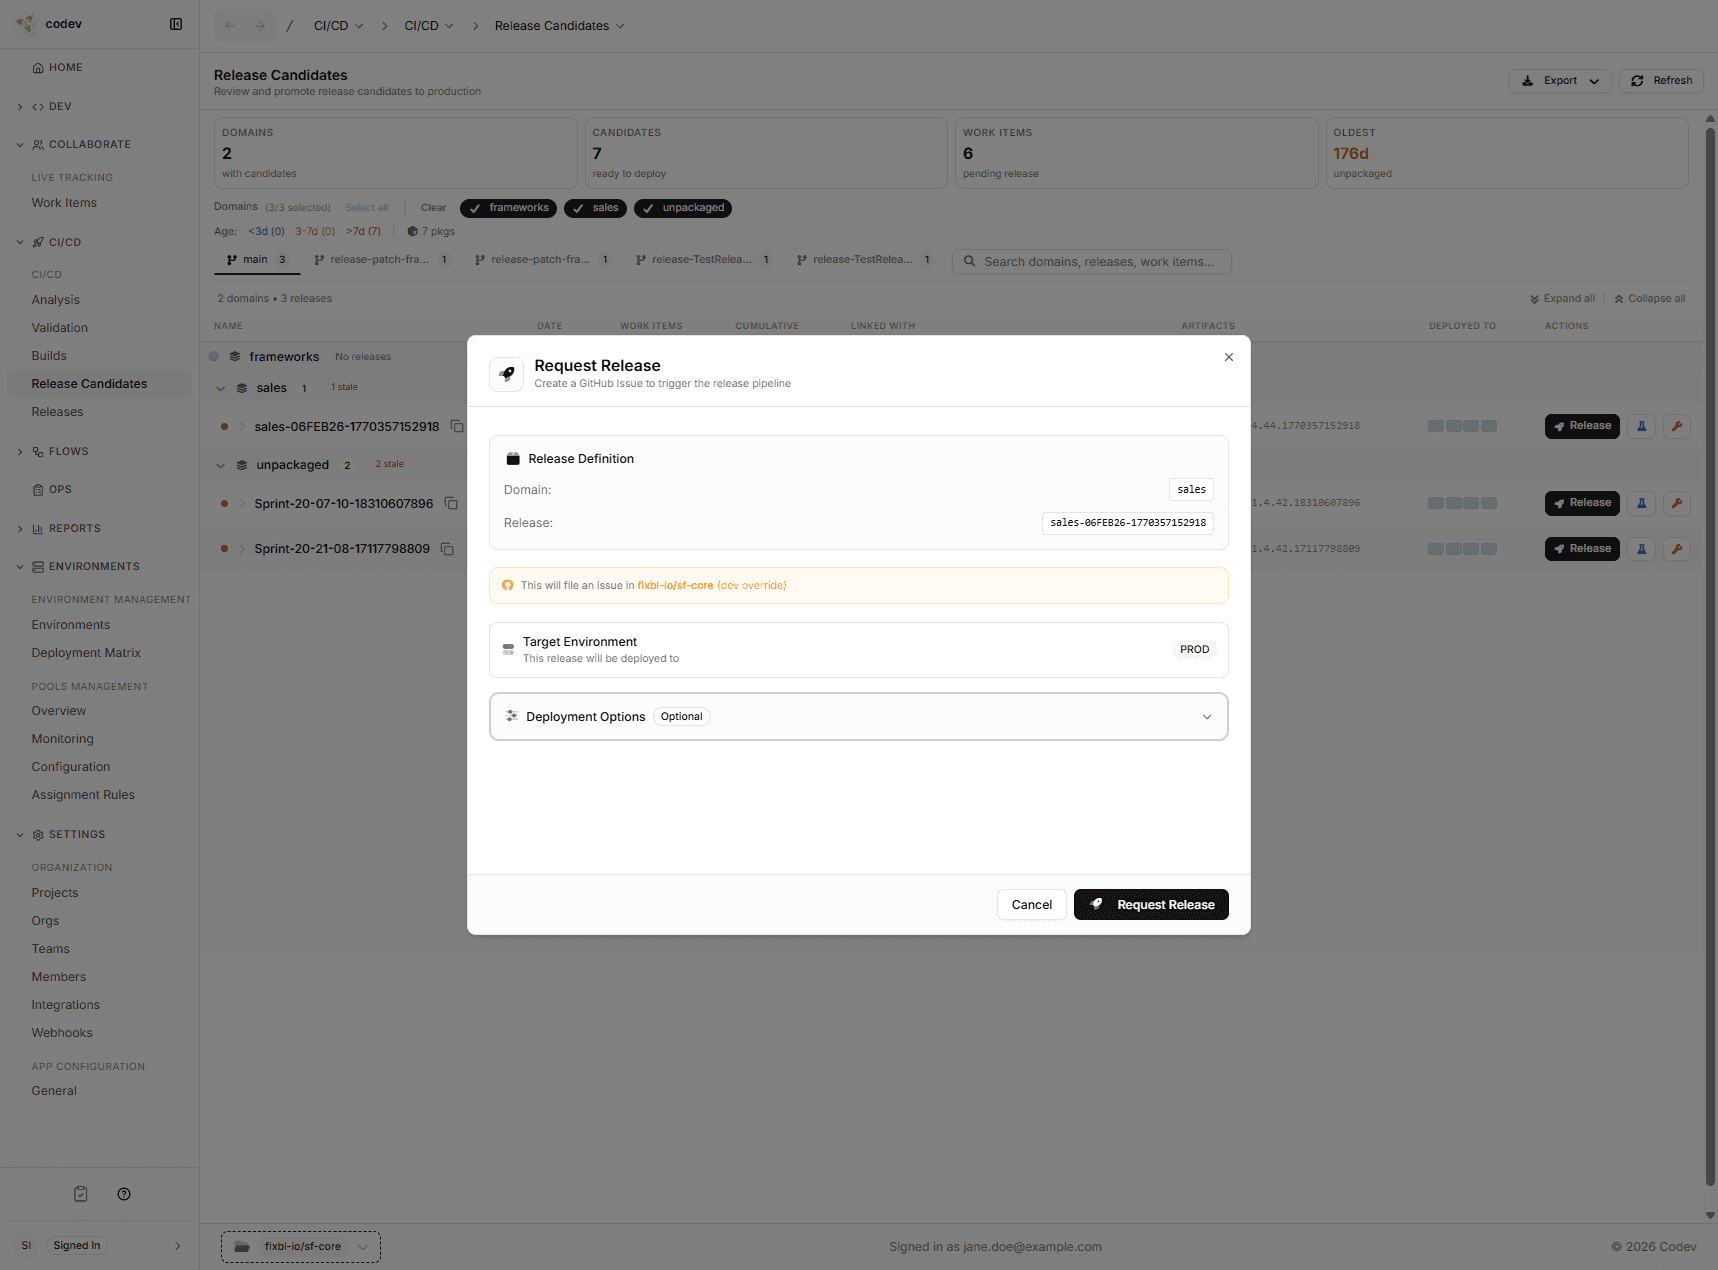
- Release: on the Release Candidates page, click Release, pick the Release environment, and codev runs a dry-run validation, waits for the approval gate, then locks the environment, deploys, and unlocks.
The same chain continues past the release — deployed releases, rollback, and hotfixes from a release are all one page further:
Validation reports and pull requests
The reports your commit validations produce, and the project's pull requests with their check status — the Review group of the Dev section.
Connecting an org with an External Client App
Register a Salesforce org in codev with an External Client App and the JWT bearer flow, instead of an SFDX auth URL.